Author: Adam Simmons
Date published: June 16th 2016
Table of Contents
Introduction
Samsung now offers a range of monitors with curved screens – in fact they now seem to be pumping out more screens with a curve than without. As we noted on our review of the S27E650C, the curve is sometimes too subtle to really notice. In this case the inclusion of a 4000R curve did little to change the viewing experience. The C27F591FD boasts a more distinctive curve, which at 1800R is ‘more than twice as curved’ as previous models. Note that this model is also referred to as C27F591F or LC27F591 of the CF591 series, with various regional suffixes. Another new addition is support for Adaptive-Sync (and hence AMD FreeSync). We put this monitor through its paces to find out what the steeper curve brings to the table and also analyse its performance in key areas such as contrast, colour performance and responsiveness.
Specifications
This model features a 72Hz 27” SVA (‘Super’ Vertical Alignment) panel, with a relatively pronounced 1800R curve. True 8-bit colour is supported alongside a specified 4ms grey to grey response time (take with a pinch of salt). Some of the key ‘talking points’ have been highlighted in blue below.
*We had originally surmised from the name that this could be some form of Quantum Dot solution for the backlight. Having spoken with those who work on such technologies it seems likely that ‘Active Crystal Colour’ refers to the use of doped phosphors (i.e. enhanced phosphors) rather than Quantum Dots to somewhat enhance colour gamut.
Features and aesthetics
From the front, the monitor has a modern look with slender bezels. These comprise a very slender silver plastic outer bezel and a very thin black panel border at the top and sides – a total thickness of ~7.5mm (0.30 inches) for both components. At the bottom there is a silver plastic lip which hides all but a sliver of panel border, a total thickness of ~17mm (0.67 inches). The stand base has a silver-coloured matte plastic finish, in a dish shape. This is fairly unconventional stand base design and does take up more desk space than is necessary, but it makes a handy place to keep a phone or something of that nature. It almost looks like it should have a QI charger integrated into it – but it doesn’t. Other noteworthy features at the front include a light matte anti-glare screen surface and the relatively steep (1800R) curve of the screen. Note that this appears greatly exaggerated on the images compared to when using the monitor in person. Both of these features are explored deeper into the review.
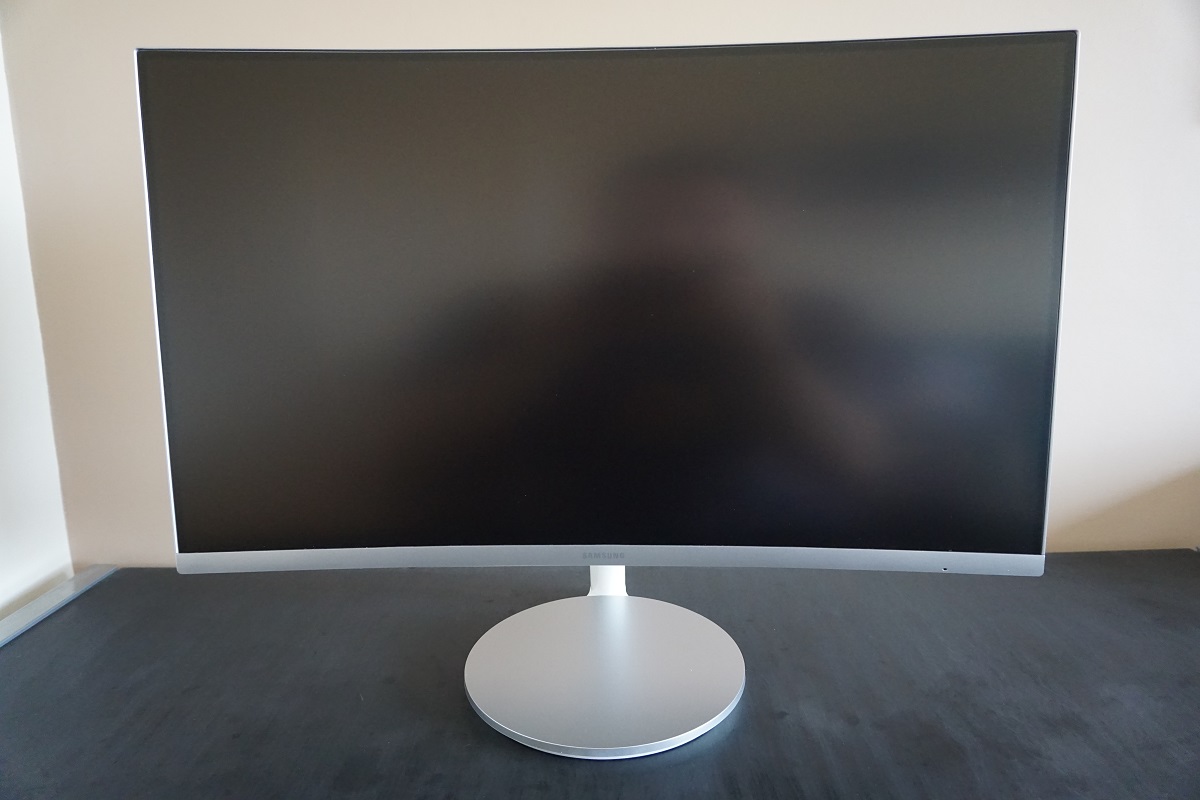


The OSD (On Screen Display) and power state of the monitor is controlled by a joystick (JOG button) located at the rear of the monitor, towards the right side as viewed from the front. This is a control system we always find quite intuitive on modern Samsung monitors, and this was no exception. The monitor has a small power LED at the right of the bottom bezel, which glows blue to signal that the monitor is on (can be disabled in the OSD) and flashes if it enters a low power state. The video below runs through the menu system of the monitor and explores some of the key features.
From the side the monitor is fairly slender, sporting its curve nicely. It measures ~10mm (0.39 inches) at thinnest point but lumps out centrally and towards the bottom in particular. The stand of the monitor offers tilt (2° forwards, 20° backwards) as the only ergonomic freedom. The total depth of the monitor including stand is ~255mm (10.03 inches). The bottom of the screen clears the desk by ~100mm (3.94 inches) with the top ~460mm (18.11 inches) above the desk.

The rear of the screen, as obvious from a side aspect as well, is glossy white plastic. The JOG button can be seen from this aspect towards the bottom left, with the included stand attaching near the bottom central region. There are no VESA holes at the rear, just some backwards-facing ports; DP 1.2a (supports Adaptive-Sync), HDMI 1.4a (supports Adaptive-Sync), VGA, 3.5mm headphone jack, 3.5mm audio input and DC power input (external power brick). There are also two down-firing 5W speakers and a K-Slot towards the far right. These speakers provide fairly rich sound output with pretty decent clarity and a bit more of a bassy quality than most integrated speakers (using the ‘Music’ setting, at least). They certainly aren’t short on volume either. In terms of overall quality, bass quantity and volume they can’t compete with a decent standalone speaker or headphone set, but they are definitely usable and better than many integrated speakers.
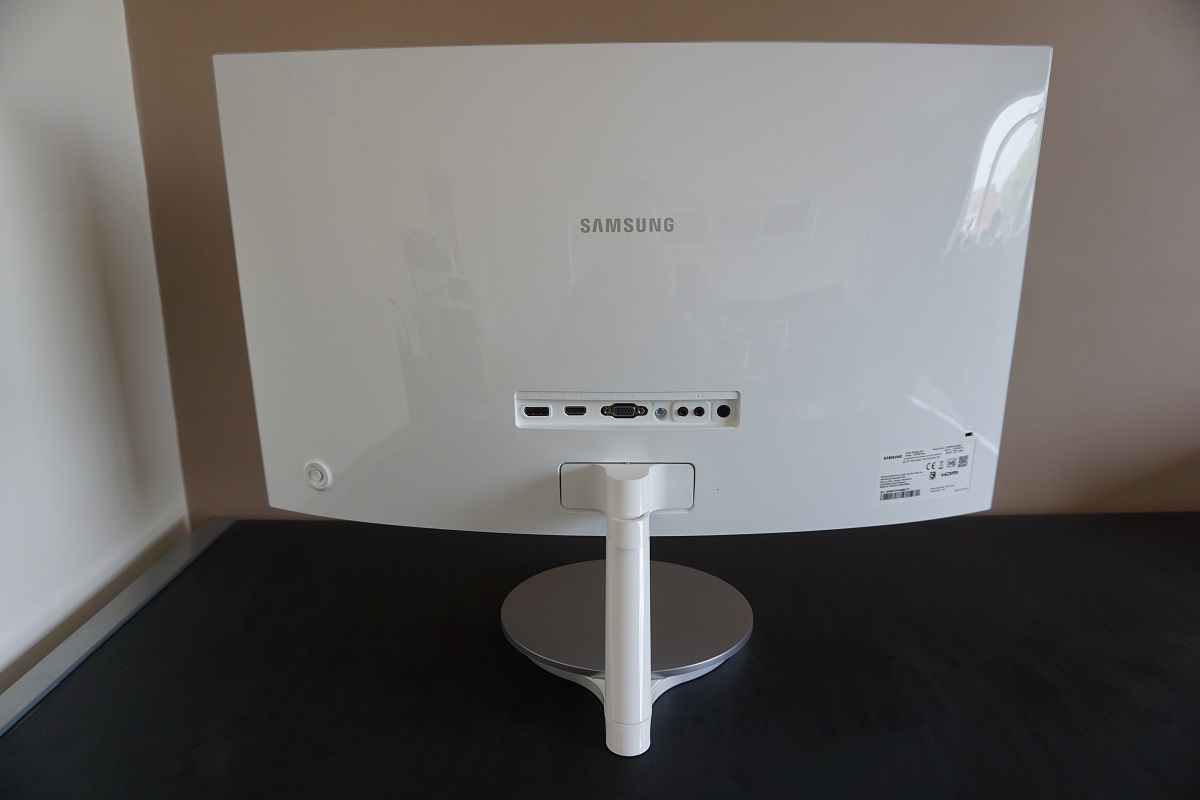
Note that the necessary power adaptor is included in the box. Standard accessories vary by region, but generally an HDMI and DisplayPort cable will be included.
Calibration
Subpixel layout and screen surface
As mentioned previously, a light matte anti-glare screen surface is used on this monitor. This has a fairly smooth surface texture, delivering an image that is free from obvious graininess even when viewing lighter content. External glare handling characteristics also remain good. Although we don’t have one to hand for a side-by-side comparison, we’re inclined to say that the image appears a touch smoother than on the older (‘E’ series) 27” curved models. Not that they were bad in that regard anyway.
![]()
The subpixel layout of the monitor is the usual RGB (Red, Green and Blue) stripe, shown above. You can see that the subpixels perhaps appear a bit squat, which we have attributed to issues with sharpness or the introduction of interlacing patterns on older curved Samsung VA models. This model did not suffer a loss of sharpness or troublesome interlacing patterns as a result of the squat subpixels. There were the faintest traces of interlacing in places, on some very light shades, but this was not as noticeable as on earlier models. Because this is something of a standard layout for both Mac and Windows machines, there’s no need to run ClearType as a Windows user or worry about text fringing on Mac systems. You may still wish to run the ClearType wizard to fine-tune according to preferences, however.
Testing the presets
As usual for a modern Samsung monitor, there is a selection of ‘MagicBright’ presets; ‘Custom’, ‘Standard’, ‘Cinema’, ‘Dynamic Contrast’ and ‘Basic Color’. This final setting is an sRGB emulation mode, which cuts down on extension beyond sRGB in the colour gamut as explored later. There are also two settings that were introduced not too long ago to Samsung models; ‘Eye Saver’ and ‘Game Mode’. The former is designed to promote relaxing viewing whilst the latter provides excessive shade crushing, oversaturation and a generally inaccurate image. We explore a selection of these modes alongside some other settings in the OSD such as ‘Gamma’. The table below includes key readings taken using a Datacolor Spyder5ELITE colorimeter alongside general observations done by eye. Readings and observations were taken after the monitor was left to run for at least 2 hours.
The monitor was kept in its ‘plug and play’ state with no additional drivers or ICC profiles loaded – assume any setting not mentioned was left at default with the exception of our ‘Test Settings’. The test system used a Club3D Radeon R9 290 royalAce FreeSync-compatible GPU connected via DisplayPort. Note that there was a bug when setting the monitor to 60Hz (or 59Hz) via DP whereby the image appeared flooded (as if contrast was at ‘100’ even when it wasn’t). We therefore set the monitor to 72Hz for these observations. Note that the image was very similar when HDMI was used, except that 60Hz worked as it should without everything looking flooded (so don’t worry, games console users). Unfortunately, we were without an Nvidia GPU for the duration of the review so could not test behaviour when connected to an Nvidia GPU. There shouldn’t be any concerns though as HDMI will certainly work as intended at 60Hz for Nvidia users. Furthermore, you should be able to set the monitor to 72Hz if preferred even when DP is used, avoiding any potential ‘flooding’ of the image, as we explore later.
If you do decide to connect using HDMI, you should ensure the colour signal is corrected as detailed in this article. In addition to ensuring the graphics driver is doing the right thing, there’s an additional setting in the ‘Picture’ menu of the monitor’s OSD called ‘HDMI Black Level’. Once you’ve got the graphics driver using the correct ‘Full Range 0-255 RGB’ signal you should ensure ‘HDMI Black Level’ is set to ‘Normal’ rather than ‘Low’. Games console users should refer to the section of this article under the heading ‘How do I set up my monitor for console gaming’. Interestingly enough our AMD GPU was set to use the correct ‘Full Range 0-255 RGB’ signal by default and the ‘HDMI Black Level’ setting was actually greyed out. We could confirm by eye that everything was working correctly, so nothing to worry about there. Nvidia GPU users will likely have to change the settings as above.
| Monitor Settings | Gamma (central average) | White point (kelvins) | Notes |
| Gamma = Mode1 (Factory Defaults) | 2.1 | 7352K | The image is very bright with a cool-tint and strong saturation. The saturation levels, although strong, aren’t anywhere near as intense on the whole as a ‘wide gamut’ (~Adobe RGB or greater) model. As is usual for a VA panel, the saturation weakens slightly towards the flanks of the screen. This occurs to a lesser extent than you’d usually see, as we explore later. The overall variety of shades and vivid look will appeal for entertainment purposes. |
| Gamma = Mode2 | 2.3 | 7375K | As above, but extra depth to shades to to higher gamma. Some shades appear too deep and some of the darker shades blend into black a bit too readily (‘black crush’ – to a greater degree than using ‘Mode1’ for gamma). |
| Gamma = Mode3 | 2.5 | 7373K | As above, but things are now far too deep with fairly extreme ‘black crush’. Shade distinction is poor and overall representation inaccurate. |
| Color Tone = Warm2 | 2.1 | 4438K | This is an effective ‘Low Blue Light’ setting. The image appears warmer and blue light output from the monitor is cut down significantly. This setting is suitable for relaxing evening viewing, for example. |
| Eye Saver Mode | 2.6 | 4757K | This is an alternative ‘Low Blue Light’ setting. This locks off the brightness control, sets the backlight to a dim brightness setting, massively reduces static contrast and significantly weakens the blue colour channel. All this is intended to provide an image that is as relaxing as possible on the eyes, but it does look obviously flooded due to the extremely low contrast. |
| Game Mode | 2.1 | 7230K | As usual this setting provides significant oversaturation and excessive sharpness – it frankly looks ugly. This monitor has a naturally vibrant image, it doesn’t need any artificial help whereby shades are pulled closer to the edge of the gamut to increase the saturation of shades that shouldn’t be highly saturated. By pulling shades closer to the edge of the gamut, without increasing the gamut, you also take a significant hit to shade variety – things get crushed together. Brightness is the only key image adjustment you can access with this mode active. |
| MagicBright = Basic Color | 2.1 | 7376K | This is an sRGB emulation mode, restricting the native colour gamut so that shades are presented within the sRGB are displayed more accurately on the whole. Unlike many such modes the contrast doesn’t take a hit. This is a potentially useful mode for applications where a higher degree of colour accuracy is desired, but be aware of VA limitations and the fact that colour controls are locked off in this mode. |
| Test Settings (modified as below) | 2.1 | 6496K | As per ‘Gamma1’ reduced brightness and corrected white point. The image is vibrant and varied with a look that many users would find pleasing for general desktop use, gaming and movies. |
Out of the box the C27F591FD (CF591) provided a strikingly vibrant and rather bright image, but had a noticeable cool tint. Gamma strayed just slightly from the desirable ‘2.2’ curve, but not alarmingly so and certainly not enough to sap the image of depth. There were other ‘Gamma’ settings which increased the gamma, but they strayed either slightly or far beyond ‘2.2’. There were two useful ‘Low Blue Light’ settings, including ‘Warm2’ which maintained strong contrast and ‘Eye Saver Mode’ which purposefully cut down contrast. The purpose of this is to reduce the time the eye spends accommodating for changes in light (assuming ambient light levels aren’t fluctuating too much, of course). We preferred ‘Warm2’ but like that Samsung has taken quite a unique and far-reaching approach with ‘Eye Saver’ – something some users might appreciate.
There is also a ‘Basic Color’ setting, an additional ‘MagicBright’ preset that is an sRGB emulation mode. Because the colour gamut of this monitor extends a fair bit beyond sRGB, this sort of setting is useful to cut down on the extra saturation brought about by the untamed gamut. This setting locks off manual colour channel adjustments, although a colorimeter could still compensate for this on a software level. For general use and entertainment purposes we actually liked the native gamut as it provided an extra dose of vividness without straying too far from the intended shades. This is very different to a model with Adobe RGB or wider gamut displaying sRGB content. We therefore employed the full gamut for our ‘Test Settings’, with the gamma tracking quite pleasing for our uses and free from worrying deviations from the ‘2.2’ curve.

Gamma 'Test Settings'
Test Settings
Our test settings involved a significant reduction in brightness alongside some changes to the colour channels, with the default ‘Mode1’ used for gamma. Following these changes the image was nicely balanced, very rich and well-varied; inviting for general purpose and entertainment usage. Note that user preferences and individual units vary, so these settings are just to be used as a reference and won’t necessarily be optimal in all cases. We’ve also included additional settings such as ‘Response Time’ setting and the refresh rate used just for reference. Anything not mentioned was left at default. Brightness= 58 (according to preferences and lighting) R= 50 G= 45 B= 43 Response Time= Faster FreeSync= Ultimate Engine Refresh rate= 72Hz
MagicBright= Custom
Contrast and brightness
Contrast ratios
We used a BasICColor SQUID 3 (X-Rite i1Display Pro) to measure white and black luminance levels, from which static contrast ratios could be calculated. The table below shows this data with various settings used, including those explored in the calibration section. Assume any setting not mentioned was left at default, save for the changes already mentioned in the calibration section and for our ‘Test Settings’. Black highlights here indicate the highest white luminance, lowest black luminance and maximum contrast ratio recorded. Blue highlights show the results using our ‘Test Settings’.
| Monitor Settings | White luminance (cd/m²) | Black luminance (cd/m²) | Contrast ratio (x:1) |
| 100% brightness | 301 | 0.10 | 3010 |
| 80% brightness | 246 | 0.08 | 3075 |
| 60% brightness | 194 | 0.06 | 3233 |
| 40% brightness | 139 | 0.04 | 3475 |
| 20% brightness | 83 | 0.03 | 2767 |
| 0% brightness | 25 | <0.01 | >2500 |
| Gamma = Mode2 | 298 | 0.10 | 2980 |
| Gamma = Mode3 | 297 | 0.10 | 2980 |
| Color Tone = Warm2 | 224 | 0.11 | 2036 |
| Eye Saver Mode | 96 | 1.71 | 56 |
| Game Mode | 321 | 0.11 | 2918 |
| MagicBright = Basic Color | 321 | 0.11 | 2918 |
| Test Settings | 172 | 0.06 | 2867 |
The average contrast ratio with only brightness adjusted was 3112:1, excluding at ‘0%’ brightness where black point was lower than our instrument could accurately measure. This slightly exceeds the specified 3000:1 and is a strong performance well beyond what non-VA LCDs can achieve. This contrast ratio provides a good ‘inkiness’ to black and other deep shades whilst lighter shades stand out very nicely in darker surroundings. Contrast remained strong at 2867:1 following the adjustments under our ‘Test Settings’, whilst the ‘Basic Color’ sRGB emulation mode had no measurable impact on contrast at all. The contrast dropped to 2036:1 using the ‘Warm2’ Low Blue Light setting, whilst it dropped to a mere 56:1 using the ‘Eye Saver Mode’ – in the latter case, of course, this drop is entirely intentional. The maximum luminance recorded was 321 cd/m², beyond the 250 cd/m² specified. Meanwhile the minimum luminance recorded was a very low 25 cd/m², providing a 296 cd/m² luminance adjustment range with plenty of usable values.
There is also a dedicated ‘MagicBright’ preset called ‘Dynamic Contrast’, which allows the backlight to adjust its intensity based on the overall level of light or dark on screen. The backlight adjusts as one individual unit, as usual, so just works on averages across the screen. This setting tended to provide excessive brightness even during mixed scenes, even where plenty of dark shade were included. It did dim fairly effectively for predominantly dark content. We don’t like such settings and prefer manual control of the backlight, but it’s there if you wish to use it.
PWM (Pulse Width Modulation)
This monitor does not use PWM (Pulse Width Modulation) at any brightness level and instead uses DC (Direct Current) dimming. The monitor is therefore flicker-free as advertised, even at low brightness settings. This will come as welcome news to those sensitive to the effects of PWM.
Luminance uniformity
We observed a black background in a dark room and observed no obvious backlight bleed. There was a bit of clouding towards the bottom, but this was still minor. It should be noted that individual units may vary in this regard, but as the best light blockers VA panels do tend to be relatively strong in this area. The image below was taken from a couple of metres back to eliminate so-called ‘VA glow’. This is a silverish-purple glow appears from a normal viewing position towards the bottom of the monitor, particularly near the corners. It becomes more noticeable from decentralised viewing angles, as demonstrated later in a video. It is very different to ‘IPS glow’ as it is nowhere near as intense or obvious. The luminance uniformity of the screen was pretty reasonable on the whole. The brightest point recorded was ‘quadrant 5’ in the centre of the screen (161.1 cd/m²). The greatest deviation from this occurred at ‘quadrant 2’ above centre (132.9 cd/m² which is 18% dimmer than centre). A 12% deviation was recorded at ‘quadrant 7’ towards the bottom left (141.1 cd/m²). Elsewhere brightness was between 4-10% of the central value. Note that individual units vary when it comes to uniformity and there may be further deviations beyond the measured points. The contour map below represents these deviations graphically, with darker greys representing lower luminance and therefore greater deviation from the central point than lighter greys. We also measured the colour temperature (white point) uniformity of the same 9 quadrants. Deviations here are assigned DeltaE values, with higher values showing greater deviation from the 6500K (D65) daylight white point target than lower values. A value above DeltaE 3 is considered significant deviation that some users would readily notice by eye. The results here were strong, without any significant deviations recorded. The highest deviation recorded was DeltaE 2.7 towards the bottom right. You can expect some deviation between individual units and there may also be deviation beyond the 9 points measured. Also bear in mind that there can be some slight shifts in perceived colour temperature based on viewing angle weaknesses on VA panels such as this. The contrast performance was excellent on Battlefield 4 (BF4). Dark areas on this game, such as gloomy underground tunnels, appeared suitably deep and atmospheric. There was just a little touch of ‘black crush’. This is related to VA gamma behaviour; whereby near-black shades appear to blend into one another if the screen is viewed from directly in front but might be distinct if viewed slightly from the side (or if observing content near the edges of the screen). Fortunately, this was about as subtle as we’ve seen from a VA panel. Some fairly subtle details such as grouting in bricks on the underside of bridges (in darkness and shade) were still visible, although were more distinct if you moved your head to one side. Bright shades contrasted brilliantly with their darker surroundings, such as roaring flames and gunfire. Coupled with the fairly smooth screen surface, they looked quite ‘pure’ as well. Dirt Rally also impressed as far as contrast was concerned, with excellent depth to dark shades and bright shades which penetrated through nicely. Racing at night on this game, particularly without headlights, generates a level of darkness that isn’t always replicated on other titles. This proved a good test of how pure and atmospheric dark areas could look. In this respect things were clearly in ‘VA only’ territory as far as LCDs are concerned. There was just a little bit of ‘VA glow’ towards the bottom of the screen, but the overall depth of black and other dark shades far surpassed IPS or TN panels. This strong contrast also helped give vegetation and other objects a distinctive structure, with shadows and fine dark details contrasting very nicely with the brighter shades alongside. On the Blu-ray of Star Wars: The Force Awakens, the strong contrast performance was again evident. There were many scenes involving an intricate mixture of light and dark elements – lightsabers and explosions set against the depths of space for example. These elements shone with brilliance, whilst the dark surroundings had very pleasing depth and quite an ‘inky’ look to the very darkest shades. These bright elements appeared nice and smooth with no obvious graininess imparted from the screen surface. Lagom’s contrast tests were used to analyse specific weaknesses in contrast performance which may not have been identified during other testing. The following observations were made. The Samsung C27F591FD’s (CF591’s) colour gamut (red triangle) was compared to the sRGB colour space (green triangle). As you can see from the gamut representation below, the monitor comprehensively covers sRGB and offers a fair bit of extension beyond this (>100%). This gives the monitor the potential to output all shades within the sRGB colour space, with a bit of extra saturation, lending itself well to general-purpose and entertainment use. It does not extend as far as ‘Adobe RGB’ in the green corner of this particular diagram and certainly doesn’t offer the sort of extended colour gamuts shown by the likes of the Dell UP2716D. So it is not to be considered a wide gamut model in that respect. The monitor also offers a ‘MagicBright’ sRGB emulation setting called ‘Basic Color’, which as you can see below chops down the colour gamut significantly. There is actually some under-coverage (96% sRGB measured), particularly in the red corner of this diagram. This cuts down saturation and allows potentially more accurate representation of shades within the sRGB colour space. If you’re after accurate sRGB reproduction it might arguably be better to simply use the native gamut of the monitor and tame the shades a bit using a colorimeter, however. Colour reproduction was pleasing on BF4, with a very rich and varied look. There were some exceptionally vibrant-looking reds and oranges (roaring flames), whilst the in-game HUD markers showcased a nice intense range of blues, reds, yellows and greens. Although shades did lose a bit of saturation towards the flanks and bottom of the screen, this was quite subtle for a VA panel – helped perhaps by the curvature of the screen. There were some pleasingly vivid greens alongside more muted pastel shades and some good earthy browns. Things certainly looked vibrant, but did not have the garish oversaturated quality you’d see from a wide gamut (~Adobe RGB colour space) screen displaying this game. Colour reproduction was equally pleasing on Dirt Rally. The racing environments appeared natural, despite an extra bit of saturation in places from the colour gamut. The strong shade variety and appropriate muted look of the earthy browns and khaki shades was maintained, whilst some of the lusher and deep greens didn’t have that inappropriately bright and bold quality that wide gamut screens tend to produce. The car liveries and advertising around the track benefited from this unmistakably vibrant look, with some truly stunning colours. Some orange shades appeared a bit too deep, but didn’t have the same intense red hue to them that some wide gamut screens tend to produce. The vibrancy was particularly impressive where bright shades (such as pinks, greens and yellows) were painted on against darker backgrounds, standing out beautifully thanks to the combination of strong contrast and generous colour gamut. We also found the colour reproduction pleasing on the Blu-ray of Star Wars: The Force Awakens. At the risk of repeating what we said in the contrast section, the scenes where light and dark met (no pun intended) were particularly impressive. The intensity of the red and blue lightsabers was particularly striking here. The vast areas of sandy desert appeared with largely appropriate saturation, not taking on an inappropriate red hue. The saturation did weaken slightly towards the far edges and near the bottom of the screen, as is typical for a VA panel. This weakening was more subtle than you’d usually observe, however. Skin tones also appeared largely as they should, perhaps just a little more saturated than they should in places but not in that ‘sunburnt’ wide gamut way. Finally, we assessed colour performance on the Blu-ray of Futurama: Into the Wild Green Yonder. With large areas of a single shade, this film is an excellent test for colour consistency and shade variety. In this respect the monitor put in a pleasing performance, especially for a model with a VA panel of this size. Consistency was not as strong as on IPS-type panels – if you observed a character’s skin tone at different areas of the screen, for example, the saturation became weaker towards the sides and bottom as noted elsewhere. The majority of the screen showed impressive richness, though, and it did seem that the curve helped enhance this aspect of colour performance. As a result of this, the monitor was able to display a good range of shades with appropriate distinctiveness. Even closely matching skin shades, for example, had quite a unique identity and appeared more or less as they should throughout the screen. The strong vibrancy was also very much evident on this screen, with some exceptionally eye-catching neon and deep shades. The saturation levels were not so uncontrolled as to make pastel shades appear far too deep or obviously inaccurate, either, which is pleasing. Lagom’s tests for viewing angle tests were used to help further explore viewing angle performance and colour consistency. The following observations were made from a normal viewing position, with eyes around 70cm from the screen. Using a sensitive camera and small tool called SMTT 2.0, we compared the latency of the C27F591FD (CF591) with a range of monitors of known latency. By taking over 30 repeat readings to enhance accuracy, we measured 6.70ms (over 1/3 of a frame @60Hz) of input lag. We did not measure a significant difference in input lag at 72Hz and don’t have the means to accurately measure input lag whilst FreeSync is doing its thing. This value is influenced both by the element of input lag that you feel (signal delay) and the element that you see (pixel responsiveness). This value indicates a very low signal delay that shouldn’t impede gaming performance. In this article we explore the key concepts related to monitor responsiveness. Chief amongst these is the concept of perceived blur and how it is not only the pixel responsiveness of a monitor that contributes towards this but also the movement of your eyes as you track movement on the screen. This second factor is often the predominant cause of perceived blur, in fact. We also explore ‘pursuit photography’, a method of image capture which reflects both of these elements of perceived blur rather than just showing the influence of pixel responsiveness. The images below are pursuit photographs taken on the UFO Motion Test for ghosting, with the test running at the default speed of 960 pixels per second. Such a speed is practical for taking such photos and highlights any issues on the test nicely. The first column shows results with the dark cyan background whilst the second column shows the medium cyan background (top and middle row of the test, respectively). All response time settings on the monitor were tested as well as a capture with the monitor running at 72Hz, which this monitor will also do comfortably as we’ll come onto later. The bottom image shows a ‘Fast 60Hz reference’, which is a Samsung S27A750D set to full brightness (forces DC dimming, without flicker) and 60Hz using its ‘Faster’ response time setting. This reference shows how things should look in this test at 60Hz where motion blur due to eye (camera) movement is the only real limiting factor. When using the ‘Normal’ setting, there is a fair degree of trailing behind the object in addition to moderate blurring of the object itself. This trailing is attributable to slower than optimal pixel responses, whereas the blurring of the object itself is down to eye (camera) movement. The trailing is more pronounced with the dark cyan background due to pixel responses being particularly slow for these transitions. Using the ‘Faster’ setting offers a marginal reduction in trailing and changes the nature of the trailing a bit. There appears to be a bit of a ‘dirty’ quality to it – this actually indicates a little bit of overshoot (inverse ghosting) due to fairly high levels of grey to grey acceleration being used. The ‘Fastest’ setting shows more extreme overshoot, with obvious colourful inverted trails behind the UFOs. When observing the monitor under more realistic and varied testing scenerios (such as games), it becomes clear that the ‘Faster’ setting does cut down on conventional trailing quite a bit compared to the ‘Normal’ setting. And the trade-off of that – slight overshoot in places – is really the lesser of two evils. Having established that this is the optimal setting to use, we also tested the monitor at 72Hz using this setting. On these captures things really look quite similar to 60Hz. The object is perhaps a bit more compact (it appeared so when observing it directly) but the trailing remains very much the same. Essentially motion blur due to eye movement is cut down just a little from the increased refresh rate, but pixel responsiveness remains a limiting factor as is usual for VA models. Something not shown here is how the monitor actually feels when you interact with the game world – 72Hz provides a slightly more ‘connected’ feeling in that respect. The monitor will comfortably run at up to 72Hz at 1920 x 1080. If you enable FreeSync in the OSD, it will automatically default to 72Hz. If you’re running an Nvidia GPU, you can set a custom resolution to ‘overclock’ the monitor to 72Hz. Doing so does not have negative implications for the image such as changes to gamma, contrast or colour temperature nor does it cause frame skipping. If you try to set the monitor to a higher refresh rate, such as 75Hz, you are given an ‘input not support’ message. This seems to occur regardless of connection used and timings. The video below shows you how to set the monitor to 1920 x 1080 @72Hz, by creating a ‘custom resolution’ – for users who are unable to use FreeSync. On Battlefield 4 there was quite a bit of motion blur, noticeable at all paces of action (whether running about as a solider or zipping about in a vehicle). Eye movement linked to refresh rate was the main cause of this, but there was certainly an influence of slower than optimal pixel responses in places. Many pixel transitions occurred quickly enough so that there was only a little if any additional blur added to what you’d perceive on the best 60Hz or 72Hz LCDs for responsiveness. The perceived blur increased in places due to some pixel transitions being introduced that the monitor can’t perform as rapidly. This was especially noticeable where dark shades were involved in the transition, such as moving past a dark and shaded building with a fairly bright blue or grey sky in the background. The building (object) had a bit of extra trailing behind it. You could perhaps describe it as slightly smeary in its appearance, although it didn’t have the sort of extended (almost smoke-like) smeary appearance that such transitions have on slower VA models. There was a bit of overshoot in places as well, but nothing particularly eye-catching or disturbing. When moving thermal optics with white hot objects against cooler medium or darker grey backgrounds, for example, you could see a slight black tint to the trail behind the objects. And a similar trailing could be observed on the map ‘Paracel Storm’, with tree trunks set against a stormy sky having a fairly noticeable (to our eyes) semi-transparent black trail to them that did not appear as a blend of the background and object colour. We made similar observations on Dirt Rally. It was again the case that most of the perceived blur could be attributed to eye movement, but there were some weaknesses in pixel responsiveness in places. This was most noticeable when driving at night and dark shadowy objects such as trees silhouetted the slightly brighter sky. You could see a more pronounced almost smeary trail behind the objects – but again, these were more short-lived and not as obvious as on some VA panels. There was also a bit of overshoot; something not everyone would notice and generally quite subtle rather than being something that jumps out at you. Overall it seems that the C27F591FD (CF591) provides quite a good balance in terms of pixel responsiveness, particularly for a VA model. Most transitions are snappy enough to have limited influence on perceived blur, whilst the acceleration is not so excessive as to introduce obvious widespread overshoot. There are definitely imperfections and some slower than optimal pixel transitions, but as far as VA models goes this is one of the better ones for gaming performance. We also tested our Blu-ray film title for responsiveness and didn’t come across any obvious limitations there. The ~24fps at which the films run was really the key limiting factor, not anything that was impeded by the monitor itself. AMD FreeSync is a variable refresh rate technology supported by certain AMD GPUs (such as these and future models), which makes use of VESA Adaptive-Sync. This is a capability integrated into some DP 1.2a and HDMI 1.4a port controllers, such as those found on the Samsung C27F591FD (CF591). As with Nvidia G-SYNC, this allows the GPU to communicate with the monitor to let it know what frame rate the content is currently running at. The monitor is then able to dynamically adjust its refresh rate to match this, where possible. Doing so eliminates the stuttering (VSync on) or tearing and juddering (VSync off) that occurs where the frame rate and refresh rate are misaligned. Although it isn’t something we are able to accurately measure, there is also a reduction in latency compared to running VSync enabled, in the variable refresh rate environment (i.e. frame rate below refresh rate limit of monitor). Unlike with G-SYNC, a separate ‘G-SYNC board’ or similar is not required and instead the existing scaling and monitor electronics are used. This reduces cost to both the manufacturer and is an easier option for manufacturers to implement with their designs – hence why the number of ‘FreeSync’ (compatible) displays dwarfs the number supporting G-SYNC. As noted above the CF591 supports Adaptive-Sync and therefore AMD FreeSync via both HDMI 1.4a and DP 1.2a. Our test system uses a Club3D Radeon R9 290 royalAce, which is compatible with the technology. AMD’s recent drivers include Radeon Software Crimson, which makes activation of the technology very simple. So simple, in fact, that it should be automatically enabled when you first plug the display in. To check this, open ‘AMD Radeon Settings’ and click ‘Display’. You should then ensure that the first slider, ‘AMD FreeSync’, is set to ‘On’. If you hover over this, it will also report the variable refresh rate display supported by the display. Note that the image below is for a different monitor and is just used here for reference. Note that there are two ‘FreeSync’ settings on the Samsung, found in the ‘System’ section of the OSD; ‘Standard Engine’ and ‘Ultimate Engine’. The ‘Standard Engine’ offers support for a variable refresh rate range of 58 – 72Hz, whereas ‘Ultimate Engine’ supports 48 – 72Hz. There didn’t seem to be any drawbacks to using the latter option and the broader refresh rate range it supports, so we suggest users simply stick with that. Outside of this range, the GPU respects your selection of ‘VSync on’ or ‘VSync off’ in the graphics driver. With ‘VSync on’ the frame rate will not be allowed to rise above 72fps, with VSync activating automatically at this point and imposing the usual latency penalty when it does so. With ‘VSync off’ the frame rate is free to rise above 72fps (72Hz refresh rate ceiling of the monitor). This will deactivate FreeSync and cause tearing and juddering which some users would find bothersome. VSync is configured in the ‘Gaming’ section of ‘Radeon Settings’, where it is referred to as ‘Wait for Vertical Refresh’. This can either be set globally under ‘Global Settings’, or alternatively for each game title on its own. The default is ‘Off, unless application specifies’ which means that VSync is only active if you enable it within the game itself, if such an option exists (it usually does). It might not be called ‘VSync’ but may be referred to as ‘sync every frame’ or something like that. Most users will probably want to enable VSync when using FreeSync to ensure that they don’t get any tearing. One of the final two options in the list, shown in the image below, would therefore be preferable. There are a couple of final points to note. Firstly, the application must be running in fullscreen mode, not a window (borderless or otherwise). Secondly, this monitor does not provide any obvious indication that FreeSync is actually active such as an LED light or on-screen notification. You will simply have to assume that it is working – provided you’ve activated the setting in the OSD and Radeon Settings, then it certainly should be. And finally, FreeSync can only remove stuttering or juddering from frame and refresh rate mismatches and can’t compensate for other issues caused by network latency, lack of memory and suchlike. Usually when we test FreeSync it is on monitors with a higher refresh rate and/or higher resolution, which provides to be potentially rather demanding. It is not too difficult to achieve a consistent 72fps (to match 72Hz) at the 1920 x 1080 resolution using a moderately powerful GPU and fairly sensible in-game settings. There are still some dips that can be expected here and there, though, especially on more demanding titles. It also allows you to crank up the detail settings a bit if you have the headroom to do so – and you don’t need to worry about those slight dips below 72fps that you might experience. Note that sensitivity to tearing and stuttering varies, so some users won’t find the difference as striking as others. It’s very subjective, so note that the observations below are just our observations as seasoned reviewers with a keen eye for this sort of thing. The first title we decided to test was Tom Clancy’s The Division, which is a fairly graphically demanding title depending on the settings used. We used fairly modest settings, with which the frame rate tended to fluctuate between around 60 – 72fps. With FreeSync disabled there was (to us) obvious stuttering or tearing, making the experience quite jarring and disrupting the ‘flow’ of gameplay. With FreeSync enabled, the refresh rate was matched to the frame rate and such unwanted aspects were eliminated. There were times where the action intensified such that the frame rate dropped further. You could definitely feel and see the effects of this (i.e. increased motion blur, decreased connected feel) so the lower frame rates alone were quite jarring in a way. There were times when the frame rate even dipped momentarily below the 48fps (48Hz) floor of operation for the monitor, leading to tearing or stuttering as you’d see on any monitor. We also tested GTA V (Grand Theft Auto 5), which again has the potential to strain a poor little Radeon 290 even at the Full HD resolution. Using fairly high settings, the frame rate tended to hover somewhere around 65 – 72fps, but not always reaching 72fps. Even these small drops from what would be the static refresh rate of the monitor cause bothersome tearing, juddering or stuttering without FreeSync. With the technology enabled everything had that sort of ‘frame rate at refresh rate’ flow to it, without any such interruptions. Occasionally the frame rate dropped lower than this, sometimes closer to 50fps. The experience here was certainly much nicer than without FreeSync enabled, but the decrease in frame rate could still be felt. The level of motion blur was increased and interactions with the game world felt a bit more sluggish. Samsung are marketing curved screens quite heavily at the moment – indeed it’s something that began with some of their ‘E’ series models last year. They’re keen to point out that having a concave curve to the screen is more natural and comfortable on the eyes. That’s because the edges of the screen are brought closer to the eyes (i.e. distance from centre to edges of screen decreased). We’ve reviewed the S27E590C, for example, which had a gentle 4000R curve. This proved to be so subtle that it barely changed the experience at all – it didn’t really add much or take much away from the experience. Such a gentle curve was the norm for their curved 24 – 27” ‘E’ series models. The C27F591FD (CF591) brandishes a steeper curve; at 1800R. Bearing in mind a lower ‘R’ value indicates a steeper curve; this makes it ‘over twice as curved’ as the previous models. The curve certainly proved more noticeable this time around, but despite how it may appear on paper and indeed some shots (especially when taken from a non-central angle) the curve remained a relatively subtle thing. It certainly wasn’t sufficient to make the monitor feel all that different when we used it – which is good in a way, as we found it very natural and adapted to it very readily indeed. If the marketing is to be believed, then it also has the potential to enhance viewing comfort. For designers or those who work with straight lines and shapes, we could certainly see how this curve could actually prove to be a less than desirable thing. We did not notice any obvious distortion on the desktop, although if we observed the task bar or other straight lines the curvature of the screen did make for an apparent subtle bending as you might expect. This was most noticeable in Excel (second image below). Note that these images are only for illustrative purposes and tend to make things look a bit different to how they do in person, with the curve generally more noticeable in the images. The interlacing patterns on some images are moiré from the camera, not artifacts from the monitor. The video below summarises some of the key points raised in this written review and shows the monitor in action. The video review is designed to complement the written piece and is not nearly as comprehensive. It seems that last year’s curved 27” models from Samsung were testing the water, seeing how consumers react to the idea of having a curved rather than flat screen. The Samsung C27F591FD (CF591) represents an evolution of these, with a significantly steeper curve. Although the curve is more of a feature this time around, it does remain quite a subtle one. Using the monitor felt natural to us, whilst we feel the curve brought a bit of extra depth to games and movies. This was something we didn’t really feel with the older (less curved) models, as the curve was simply too subtle to notice at all. Whether or not curved monitors are your thing (perhaps you’re quite indifferent to them), the screen itself impressed on many fronts. The image took a bit of tweaking, as it was too bright and cool-looking out of the box, but following this the richness and variety of shades displayed was very pleasing. The generous (beyond sRGB – but not ‘wide gamut’ in the traditional sense) colour gamut and light matte screen surfaces helped provide a vivid but not overblown look to the image. The VA panel helped deliver these colours in quite a ‘punchy’ way and indeed the consistency was about as good as we’ve seen from a VA model of this size. Where shades really caught the eye was in ‘high-contrast’ situations – with the contrast performance being a known strength of VA panels such as this. In this respect things were as we expected, with strong static contrast of ~3000:1 (as specified) and a backlight that remains flicker-free at all brightness levels. This helped the monitor deliver quite deep-looking blacks and dark shades and helped lighter shades ‘pop’ out amongst them. The matte screen surface was not only light; it was also smooth – presenting light shades without the graininess associated with some matte surfaces. Responsiveness is never the strong point of VA technology and that was certainly the case here. There was a bit of trailing from slower than optimal pixel transitions, but this was not as pronounced as we’ve seen on some VA models and generally confined to darker shades. There were also some traces of overshoot. Overall, though, we’d see this was one of the better balanced VA models we’ve come across in terms of responsiveness. This helped the monitor make use of its refresh rate, which is ‘officially’ 72Hz with FreeSync enabled and can be ‘overclocked’ to that without. The monitor worked as you would hope with FreeSync, providing an experience between 48 and 72Hz (FPS) that was free from the stuttering or tearing that comes with a static refresh rate. Input lag was also low, with the signal delay clearly being minimal and the pixel response time accounting for the vast majority of the input lag readings we took. Overall we feel this monitor delivers one of the most engaging ‘Full HD’ experiences out there. It may not be the best choice for colour-critical work (although can be used for some if you’re a hobbyist) nor will it win any wars of responsiveness with the higher refresh rate gaming-oriented screens. But when it comes to general use and providing an engrossing gaming and movie watching experience, this model hits the spot. It certainly isn’t the cheapest of models nor does it offer the sort of ergonomic flexibility some would hope for given the price. However; we do still feel it does enough to justify this price tag. The bottom line; a screen with a curve that is subtle but noticeable, with much more to offer beyond just that.

The Spyder5ELITE was used to analyse the uniformity of lighter colours, represented by 9 equidistant white quadrants running from top left to bottom right. The table below shows the luminance recorded at each quadrant alongside the percentage deviation between a given quadrant and the brightest point recorded.

Luminance uniformity table

Luminance uniformity map

Colour temperature uniformity map
Contrast in games and movies
Lagom contrast tests
Colour reproduction
Colour gamut

Colour gamut test settings

Colour gamut 'Basic Color'
Colour in games and movies
Viewing angles

The video below shows this text test, a mixed desktop background and dark desktop background from a variety of viewing angles. Note the ‘VA glow’ mentioned previously, which appears to bloom out a bit off angle. It does not do this to anywhere near the same extent that ‘IPS glow’ would.
Responsiveness
Input lag
Perceived blur (pursuit photography)

Perceived blur with various settings
Running a custom resolution (overclocking)
Because the monitor is designed to run at 72Hz, this is to be considered a ‘mild’ overclock that is completely within manufacturer tolerances. There is minimal risk involved and in all likelihood the monitor will last for its useful life in much the same way as if it was run at 60Hz. The general advice we give at this stage as to be aware that overclocking is something which you do at your own risk. The risk may well be very low, especially as the monitor is clearly designed to run at 72Hz, but we accept no liability should anything happen to the monitor which may or may not be due to running it at an increased refresh rate.
Responsiveness in games and movies
FreeSync – the technology and activating it


FreeSync – the experience
The curve


We found the curve again completely natural and easy to adapt to (if adaptation was even required, which is questionable) when watching movies and playing games as well. It isn’t such a steep curve that it wraps around your face or anything, but it does envelop your view a bit more than a flatter screen would. This gave a sort of extra depth to the experience, but not in a way that dramatically impacted the overall ‘feel’ of the movie or game. It is hard to describe really – we liked the effect, but found it quite subtle really. Any strange interlacing patterns in these images (and indeed those above) are moiré from the camera rather than artifacts on the monitor itself.


Video review
Conclusion
![]()
Positives Negatives Strong vibrancy and varied shade representation, especially following appropriate tweaking in the OSD – a generous colour gamut without wandering into true wide gamut territory
Slight deviation from the ideal ‘2.2’ curve even after tweaking and slight loss of saturation towards edges and bottom of screen – but about as little of this as we’ve seen from a 27” VA panel
Strong contrast performance providing a fairly inky look to dark shades and allowing lighter shades to ‘pop’ out from this. The screen surface was light and left such light shades appearing relatively smooth rather than noticeably grainy Minor ‘black crush’, but a level of detail maintained throughout the screen that puts non-VA panels and in fact many VA panels to shame A fairly responsive performer overall given the panel type, with some rapid pixel transitions and very low signal delay – plus FreeSync and 72Hz capability working as you’d hope
Slight overshoot and extra trailing in places, but not to the extent seen on many VA models – sensitivity to this does vary
A nice design overall, we feel – and we actually liked the curve and found it to add to the experience without proving distracting or unnatural
Somewhat redundant ‘dish’ stand base, limited ergonomic flexibility and a bit pricier than many Full HD models
![]()

