Author: Adam Simmons
Last updated: July 2nd 2026
Table of Contents
Pretext
This article provides guidance for users with discrete desktop GPUs from Nvidia and AMD for correcting colour signal issues that can occur via both HDMI and DisplayPort. For mobile GPUs or other graphics solutions, including those from Intel, it is recommended that a custom resolution is set using CRU (Custom Resolution Utility). Refer to the Nvidia section on this, specifically the second half of “Second solution: setting a custom resolution” where the process of using CRU is mentioned. Users with Intel graphics chipsets should alternatively look for an option called ‘Quantization Range‘ in the Intel Graphics Control Panel and ensure it is set to ‘Full Range’.
Introduction
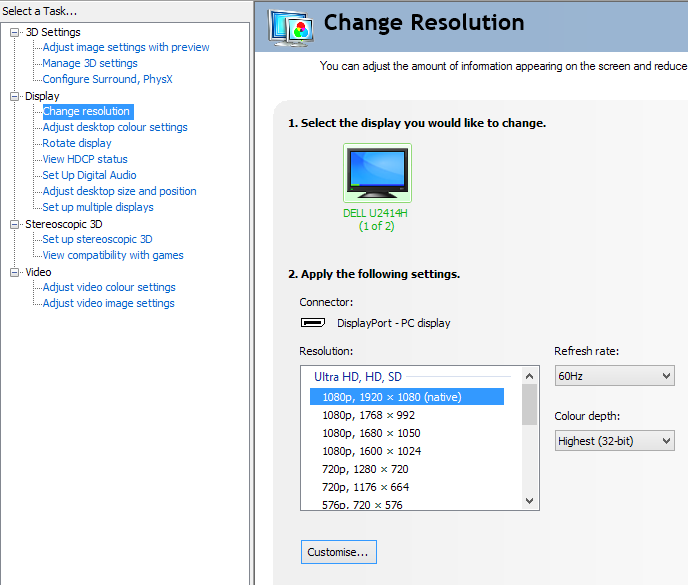
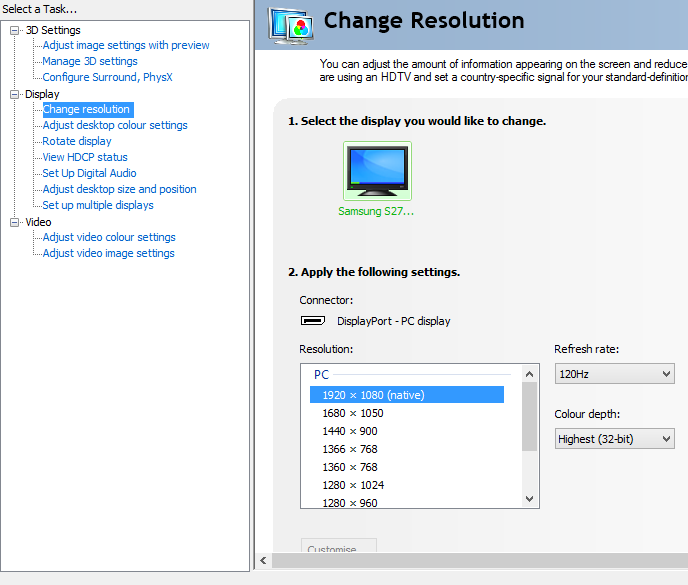
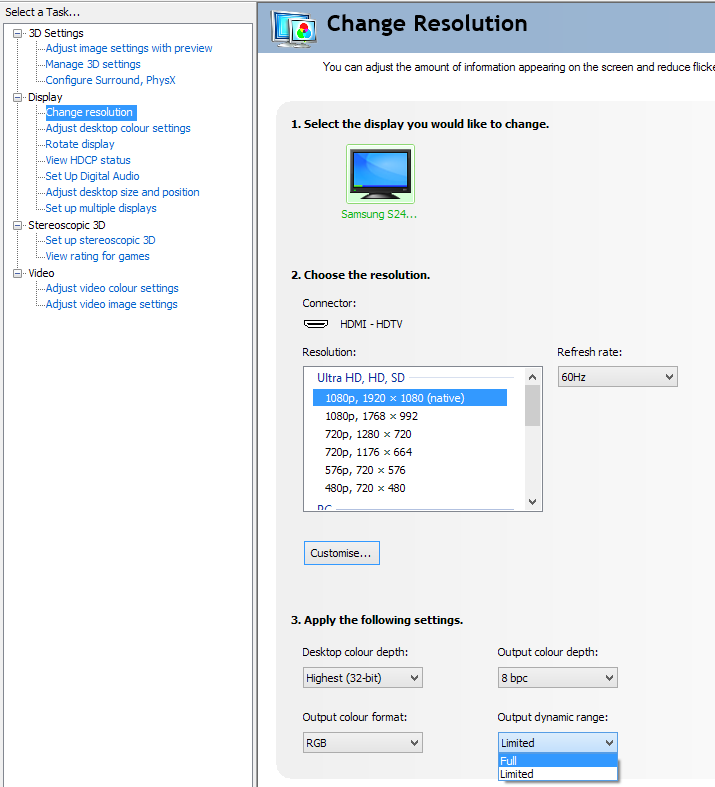
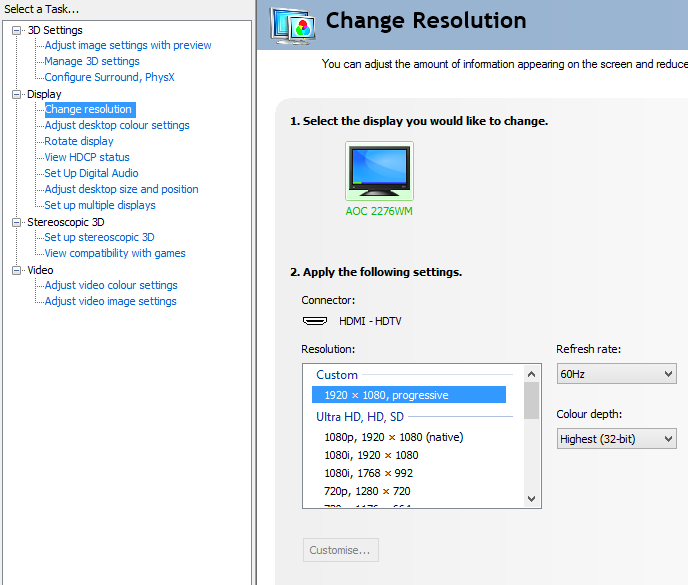
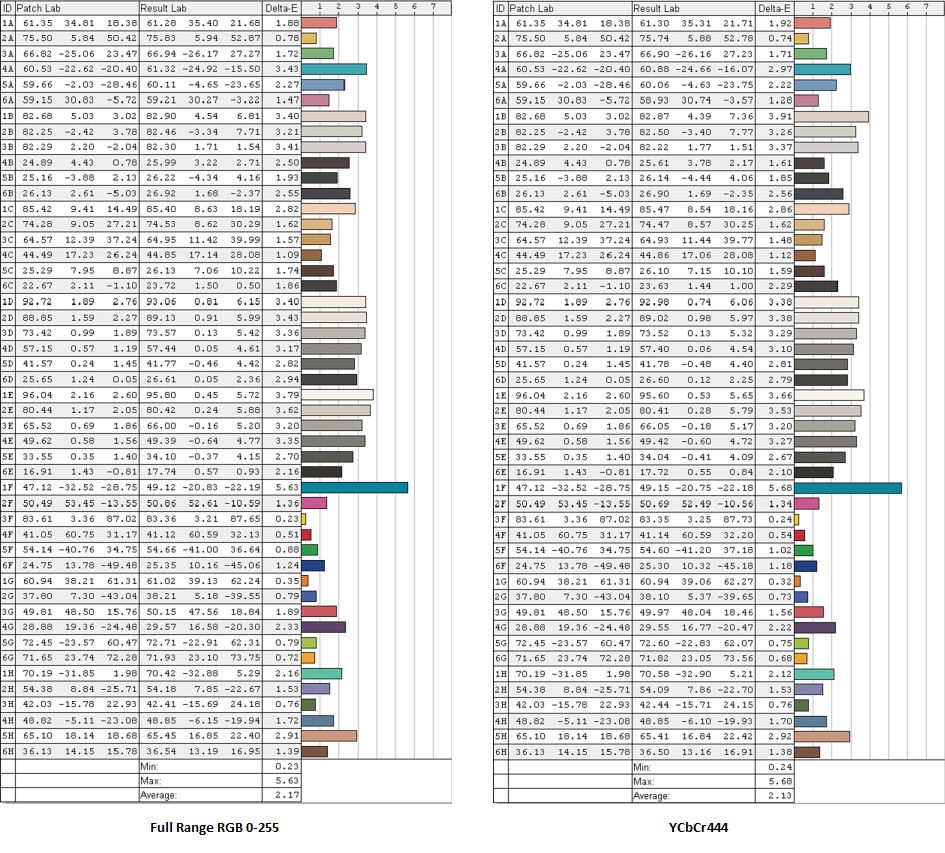
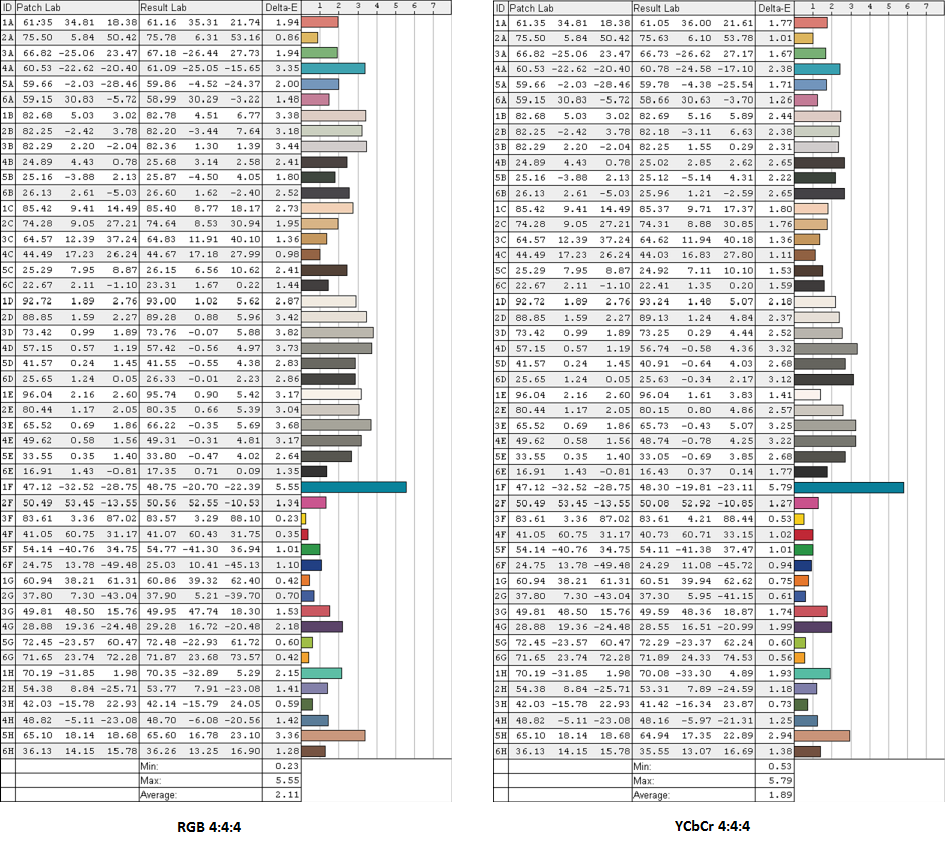
You may have heard people say that the image quality of HDMI (High-Definition Multimedia Interface), DP (Display Port) and the now outdated DVI (Digital Visual Interface) are equivalent. They’re digital signals that either ‘work’ so the monitor displays an image or ‘don’t work’ so that it doesn’t. A user just has to consider the bandwidth requirements of their monitor and choose a port on the GPU (Graphics Processing Unit) and monitor that will support the full resolution and refresh rate of their display. Unfortunately things aren’t quite as clear-cut as that, and there is a murky middle ground. It’s this quagmire in the middle that many users will find themselves stuck in due to how HDMI is typically handled by PC graphics cards. HDMI is designed as a universal signal widely used by TVs and entertainment systems, unlike DVI and DisplayPort which are built from the ground up as computer monitor ports. The aim of this article is not to bog you down with all of the technical fripperies of these different ports and associated aspects. Rather it’s designed to give you some straightforward actionable advice which will allow you to optimise the HDMI colour signal for PC use. When a monitor with a resolution and refresh rate in common with TVs (e.g. 1920 x 1080 @60Hz) is connected to an Nvidia GPU by HDMI or DVI-HDMI cable, the GPU may to treat the screen as an ‘HDTV’ rather than a monitor. This is also quite common when using DP, even though that’s a PC-only connection. You can see how the graphics driver categorises things for the Full HD resolution as that shared with a TV by opening the Nvidia Control Panel and navigating to ‘Display’ – ‘Change resolution’. It will usually be listed under ‘Ultra HD, HD, SD’ as ‘1080p, 1920 x 1080 (native)’ as shown below. This first resolution list in Nvidia Control Panel lists resolution and refresh rate combinations which are listed in the EDID of the monitor as ‘TV’ resolutions rather than ‘PC’ resolutions. This listing method is not only typical for 1920 x 1080 (Full HD/1080p) displays running at 60Hz – it can also apply to higher refresh rates such as 120Hz. Additionally, it may apply to the ‘4K’ UHD resolution, which is often listed as ‘4k x 2k, 3840 x 2160’ and treated as a ‘TV’ resolution. In the image above you may notice that a Dell U2414H, connected via DisplayPort, has been categorised in this way. The image below shows the second resolution list, the ‘PC’ resolution and refresh rate combinations from the EDID of the monitor. This will typically included PC-specific refresh rates like 144Hz and above and resolutions like 2560 x 1440 (WQHD) which are not shared with TVs. But the problem is not simply that the resolution is listed in the wrong way, it’s the effect that this can have on the colour signal that is important. The GPU may send out a ‘Limited Range RGB 16-235’ colour signal by default rather than the optimal ‘Full Range RGB 0-255’ signal. Without going into the intricacies of how these colour signals differ, there is a definite mismatch between the colour signal sent to the monitor and the screens native capabilities. Some displays cope with this better than other, but this disparity often leaves the monitor unable to display shades with an appropriate depth and will always affect shade variety. Black may appear an obvious dark grey (overall static contrast suffers – this is measurable) and the gamma curve may be shifted such that many shades appear a lot lighter than they should. The whole image may look like it has a sort of bleached haze over it, giving what is commonly referred to as a ‘washed out look’. The table below gives some basic readings taken from the AOC i2473Pwy connected by HDMI and set to use both a ‘Limited Range RGB 16-235’ signal and a ‘Full Range RGB 0-255’ signal. Results for a third signal type discussed below, ‘YCbCr444’, are also included. The ‘Test Settings’ and equipment from the review were used to take these readings – a Spyder4Elite for the gamma and white point measurement and a Konica Minolta CS-200 for the rest. The ‘Test Settings’ simply involved lowering the brightness a bit and making minor colour channel adjustments. Some screens handle the ‘Limited Range RGB’ signal better and would show less dramatic disparity, but it’s still best to use the ‘Full Range RGB’ signal for monitors where possible. Although Nvidia Control Panel is used as an example for the solutions below, the Nvidia App offers the same functionality. As of driver version 347.09, Nvidia have added a small drop-down to the Nvidia Control Panel (NVCP) that will allow you to enforce the correct ‘Full Range’ signal. Simply open NVCP and navigate to ‘Display – Change resolution’. You should see a drop down box labelled ‘Output dynamic range’. At time of writing this is the final drop-down box on the page, under ‘Apply the following settings’ as shown below. Make sure this is set to ‘Full’ rather than ‘Limited’ and press ‘Apply’ to enforce the ‘Full Range RGB 0-255’ signal. ‘Limited’ is used by default on Full HD monitors connected using HDMI and some connected using DisplayPort, when running at 60Hz or other refresh rates listed as ‘Ultra HD, HD, SD’. For resolutions or refresh rates listed as ‘PC’ the default setting will be ‘Full’. If the monitor has an ‘HDMI Black Level’, ‘HDMI RGB PC Range’ or similar option make sure this is set to ‘Normal’, ‘High’, ‘Full’ or ‘RGB (0~255)’ rather than ‘Low’, ‘Limited’ or ‘RGB (16~235). The exact nomenclature depends on the monitor model. An ‘Automatic’ setting or similar should correctly detect the colour signal type send out by the GPU. It is possible to enforce a ‘Full Range RGB 0-255’ signal over HDMI or incorrectly functioning DisplayPort by setting a custom resolution. This resolution can be set such that it is treated exactly the same as the default native resolution of the monitor but with the colour signal corrected. The video below shows this process, focusing on 60Hz where the issue is most likely to occur. Again ensure that the ‘HDMI Black Level’ or similar option on the monitor is set correctly, if such an option exists. Although this will work with most applications and the desktop, some games ignore custom resolutions and will revert to using your monitor’s native resolution with the default colour signal. On many such games your custom resolution will be used if you set the refresh rate to a value other 60Hz (essentially overclocking or underclocking your monitor if it’s a 60Hz model). Most 60Hz Full HD monitors will be able to use 65Hz without any issues, some can be pushed further if you’re feeling adventurous. Some users would be uncomfortable changing this from the default 60Hz, which we understand, so for those looking for a simple ‘universal’ fix there are some alternatives. One alternative to setting a custom resolution in the Nvidia Control Panel is to use the ‘Custom Resolution Utility (CRU)’ created by ‘ToastyX’. Full instructions on how to use this are included in the first post on the thread linked to. Simply run this utility (CRU.exe) and click the ‘Add…’ button under ‘Detailed resolutions’ as shown in the image below. Different versions of CRU can have slightly different wording, but the process is the same. This brings up a ‘Detailed Resolution’ configuration box shown to the right in the image above. Select ‘Automatic PC’ in the ‘Timing’ dropdown and enter the resolution and refresh rate as shown in the image. One key feature of CRU is that after adding a ‘Detailed resolution’ you can move a resolution up to the top of the list so that is treated as the native resolution. You do this by clicking on the resolution you just created and using the little up arrow button to the right of the ‘Reset’ button. This is important because those games that like to ignore Nvidia’s custom resolutions will still use the new native resolution that you set using this utility. Remember to press OK and restart your computer to activate your new resolution. Note that CRU can also be used to overclock monitors connected to both Nvidia and AMD GPUs by setting a higher than native refresh rate, and that is indeed one of its key original purposes. Some users will find that functionality useful, but that’s not necessary to correct the colour signal. Another good thing about CRU is that it offers a reliable method to correct the colour signal of Nvidia’s mobile GPUs. Because the graphics driver of mobile GPUs is massively cut down you aren’t able to set a custom resolution using Nvidia Control Panel. For users with Nvidia’s desktop GPUs there are a few alternatives to creating custom resolutions which can be used to correct the signal. It is very easy to get rid of that ‘washed out’ look and the problematic gamma by setting the graphics card to use the YCbCr444 colour format. Simply open the Nvidia Control Panel and navigate to ‘Display’ – ‘Adjust desktop color settings’. Select ‘YCbCr444’ from the ‘Digital color format’ dropdown as shown below. The ‘Black Level’ option on the monitor, if there is one, should be greyed out after selecting this colour signal type. This will switch the colour signal the graphics card sends out from RGB (‘Limited Range RGB 16-235’ by default) to an alternative which provides a very similar image to ‘Full Range RGB 0-255’ on most monitors. The measured gamma, white point and contrast are very similar indeed and the image looks very much comparable to a ‘Full Range RGB’ signal on most monitors. Some colour values are changed very slightly, with certain shades displayed more accurately and some less accurately. The images below compare the colour accuracy of the AOC i2473Pwy across a broad range of shades using both ‘Full Range RGB (0-255)’, shown on the left and ‘YCbCr444’, shown on the right. These tests were repeated several times and the slight differences were consistent for one signal type vs. the other – so it isn’t just the colorimeter being weird. Different monitors will of course show different deviations in accuracy, but both colour signals should generally be just as close to each other as in this example. On a minority of monitors the changes can be more pronounced, for example the clarity of text can be affected with a blurred or ‘fringed’ look in places. If you notice such undesirable consequences on your monitor we’d advise using one of the other methods to correct the signal. As you can see there some slight differences here and there but nothing of huge significance. After selecting the ‘YCbCr444’ colour signal the resolutions will be listed in exactly the same way by the driver, so will remain in the ‘Ultra HD, HD, SD’ list if that’s where they were before. Regardless of the technique you use to correct the colour signal, perhaps the easiest way to see the difference is to observe the Lagom black level test. Use a browser other than Firefox as Mozilla’s colour management can throw things off here. Before correcting the signal you may notice that all of the squares are distinct from the background with little individuality in the shades of the first few blocks. The relatively low gamma and inability of the monitor to display distinctions below a grey level of 16 would have this effect. After correcting the colour signal the first few blocks should blend in with the background better and offer more distinction between themselves and neighbouring shades. The background will appear darker (a grey level of ‘0’ rather than ‘16’) as well. On some monitors the differences can be a lot pronounced than others. The first and probably most pressing issue you may face when connecting an AMD GPU to a Full HD monitor using HDMI or DVI to HDMI is one of scaling. At least if you’re using an older driver, the image will likely appear compressed and fuzzy with a black border surrounding it. That is because the GPU’s default behaviour, in older drivers at least, is to ‘underscan’ the image. To fix this for older drivers, you simply need to Open Catalyst Control Center. Once you’ve got that open navigate to ‘My Digital Flat Panels’ – ‘Scaling Options’ and move the slider to ‘Overscan (0%)’ or all the way to the right as shown in the image below. For AMD GPU users DisplayPort connections should always use the correct colour signal by default. And unlike when connecting a monitor to an Nvidia GPU using HDMI, connecting an AMD GPU via HDMI is usually less problematic when it comes to the colour signal. The image is not washed out and it looks very much as it should on most monitors. When using HDMI, the default behaviour of AMD GPUs may not be to use a ‘Limited Range RGB (16-235)’ signal like Nvidia GPUs, but rather to use a ‘YCbCr 444’ signal which is referred to by AMD as ‘YCbCr 4:4:4’. In our testing, the use of ‘YCbCr 4:4:4’ compared to ‘Full Range RGB (0-255)’ had a slightly more pronounced effect on white point, contrast and measured colour values on an AMD vs. Nvidia GPU. It is still nowhere near as pronounced as comparing Nvidia’s default ‘Limited Range’ signal with ‘Full Range’ on models which show clear ‘Limited Range’ issues. The table below compares some key values on an AMD GPU connected to the AOC i2473Pwy, with the GPU using both ‘YCbCr 4:4:4’ and ‘Full Range RGB 0-255’. The term ‘RGB 4:4:4’ is used in the table as this is AMD’s preferred terminology for the ‘Full Range RGB’ signal. Again the same ‘Test Settings’ and measuring equipment from our review was used with an AMD Radeon R270X GPU in place of the Nvidia GeForce GTX 780. The differences in these key readings are not exactly huge, most notable is the slight boost in contrast you gain by enabling the ‘RGB 4:4:4’ signal. The black luminance remains the same whilst the white luminance is raised by 5 cd/m2 to give a contrast ratio of 1238:1 compared to 1184:1. This is hardly a massive difference on this particular monitor but any bonus is a good thing. The images below compare the colour values of ‘YCbCr 4:4:4’ (left) and ‘RGB 4:4:4’ (right). Again we took these measurements several times and the results were consistent. You can see that there is greater deviation in colour accuracy between the two signals than there was on the Nvidia GPU. This is true for deep red and certain grey and pastel shades in particular, amongst others. There is little need to critically analyse the accuracy of specific colour values for one signal type vs. the other as this varies between monitors. The take home message here is simply that ‘YCbCr 4:4:4’ and ‘RGB 4:4:4’ (‘Full Range RGB, 0-255’) do differ in their shade representation on AMD GPUs and often to a greater extent than Nvidia GPUs. The deviation will be greater between signals on some monitors than others. Unlike Nvidia’s ‘Limited Range RGB (16-235)’ signal AMD’s default ‘YCbCr 4:4:4’ signal never causes things to look washed out by dramatically altering gamma or contrast. But it can still affect colour values so some shades are presented differently to how they would over a DVI or DisplayPort connection (i.e. ‘correct’). And as with Nvidia cards, this signal type can cause a minority of monitors to display blurred or ‘fringed’ text where certain colours are involved. Most users will probably be quite happy to stick with this default signal, but it is actually very simple to change the signal used using one of two methods. Furthermore, with newer drivers AMD often (but not always) defaults to the correct ‘Full Range RGB’ signal. In contrast to Nvidia GPUs, connecting an AMD GPU up using a DVI to HDMI cable causes it to use the colour signal it would usually use for DVI; ‘Full RGB’. If you have such a cable handy or are happy to buy one (perhaps if you don’t have a regular HDMI cable handy) then this is one possible solution. More recent GPUs generally lack DVI ports, so the second solution is going to be the one to try. Whether using a DVI to HDMI cable or changing the pixel format (below) you will need to ensure any ‘Black Level’ or ‘HDMI Range’ setting on the monitor, if such a setting exists, is set correctly. Make sure you’re using the ‘Normal’, ‘High’, ‘Full’ or ‘RGB (0~255)’ setting on the monitor rather than ‘Low’, ‘Limited’, RGB (16~235) or other words to that effect. To fix this in older drivers, simply open Catalyst Control Centre. After doing this, navigate to ‘My Digital Flat-Panels’ – ‘Pixel Format’ and change this from the default of ‘YCbCr 4:4:4 Pixel Format’ to ‘RGB 4:4:4 Pixel Format PC Standard (Full RGB)’ as shown below. This is the ‘Full Range RGB 0-255’ option for AMD users. The first image below is taken from Catalyst Control Centre, which the earlier drivers used. Newer drivers have replaced Catalyst Control Centre with AMD Software (formally AMD Radeon Software). Open this, then click ‘Settings’ (cog icon towards top right). Click on ‘Display’ and make sure ‘RGB 4:4:4 Pixel Format PC Standard (Full RGB)’ is selected as the ‘Pixel Format’, as shown in the second image. You will only have to change this option once, unless you clean install a new graphics driver. As noted above you should also make sure the ‘HDMI Black Level’ or similar setting on the monitor is set correctly as well. If you’d like to put yourself in the shoes of an Nvidia user with their default ‘Limited Range RGB (16-235)’ signal then select the ‘RGB 4:4:4 Pixel Format Studio (Limited RGB)’ pixel format. Just remember to change it back afterwards, not that you’ll forget if you observe a fairly significant degradation in contrast and colour quality. Many monitors have moved on from using DVI (which is handled perfectly in both Nvidia and AMD drivers) to using HDMI and DisplayPort. This trend will continue as these two new standards evolve. When these monitors are running at a resolution and refresh rate combination in common with TVs, the GPU will often treat it as a TV and may send out a suboptimal colour signal. Nvidia GPUs are the worst offenders, sometimes using a ‘Limited Range RGB (16-235)’ colour signal by default that can completely destroy the image quality of the monitor by hampering contrast, colour vibrancy and shade variety. It’s quite common to see this behaviour over DisplayPort as well as HDMI, despite that being dominantly a PC connection where the GPU treating the monitor as a TV is counter-intuitive. As this article demonstrates it is fairly simple to fix any issues with colour signal that you may come across using HDMI or DisplayPort and indeed fix AMD’s odd ‘scaling’ issue for older drivers. But there are many users who will never read this article and don’t know how to fix these issues – cursing away at their monitor and perhaps sending it back to the retailer instead. We’re happy to see that since this article was first published, Nvidia have added that drop-down ‘Dynamic range’ option to the driver. And AMD usually always handles the signal correctly as ‘Full Range RGB’ by default in their more recent drivers. Whilst it’s good to see the situation improving, there are still times where the default behaviour is sub-optimal. As many TVs now happily support a ‘Full Range’ RGB signal anyway, it would make more sense for the GPU to universally use this preferred signal type by default in all cases. As an Amazon Associate I earn from qualifying purchases made using the below link. Where possible, you’ll be redirected to your nearest store. Further information on supporting our work.

As an Amazon Associate I earn from qualifying purchases made using the below link. Where possible, you’ll be redirected to your nearest store. Further information on supporting our work.

How Nvidia GPUs handle the HDMI signal
The problem

Nvidia signal table
Nvidia solutions
First solution: functionality now built into the Nvidia display driver
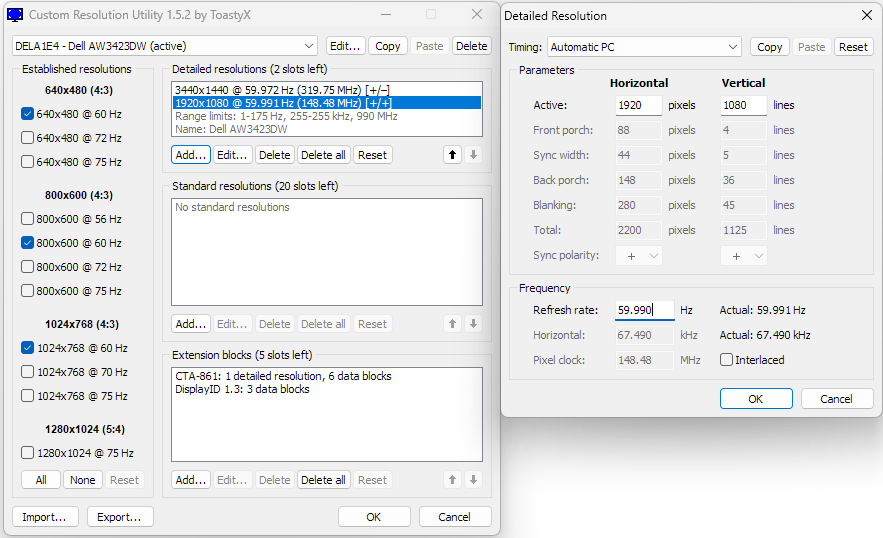
Second solution: setting a custom resolution
After creating it, you can see your new ‘Custom Resolution’ listed separately in the Nvidia Control Panel resolution list as shown below.
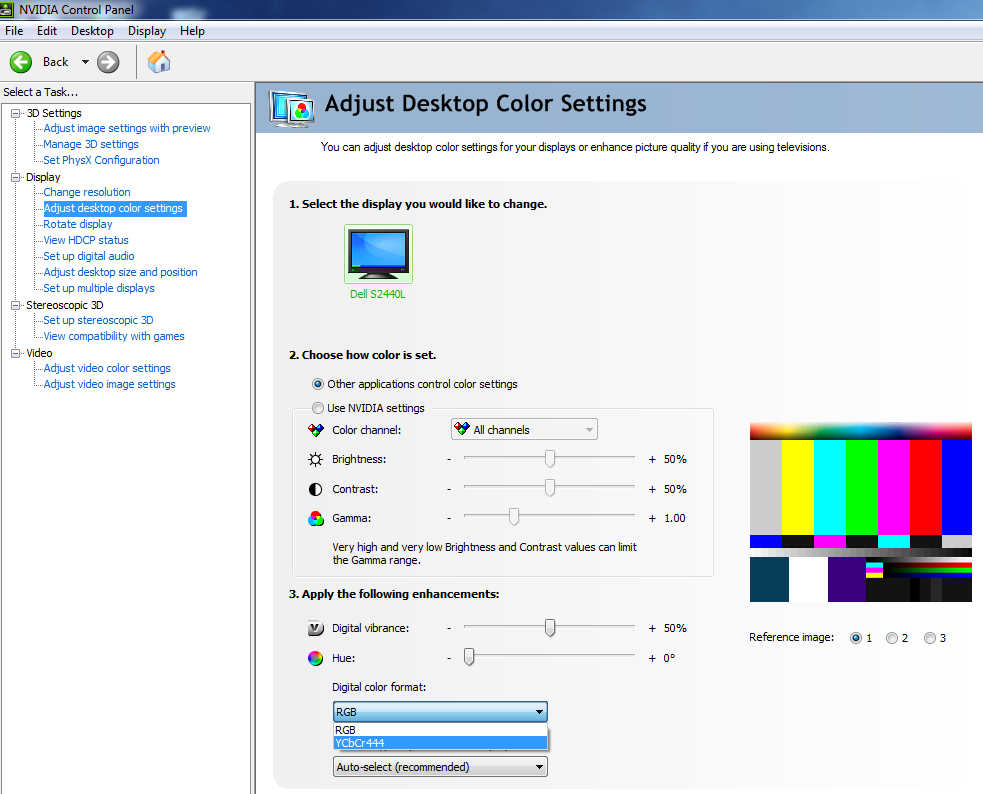
Third solution: using the YCbCr444 colour signal
How AMD GPUs handle the HDMI signal
The initial problem – scaling (a simple fix)

For newer drivers this issue shouldn’t occur, but if you do notice this issue you should find an ‘HDMI Scaling’ slider in the ‘Display’ section of ‘AMD Software’, as detailed in this AMD article.
The other problem – pixel format

AMD signal table
AMD solutions
First solution: use a DVI to HDMI cable
Second solution: change the pixel format
![]()
![]()
Conclusion

