Author: Adam Simmons
Date published: September 1st 2017
Table of Contents
Introduction
For users looking for the most fluid gaming experience, a high refresh rate is often a key priority. We’ve looked at a number of models with 100Hz refresh rates and beyond – and even a 240Hz model in the form of the ViewSonic XG2530. As with the ViewSonic, the AOC AG251FG features a 240Hz refresh rate. Instead of coupling it with support for AMD FreeSync variable refresh rate, it goes the green route with support for Nvidia G-SYNC. We take a look at these elements, in addition to other aspects of responsiveness and key areas such as contrast and colour reproduction.
Specifications
The monitor uses a 24.5” 240Hz TN panel from AUO, with support for 8-bit colour (6-bit + FRC dithering) and a specified 1ms grey to grey response time. It all looks rather fast on paper, but as we know all too well simply on-paper specifications can be quite misleading. So in-depth testing is helpful as well. As usual we’ve highlighted some of the key ‘talking points’ of this model in blue below.
Features and aesthetics
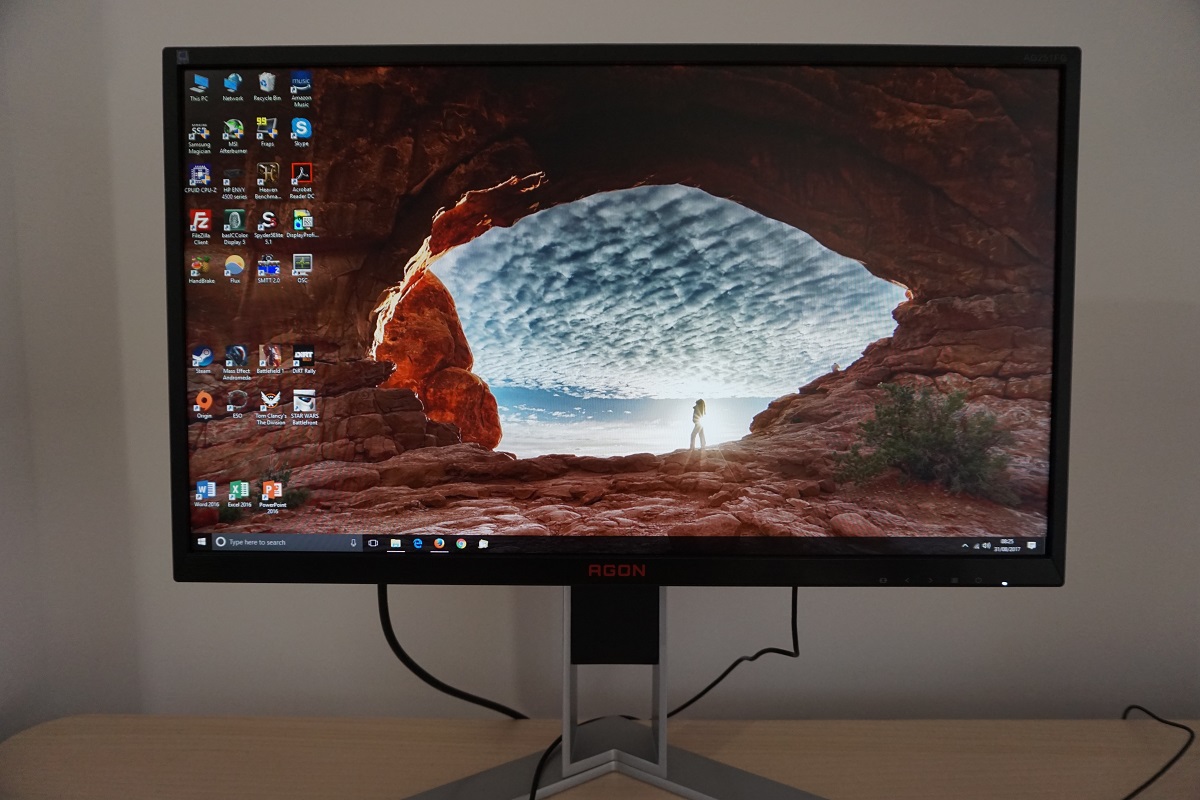
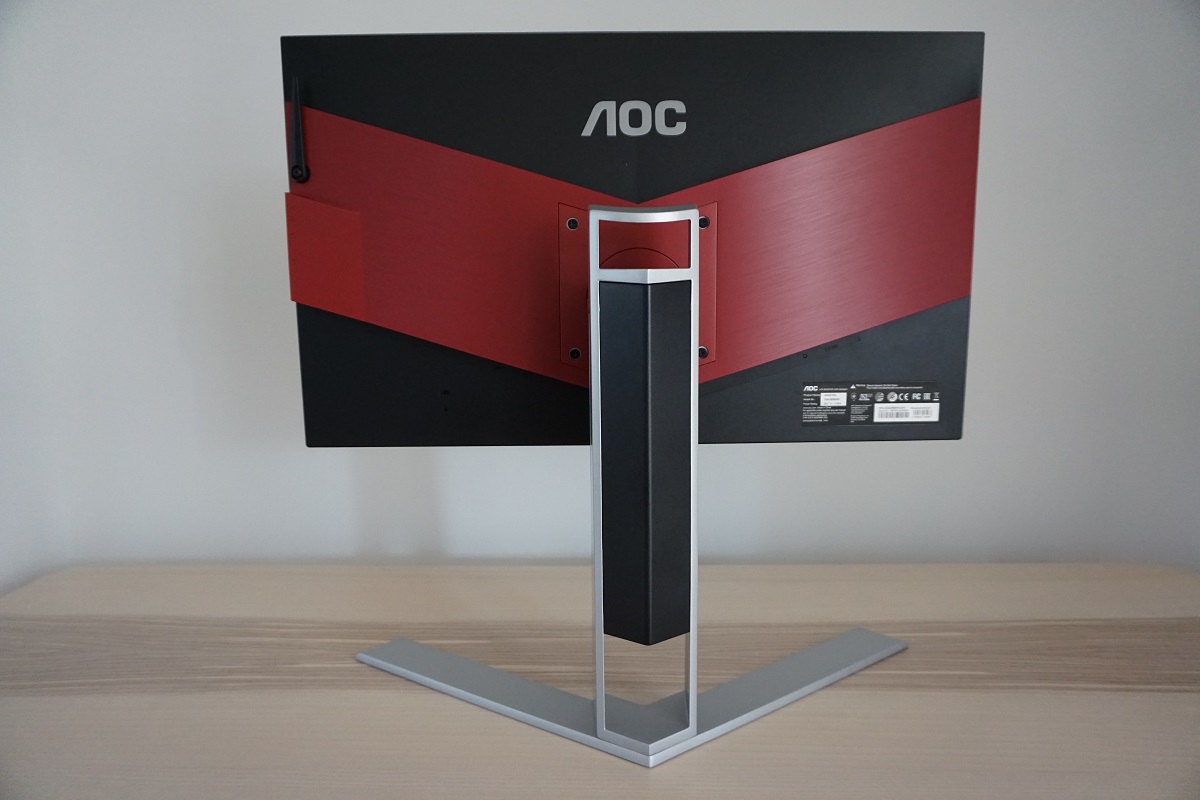
The monitor looks quite angular from the front, accentuated by the ‘penguin-foot’ stand base. The silver elements of the stand are powder-coated metal, with a nice solid feel and quite some weightiness compared to plastic alternatives. The bezels are fairly slim at the sides; ~10.5mm (0.41 inches). They’re a shade thicker at the top at ~12.5mm (0.49 inches) and significantly thicker at the bottom at ~20mm (0.79 inches). The bezels are matte black plastic, with the bottom bezel featuring a layer of brushed black-coloured metal and a central red AGON logo. The bezel design of the monitor is single-stage, with the panel border almost entirely concealed by the bezel. The front view is dominated, of course, by the 24.5” screen – this has a ‘regular’ (medium) matte anti-glare finish as explored shortly.
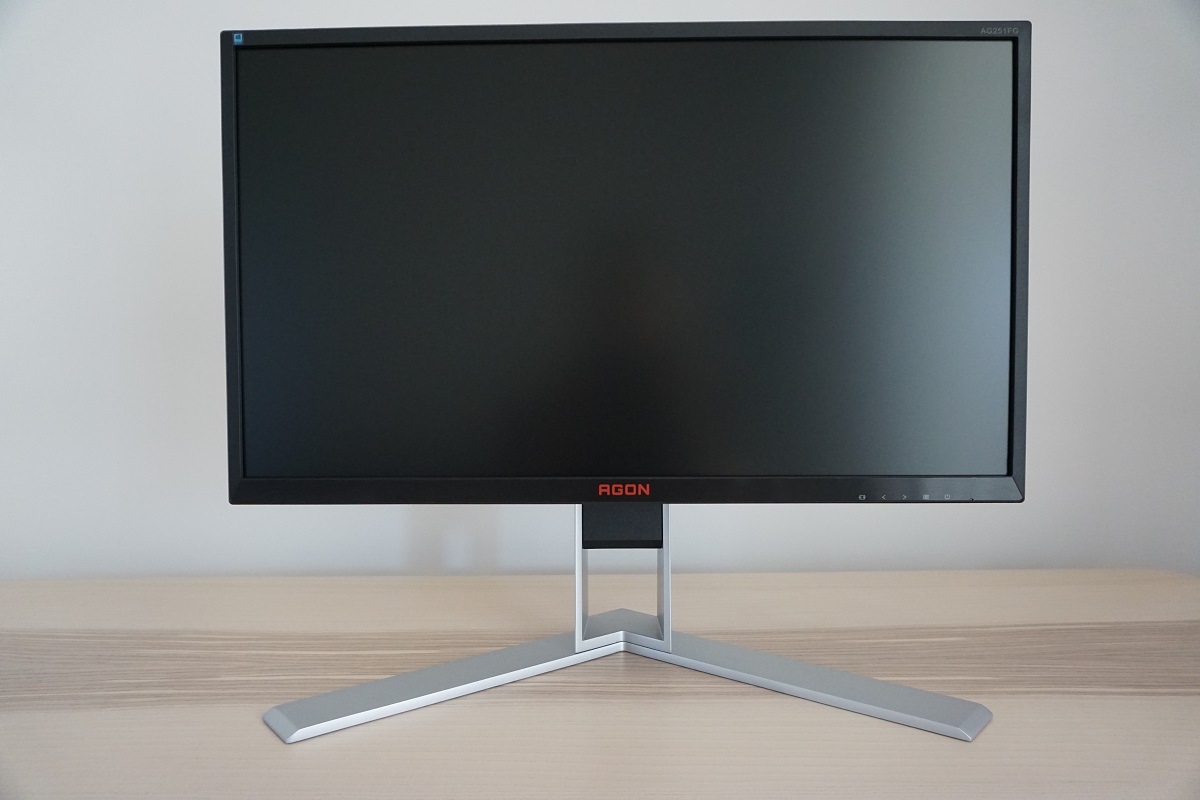
The OSD (On Screen Display) controls face downwards at the right side of the bottom bezel. They are tactile buttons. Button labels are located on the front face of the bottom bezel, alongside a small power LED. This glows white when the monitor is on and orange when it’s in a low power state. It’s quite bright and can’t be disabled or dimmed in the OSD. The video below gives a run-down of the OSD menu system.
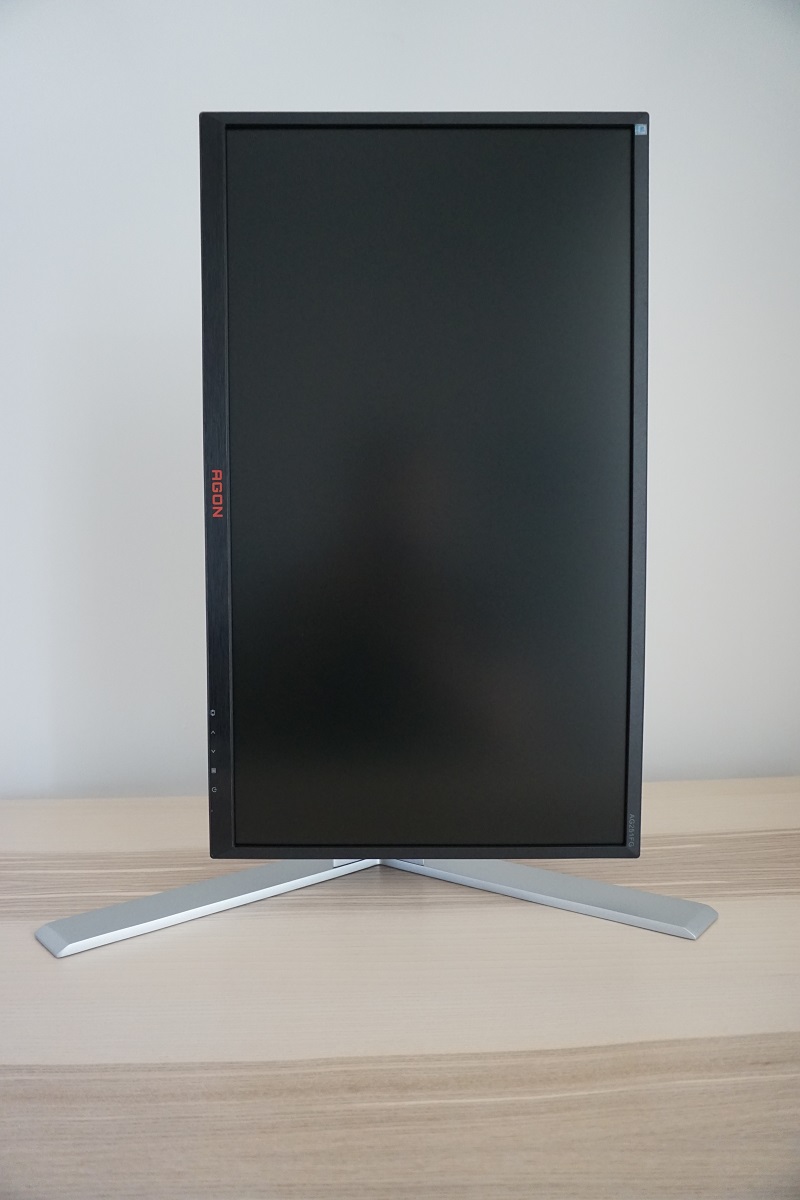
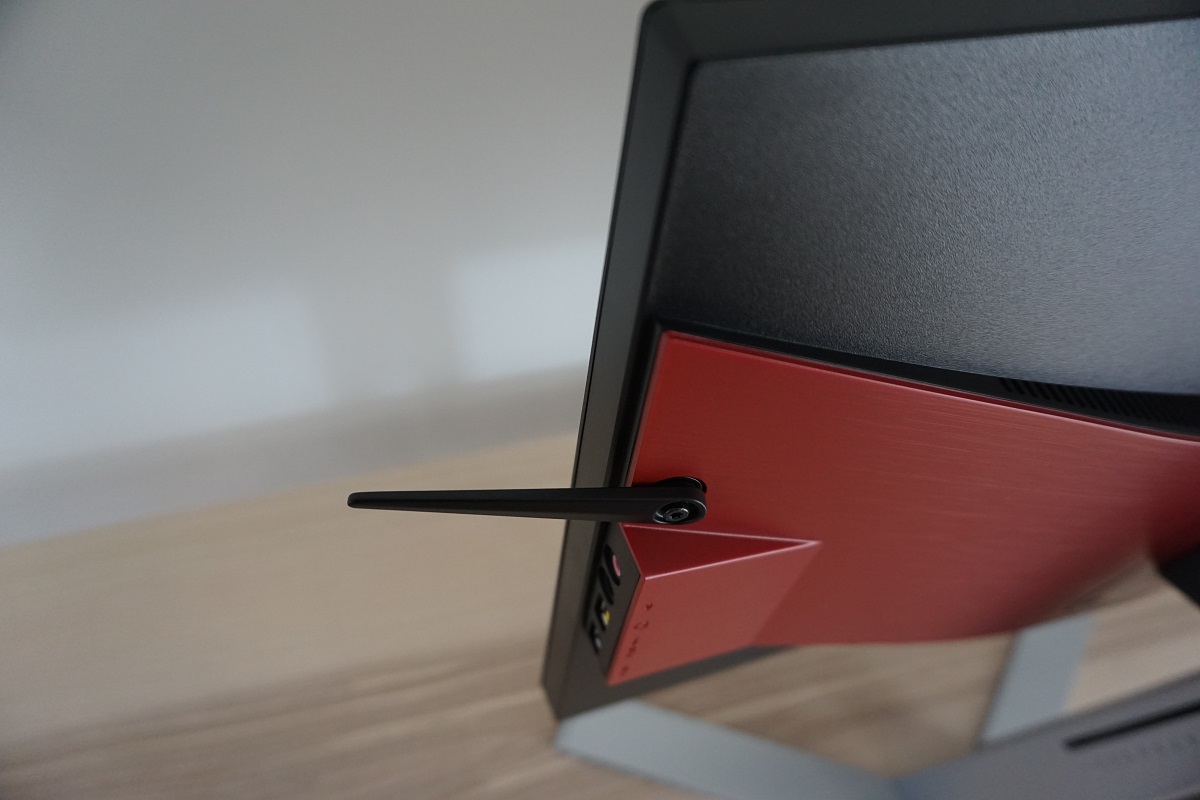
From the side the robust stand dominates, whilst the screen itself is reasonably slender (~16.5mm or 0.65 inches) at thinnest point, extending further back centrally. You can see a layer of red from the rear of the monitor at this angle, too. The right side of the screen features some ports; 3.5mm microphone jack, 3.5mm headphone jack and 2 USB 3.0 ports (the top one featuring fast-charging). There is also a flip-down headphone hook above the port area, which folds away neatly upwards when not needed so it is out of sight from the front of the screen. Further back you can see a slider with a movable red triangular pointer, assisting with exact height adjustments of the monitor in mm (up to 130mm). There’s also a tilt indicator. The stand offers good ergonomic flexibility; tilt (3.5° forwards, 21.5° backwards), swivel (20° left, 20° right), height adjustment (130mm or 5.12 inches) and pivot (90° clockwise rotation into portrait). At lowest height the screen clears the desk by ~81mm (3.19 inches) with the top of the screen ~417mm (16.42 inches) above the desk surface. The total depth of the monitor including all stand elements is ~250mm (9.84 inches).
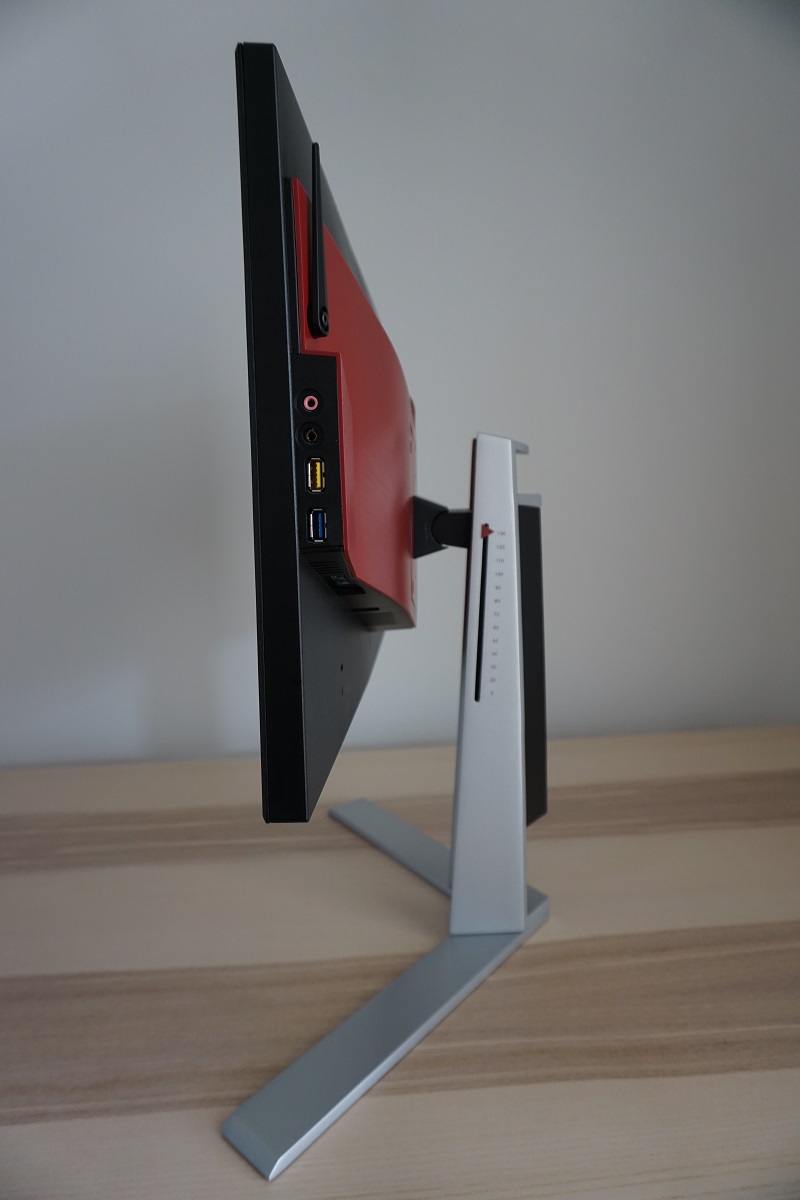
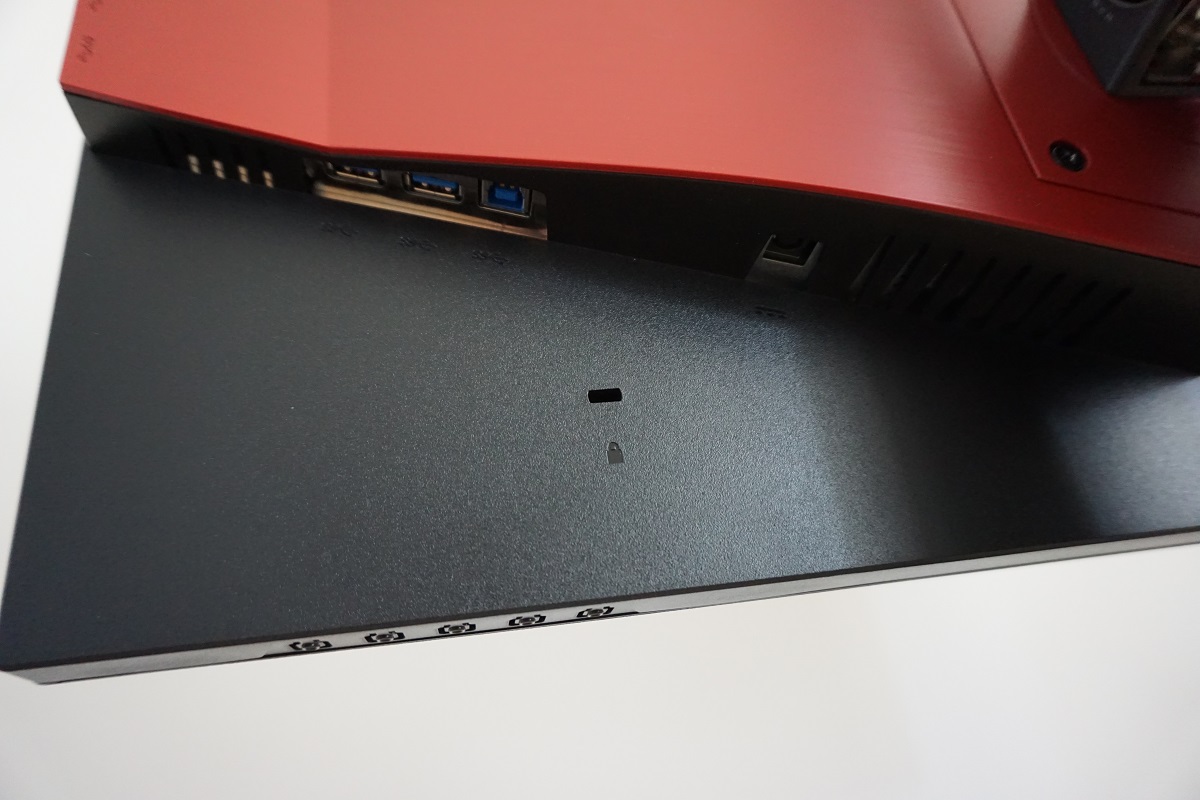
The rear of the screen combines matte black plastic with red brushed plastic ‘wings’. The stand is screwed on using included screws in a 100 x 100mm VESA arrangement. The attachment plate has an obscure shape, so an adaptor is included that will allow ordinary square 100 x 100mm VESA mounting to take place for alternative stands or mounts. There is a K-Slot towards the bottom left. The ports of the monitor are down-firing and are split between the left and right side of the stand. Towards the left they are; 2 USB 3.0 ports (plus upstream) and a DC power input (external power brick). Towards the right there is a DP 1.2 port (supports G-SYNC), HDMI 1.4 port and a 3.5mm microphone jack. There are also basic 2W up-firing stereo speakers included, which provide rather low quality sound output. This will be sufficient for those looking for very basic sound output, listening to voices on the radio or perhaps watching videos on YouTube etc. But the sound is a bit muffled regardless of volume – we’d recommend investing in some standalone speakers or headphones instead.
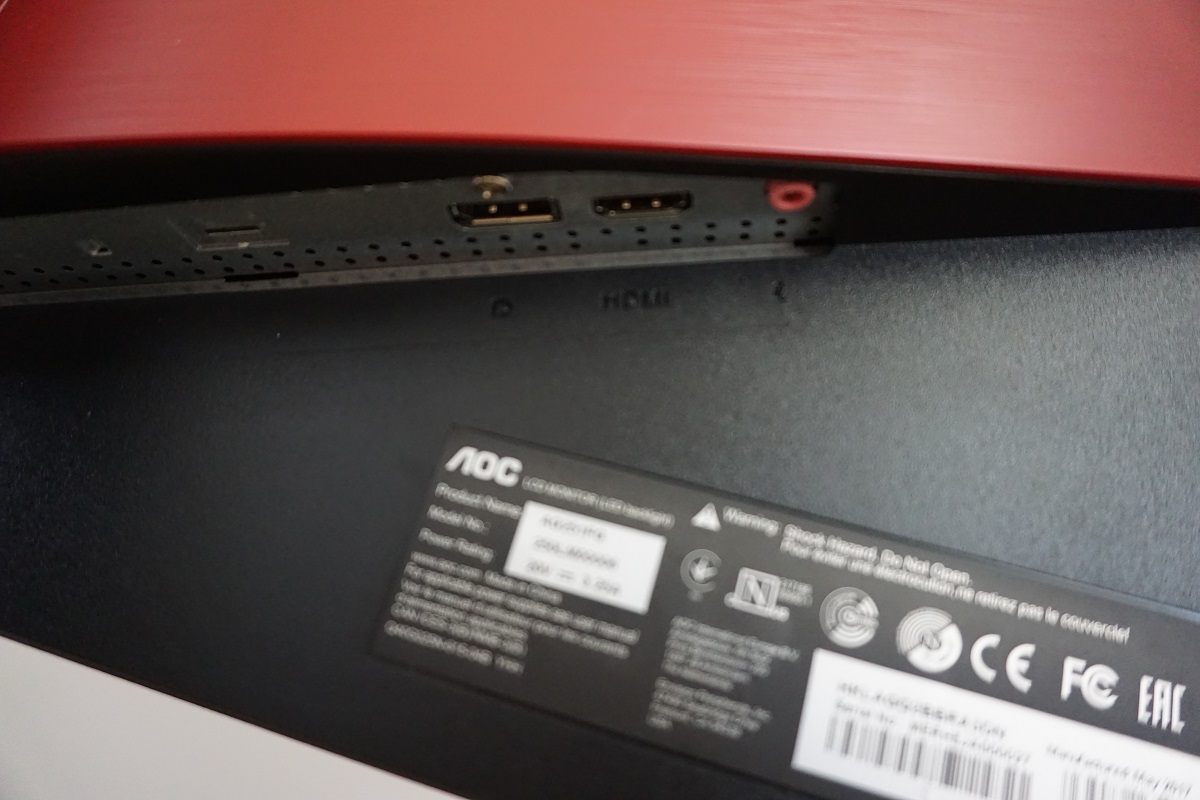
Note that the full refresh rate at native resolution can be harnessed by either Nvidia or AMD GPUs via DP 1.2, whilst supported Nvidia GPUs will also allow G-SYNC to be used. The HDMI port is really just there for connection to other devices such as games consoles. When connected to our Nvidia GPU via HDMI, the monitor actually worked best with a ‘Limited Range RGB’ signal (refer to this). ‘Full’ gave obvious oversaturation and bleaching, whereas the image was displayed correctly with ‘Limited’ selected. The necessary power adaptor is included as a standard accessory alongside an HDMI cable and DP cable.
Calibration
Subpixel layout and screen surface
The image below is a macro photograph taken on Notepad with ClearType disabled. The letters ‘PCM’ are typed out to help highlight any potential text rendering issues related to unusual subpixel structure, whilst the white space more clearly shows the actual subpixel layout alongside a rough indication of screen surface. This model uses a ‘regular’ (medium) matte anti-glare surface, which provides strong glare handling characteristics. Light emitted from the monitor undergoes significant diffusion as well, affecting the potential vibrancy and clarity of the screen. There is a moderate graininess to the screen surface, most noticeable when observing lighter shades. This is not the same sort of heavy ‘smeary’ grain that some matte surfaces have, though, and is explored in more detail later.
![]()
As shown in the image above, the monitor uses the standard RGB (Red, Green and Blue) stripe subpixel layout. This is the default expected by modern operating systems such as Microsoft Windows and Apple’s MacOS. As a Windows user you don’t need to run through the ClearType wizard, although you may still wish to adjust this according to your preferences. As a Mac user there’s no need to worry about text fringing from non-standard subpixel layouts. The subpixel spacing and structure is normal, with no specific issues identified related to text rendering.
Testing the presets
The AG251FG includes some ‘Game Mode’ settings which act as presets; ‘FPS’, ‘RTS’, ‘Racing’ and ‘Gamer’. These simply adjust the settings available to the user to various preset values. The table below shows key readings taken using a DataColor Spyder5ELITE colorimeter alongside some general observations, using a range of settings. The monitor was left in its ‘Plug and Play’ state, connected to a Windows 10 machine without additional drivers or ICC profiles specifically loaded. It was connected to an Nvidia GTX 1070 via DP 1.2. The monitor was left running for over 2 hours before readings were taken. Unless otherwise stated, assume that default settings were used, the exception being that refresh rate was set to 240Hz in Windows (did not affect observations in this table). The exception to this was ULMB where refresh rate was set to various other values – brightness was also increased to ‘100’ from the default ‘90’. We made similar observations on an AMD Radeon 290, which supported 240Hz without frame skipping via DP 1.2 – but obviously ULMB wasn’t supported on this non-Nvidia GPU. When viewing the figures in this table, note that for most PC users ‘6500K’ for white point and ‘2.2’ for gamma are good targets to aim for.
| Monitor Settings | Gamma (central average) | White point (kelvins) | Notes |
| Gamma1 (Factory Defaults) | 2.2 | 6231K | Very bright and a look verging slightly on the warm side. The image appears much richer than on many high refresh rate TN models out of the box, however. This is due in large part to the gamma tracking being significantly better than such models. There was some excessive saturation higher up the screen and a more muted look lower down as viewed from a normal viewing position. This is entirely typical for a TN model whereby perceived gamma changes depending on which section of the screen you’re looking at. |
| Gamma2 | 2.0 | 6230K | As above with lower gamma, giving the image a more muted look overall. |
| Gamma3 | 2.4 | 6215K | As factory defaults but gamma now averages 2.4; this gives a deeper than intended look, making the top of the screen in particular look rather dark. Some users might quite like this look overall, though, and it does alleviate some of the perceived under-saturation lower down the screen. |
| Color Temp. sRGB | 2.2 | 6209K | Very similar to factory defaults, but many controls are now disabled (including brightness, which is set at a very bright setting). |
| Color Temp. User | 2.1 | 6156K | The image appears dimmer and a bit washed out in places. This is simply because the default colour channel position for ‘User’ is ‘50’. However; the point of optimal contrast and therefore the neutral position is actually ’65’. Be aware of this when making adjustments and use ‘65’ as a starting point for each channel. |
| Low Blue Light = 20 | 2.2 | 4879K | This is an effective Low Blue Light (LBL) setting. The image appears warm with a somewhat greenish hue. The blue colour channel is weakened significantly, making this appropriate for relaxing evening viewing and other times when you might like to minimise blue light exposure. This is most effective when combined with a reduction in brightness. |
| ULMB @ 144Hz | 2.2 | 6160K | The screen flickers at a frequency matching the refresh rate of the display (i.e. 144Hz) and also appears a fair bit dimmer than factory defaults. The brightness is still rather high, though, and can of course be lowered if preferred. Individual sensitivity to the flickering varies – it is similar to observing a 144Hz CRT so isn’t as obnoxious as lower refresh rate flickering. |
| ULMB @ 120Hz | 2.2 | 6137K | As above but brightness slightly higher and flickering slightly more noticeable due to decreased refresh rate (120Hz). We didn’t find this difference in flickering particularly obvious, although individual sensitivity again varies. |
| ULMB @ 100Hz | 2.2 | 6154K | As above but yet more flickering (we found this more noticeable) due to 100Hz refresh rate. Brightness is also increased quite a bit, most users would likely want to reduce this significantly. |
| Test Settings (see below) | 2.2 | 6490K | As factory defaults with significantly reduced brightness and slight colour channel rebalancing. The image appears well-balanced and fairly rich – with the usual TN caveats. |
Out of the box the monitor produced an image that was considerably richer than what many high refresh rate TN models produce. This was due in large part to the gamma, which averaged 2.2 rather than something much lower. The white point of our unit was also decent, if a little warm compared to the 6500K daylight target we were aiming for. The gamma curve (shown below, for our ‘Test Settings’) doesn’t stick too strictly to the ‘2.2 curve’, although it does average 2.2. The slight bowing in the middle actually gave some shades a little bit of extra depth and helped to alleviate some of the perceived saturation loss lower down the screen. There were definite inconsistencies in saturation levels, but that’s something that applies to all TN models. The monitor also has a ‘Low Blue Light’ (LBL) setting, which can be set between ‘0’ (minimum effect) and ‘20’ (maximum effect). This worked effectively, especially at the strongest level, although we would have seen a setting which can be more easily activated and deactivated. Having to cycle the setting from ‘0’ to ‘20’ when you want to activate it fully, and vice-versa, is a bit cumbersome. It is nice to see this setting included, at least. For our ‘Test Settings’ we lowered the brightness and made some changes to the colour channels. Note that the colour channels are set to‘50’ out of the box, but as noted earlier ‘65’ is the correct neutral position. Furthermore, a factory reset does not actually change the colour channels for some reason. Also remember that that individual units can vary, so these settings won’t necessarily be optimal for all users and are just intended as a rough guide. Anything not mentioned was left as default, including contrast. We’ve also included the ‘Overdrive’ setting and refresh rate used in Windows, just for reference. Color Temp.= User R= 61 G= 63 B= 65 Overdrive= Light Refresh rate (Windows setting)= 240Hz A BasICColor SQUID3 (X-Rite i1Display Pro) was used to measure the luminance of black and white using a range of settings. From these values, static contrast ratios were calculated. This data is presented in the table below, with blue highlights indicating the results under our ‘Test Settings’. Black highlights indicate the highest white luminance, lowest black luminance and highest contrast ratio recorded. Assume that any setting not mentioned was left at default, with the exceptions already mentioned in the calibration section. Note that changing refresh rate did not impact contrast (where ULMB was disabled).

Gamma 'Test Settings'
Test Settings
Brightness= 34 (according to preferences and lighting)
Contrast and brightness
Contrast ratios
Monitor Settings White luminance (cd/m²) Black luminance (cd/m²) Contrast ratio (x:1) 100% brightness 380 0.41 927 80% brightness 322 0.35 920 60% brightness 261 0.28 932 40% brightness 197 0.21 938 20% brightness 129 0.14 921 0% brightness 57 0.06 950 Factory defaults (90% brightness) 350 0.38 921 Gamma2 349 0.38 918 Gamma3 348 0.38 916 Color Temp. sRGB 349 0.38 918 Color Temp. User 197 0.4 493 Low Blue Light = 20 335 0.38 882 ULMB @ 144Hz 192 0.21 914 ULMB @ 120Hz 201 0.23 874 ULMB @ 100Hz 258 0.29 890 Test Settings (see below) 169 0.19 889
The average contrast ratio with only brightness adjusted on the AG251FG was 931:1, which is reasonably close to the 1000:1 specified. Under our ‘Test Settings’, where adjustments were made to colour channels, the static contrast dropped to a still respectable 889:1. Decent contrast was also maintained with the most effective ‘Low Blue Light’ setting employed, dropping to 882:1. The most significant drop was seen with the ‘User’ mode and all channels left at the default of ‘50’. As noted earlier, this is not the neutral position (that would be ‘65’), hence the contrast takes a huge hit. The highest luminance recorded on this table was 380 cd/m², whilst the lowest white luminance recorded was 57 cd/m². This provided a 323 cd/m² luminance adjustment range.
PWM (Pulse Width Modulation)
The AG251FG does not use PWM (Pulse Width Modulation) at any brightness level and instead employs DC (Direct Current) to dim the backlight. The backlight is therefore considered ‘flicker-free’, which will come as welcome news to those sensitive to the side-effects of PWM or who simply prefer to know a flicker-free backlight is used. The exception to the flicker-free status is where ULMB is active; this by its very nature flickers at a frequency matching the refresh rate selected.
Luminance uniformity
Whilst observing a black screen in a dark room, using our test settings, we noticed slight backlight bleed towards the bottom of the screen. This is shown in the image below, but remember that individual units vary when it comes to uniformity issues, which includes issues such as backlight bleed and clouding. A slight silver or golden (depending on angle) sheen is visible from sharper viewing angles. This is highlighted in a viewing angles video later on in the review. It’s very different to ‘IPS glow’; not as obvious and not observed from a normal viewing position.

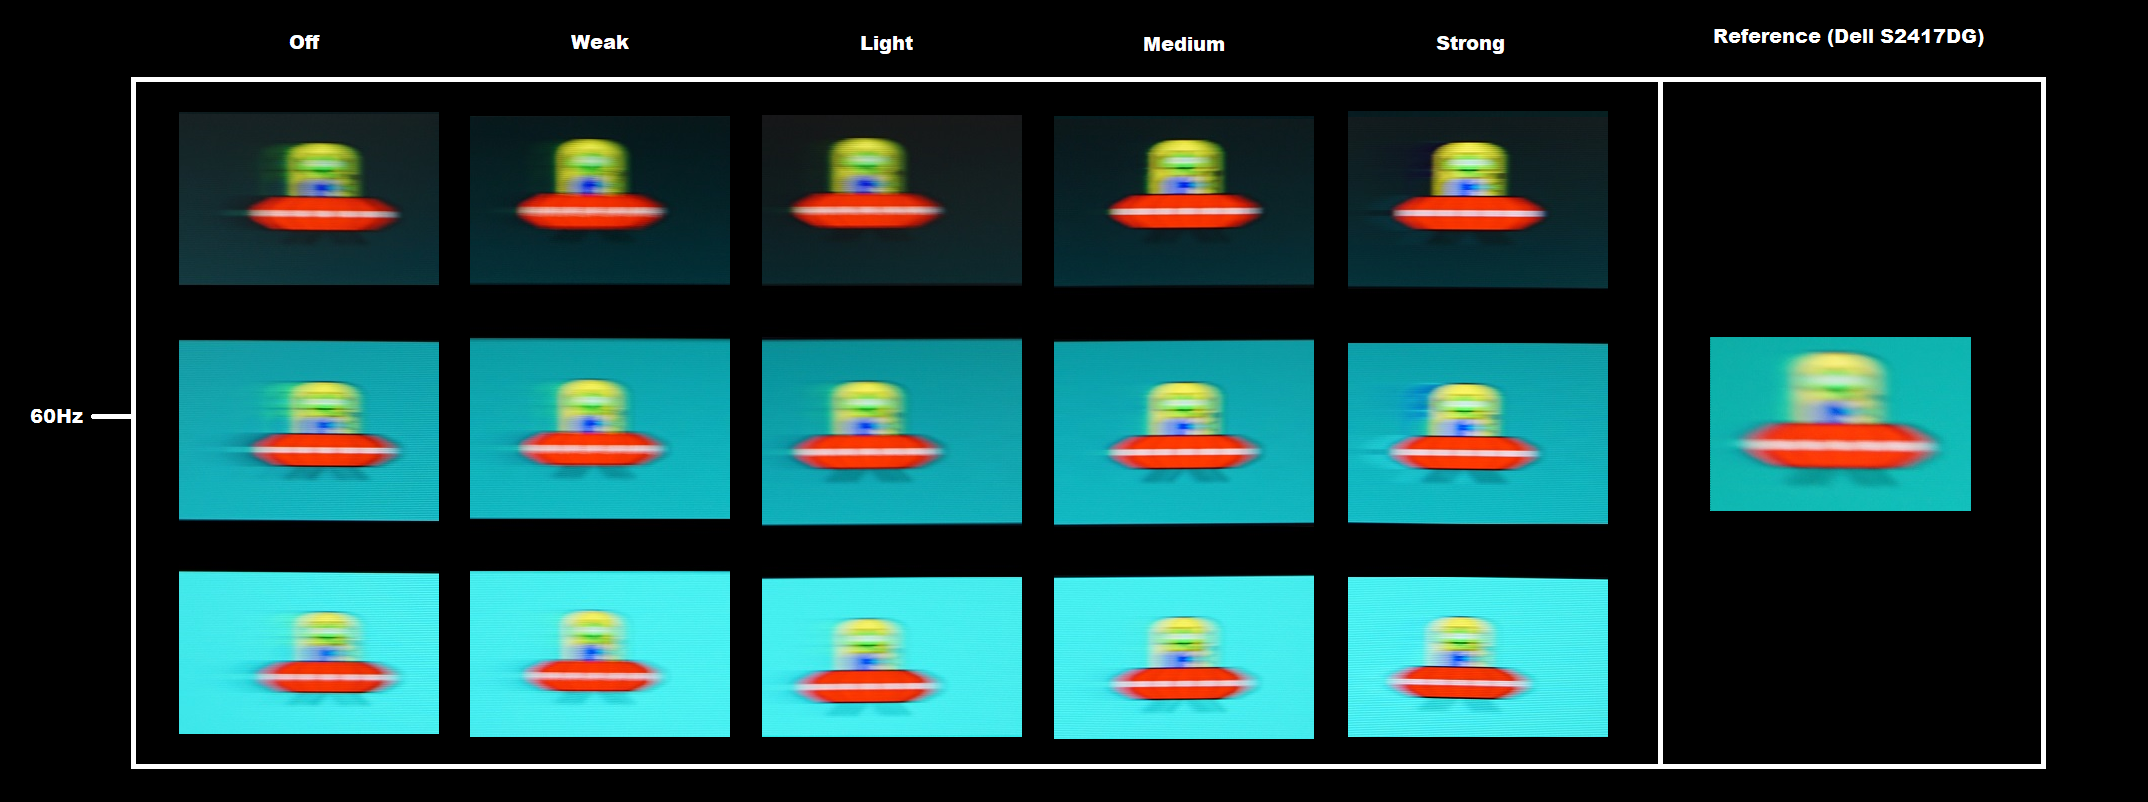
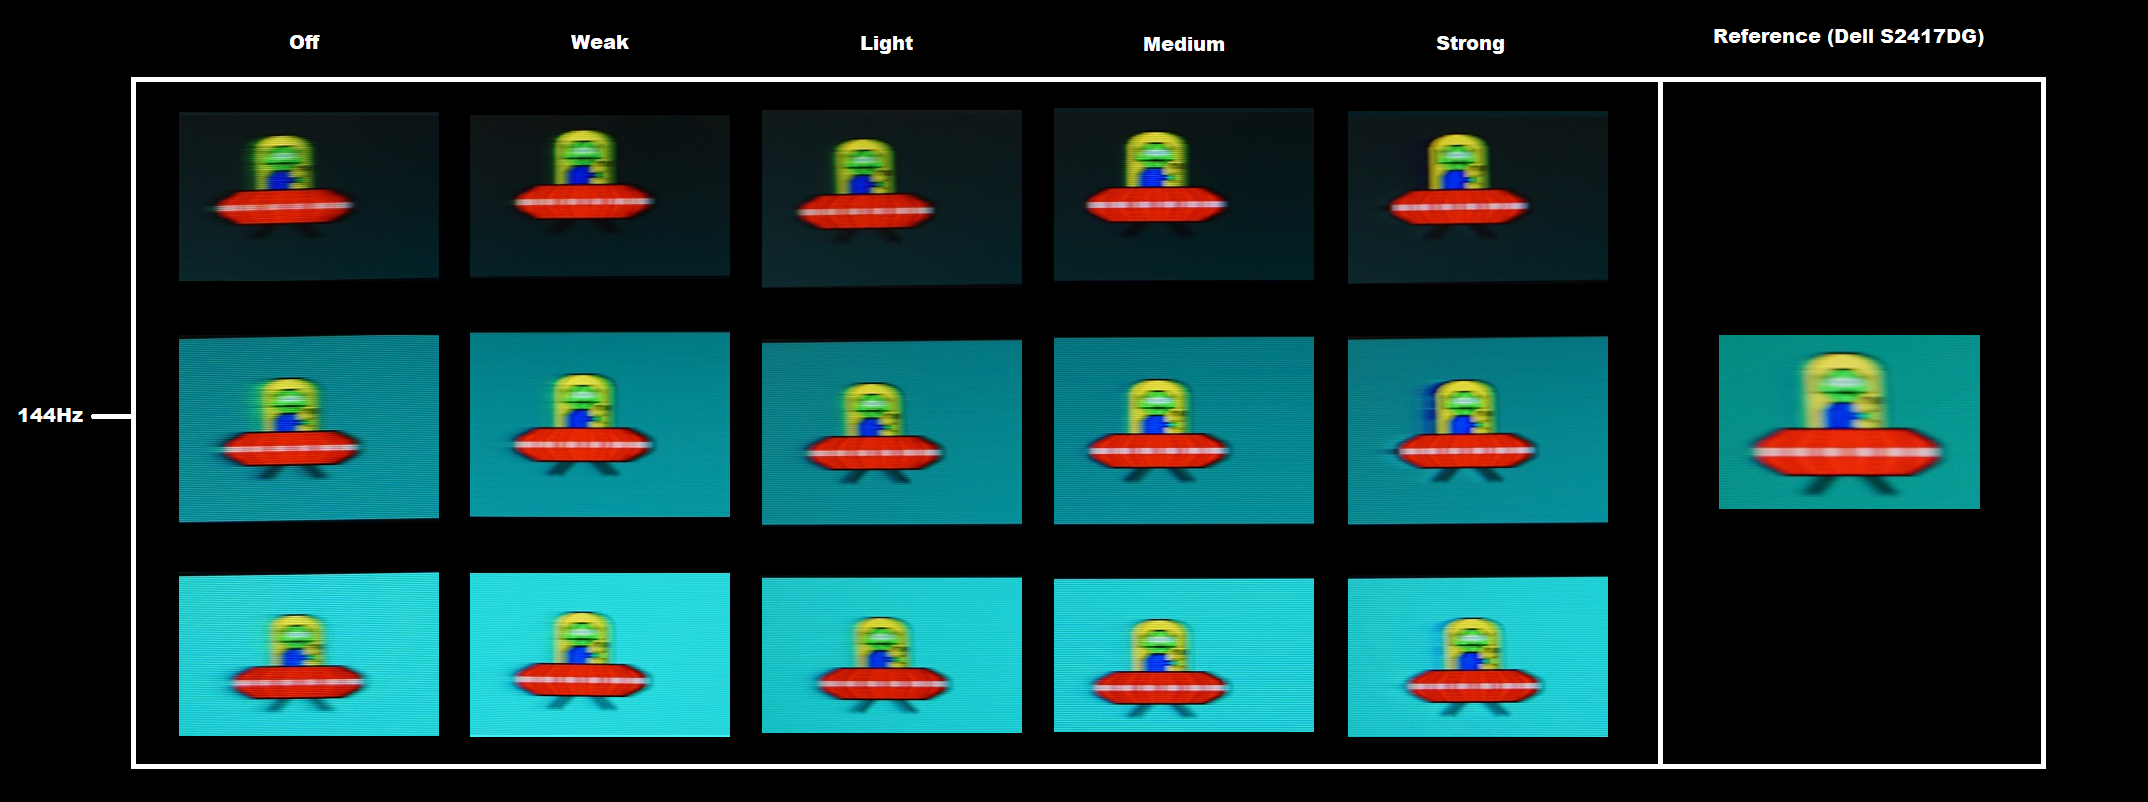
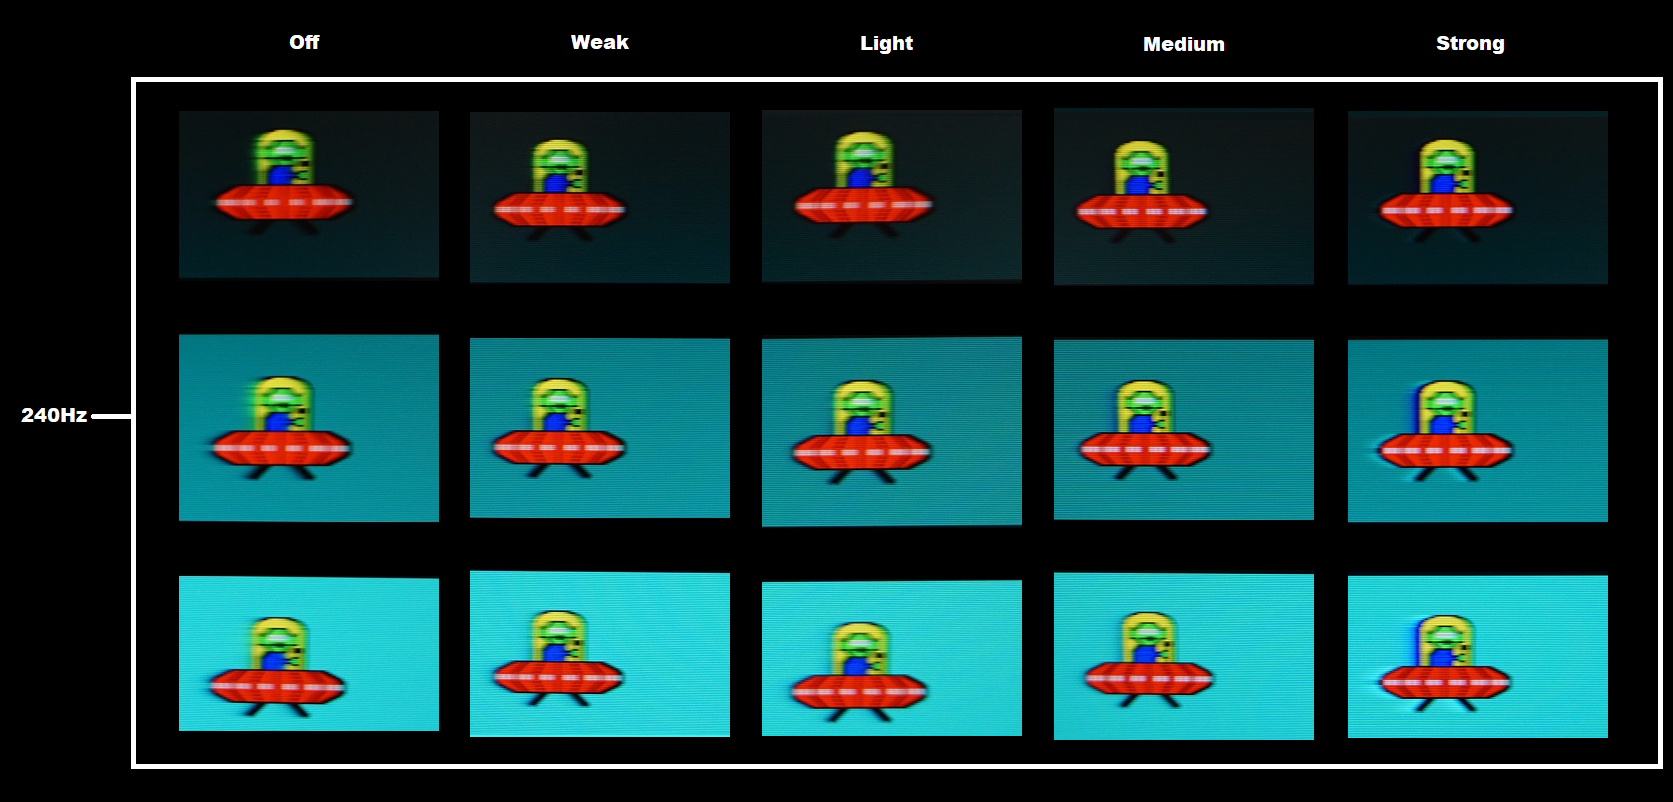
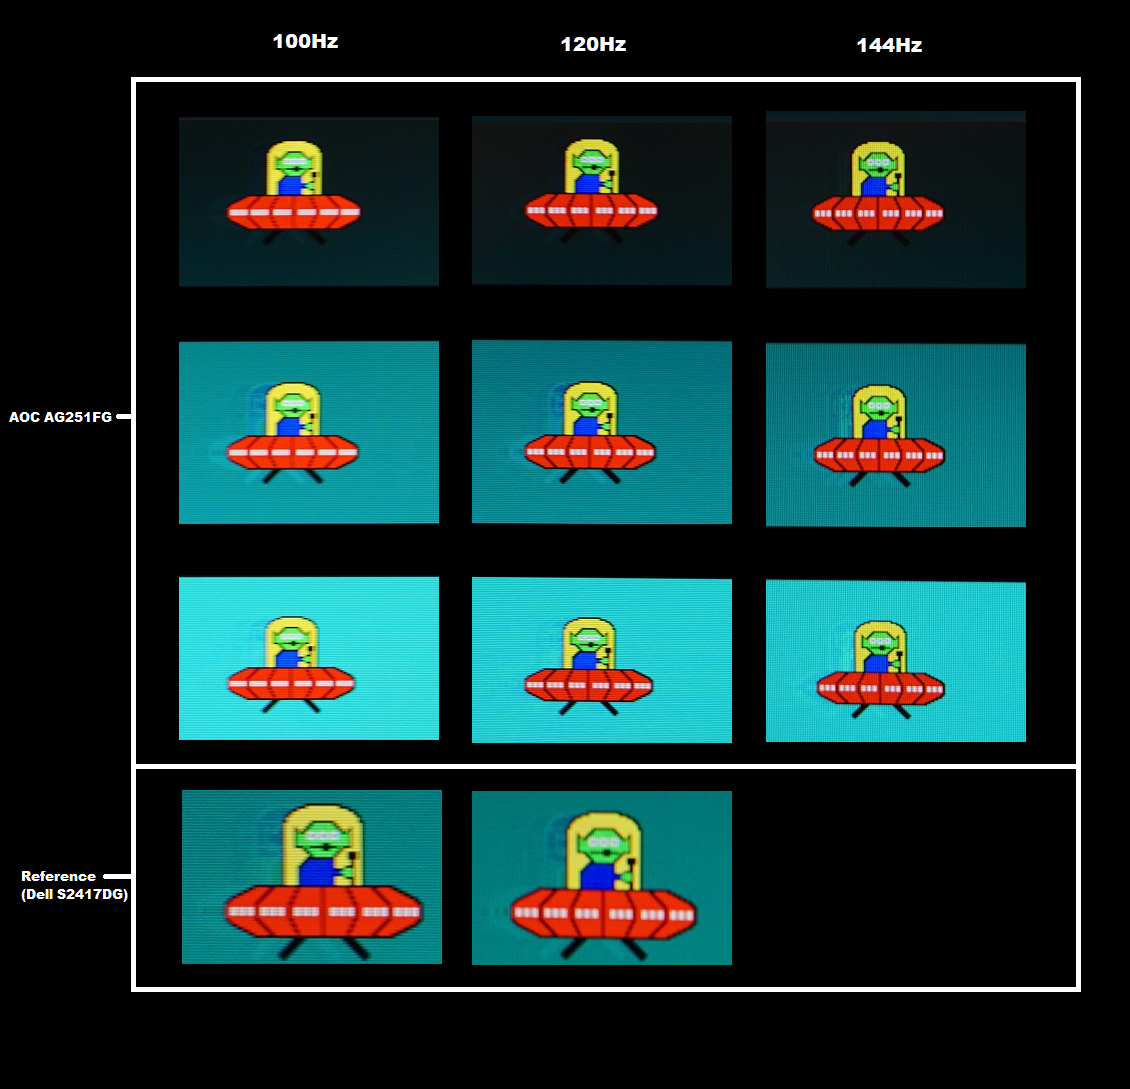
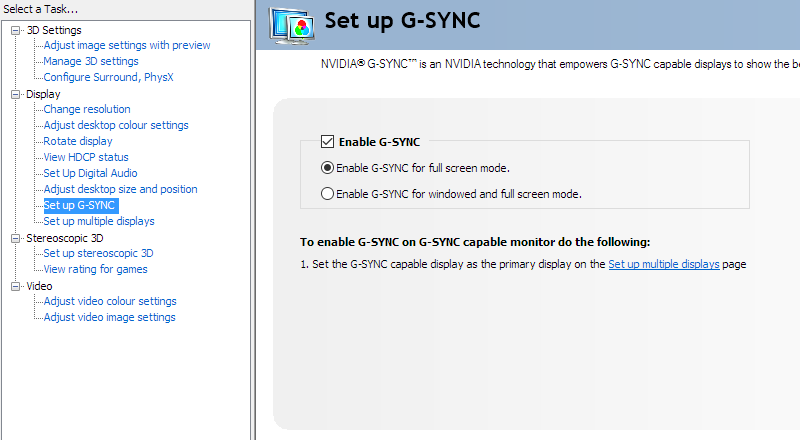
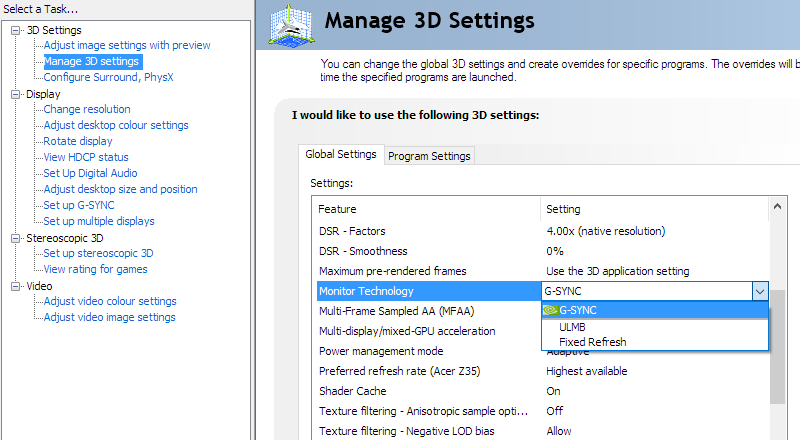
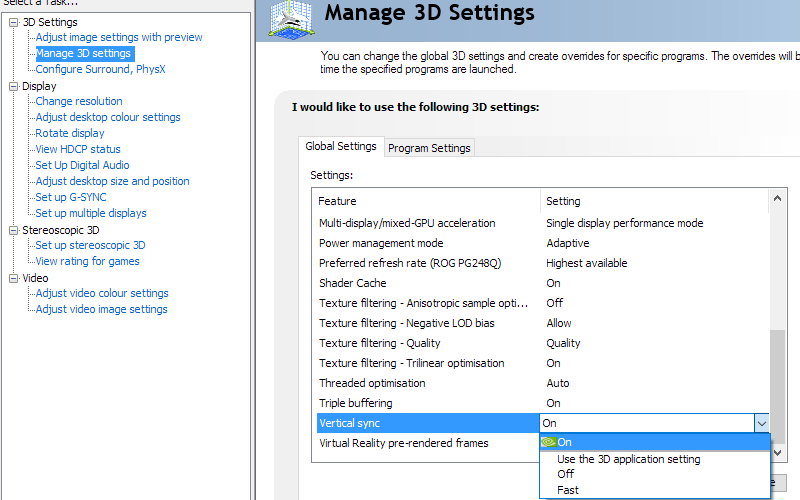
We also used the Spyder5ELITE to assess the white uniformity of the monitor, represented by 9 white quadrants running with equal spacing from the top left to bottom right of the screen. The following table shows the deviation between each point and the brightest recorded point. The luminance uniformity was variable, with some decent patches and slightly worse areas of uniformity. The brightest point recorded was ‘quadrant 9’ towards the bottom right of the screen (166.9 cd/m²). The greatest deviation from this occurred at ‘quadrant 4’ to the left of centre (140.8 cd/m², which is 16% dimmer than centre). Elsewhere deviation from the brightest point was 4 – 15%. It’s important to remember that individual units vary in their uniformity and that further deviation can be expected beyond the points measured here. Also note that the viewing angle limitations of the TN panel introduce differences in perceived luminance that aren’t accounted for in these measurements. Perceived brightness changes depending on which part of the screen you’re looking at. The contour map below shows these deviations graphically. In this graphic, darker greys represent lower luminance and hence greater deviation from the brightest point than lighter greys. The percentage deviation between each quadrant and the brightest point is also given. Due to the aforementioned viewing angle limitations, we will not be providing colorimeter-based analysis of the colour temperature uniformity on this monitor. Perceived differences in colour temperature due to viewing angle can be quite pronounced, even from a normal viewing position. Any readings provided here would therefore have the potential to be highly misleading. On Battlefield 1 (BF1) the monitor put in a decent contrast performance overall. When observing dark scenes, the level of detail was as it should be for most of the screen (particularly centrally). Due to the viewing angle related perceived gamma changes, the level of detail decreased further up the screen so that a lot of detail was masked (perceived gamma raised). Building interiors and the dark underside of bridges, for example, just looked like a mass of black without the sort of subtle details visible elsewhere on the screen. Further down the screen details were brought out in dark scenes; they were more visible than intended (perceived gamma lowered). There was no ‘IPS glow’ or anything of that nature, of course. Brighter elements, particularly white, stood out nicely against darker surroundings. The screen surface imparted slight but not heavy/smeary graininess. On Dirt Rally the contrast performance was again decent. As above, the level of detail was appropriate centrally but affected in different regions of the screen by perceived gamma variations. Particularly vertically. Car tire tread patterns, for example, looked very distinct when displayed at the bottom of the screen but completely indistinct near the top. The lack of ‘IPS glow’ helped give night scenes a decent depth and atmosphere overall, although the perceived gamma variations did affect this aspect. Brighter shades such as car headlights penetrated through the darkness nicely, with a bit of a a grainy look from the screen surface but nothing too obtrusive really. We also observed the contrast performance on the Blu-ray of Star Wars: The Force Awakens. This film has a lot of high-contrast scenes in it, whereby bright elements such as explosions and light sabers light up much darker surroundings. Whilst not a scratch on some VA models with much stronger contrast, the overall atmosphere in such scenes was pretty decent. The distinction between ‘bright’ and ‘dark’ was certainly there and the corners didn’t appear flooded from ‘IPS glow’ or anything like that either. The ‘darkness’ did again appear lighter lower down the screen due to the perceived gamma changes, but this wasn’t too extreme. The black bars at the top and bottom of this 16:9 letterbox format film helped a bit. That’s because the image itself did not occupy the extreme top and bottom where such perceived gamma changes are most pronounced. Lagom’s tests for contrast were used to more closely analyse contrast performance, highlighting weaknesses in quite a specific way. The following observations were made from a normal viewing position, around 70cm from the screen. The colour gamut of the AG251FG (red triangle) was compared with the sRGB reference colour space (green triangle), as shown in the image below. The monitor offers fairly comprehensive sRGB coverage (98%), with a sliver of under-coverage in the green and blue corners of this diagram. There is also a bit of over-extension for some green and red shades on this representation, which allows the monitor to output some shades in a slightly more vibrant way. On Battlefield 1 (BF1) colours looked fairly rich and natural on the whole. In that sense this model distanced itself from models with obvious low gamma problems, which provide an obviously ‘washed out’ look in comparison. There was the usual TN-related loss of saturation lower down the screen and higher saturation towards the top of the screen. Some greens of vegetation, for example, were represented in a rich and accurate way centrally, but appeared quite faded lower down the screen and too deep further up the screen. The overall look was again relatively rich, though, at least compared to the aforementioned TN models with poor central gamma handling. There were some decent vibrant oranges and yellows present as well, giving fire and explosions a fairly lively look. These didn’t have the same ‘pop’ as on some models with lighter screen surfaces and moreover larger colour gamuts, but were still quite eye-catching. On Dirt Rally things again looked quite natural and fairly rich in the colour department. The racing environments had a decent range of earthy browns and a nice palette of greens, although the saturation changes we observed elsewhere were of course still in effect here. This affected the ‘identity’ and individuality of shades and therefore affected the apparent shade variety, as well as giving some shades a bit of a faded look near the very bottom of the screen. Overall, though, things looked a lot more pleasing than on models with clear central gamma issues. There were also some fairly lively shades displayed for car paint jobs, such as bright reds and deep greens. These were again more impressive when viewed higher up the screen vs. near the bottom. Finally, we assessed the colour performance using the Blu-ray of Futurama: Into the Wild Green Yonder. With large areas of individual shade, this film highlighted the usual TN colour consistency weaknesses very readily. Many closely matching pastel shades, such as character skin tones, lost their individuality and identity due to the saturation levels varying depending on their on-screen position. The title still displayed these in a distinctly ‘pastel’ way overall and also had a good mix of deep and bright neon shades which were much more vibrant, as intended. We used Lagom’s tests for viewing angle to more closely analyse colour consistency and viewing angle performance. The following observations were made from a normal viewing position, eyes around 70cm from the screen. A sensitive camera and a utility called SMTT 2.0 was used to measure input lag on the AG251FG, by comparing to a number of monitors of known latency. Over 30 repeat readings were taken to help maximise accuracy. Using this method, we calculated 4.68ms (a little over 1 frame at 240Hz) of input lag. This figure is influenced both by the element you ‘see’ (pixel responsiveness) and the element you ‘feel’ (signal delay). It indicates a low signal delay which shouldn’t bother most users, including many competitive gamers. Note that we have no way to accurately measure input lag when G-SYNC is actively doing its thing. Our article on responsiveness analyses the key factors which affect monitor responsiveness, including the concept of ‘perceived blur’. This is something that is contributed to in part by the pixel responsiveness of the monitor, but often more significantly by the movement of your eyes as you track motion on the screen. A photography technique called ‘pursuit photography’ is also explored, which allows motion on a monitor to be captured in a way that accurately reflects both of these elements. A moving camera rather than a static camera is key to this, otherwise you are only capturing the pixel response element of perceived blur and not the influence of eye (camera) movement. The images below are pursuit photographs taken using the UFO Motion Test for ghosting, with the test running at its default speed of 960 pixels per second. This is a good practical speed to take such photographs at, highlighting both elements of perceived blur nicely. The UFOs move across the screen from left to right at a frame rate matching the refresh rate of the display. Four sets of photos are included. The first three sets show the monitor set to 60Hz, 144Hz and 240Hz, respectively. The final set shows the monitor set to 100Hz, 120Hz and 144Hz with ULMB (Ultra Low Motion Blur) active – an Nvidia-specific strobe backlight mode explored shortly. All three rows of the test (dark, medium and light background) are used to showcase a range of different pixel transitions. All of the ‘Overdrive’ settings of the monitor are tested. Where applicable, shots are provided for reference from a Dell S2417DG. This gives an indication of what things look like where pixel responsiveness isn’t really a limiting factor and it’s only really eye movement that contributes to perceived blur. This same reference screen is used with ULMB active for comparison, although as you can see there are pixel responsiveness related issues here in the form of fairly strong overshoot (inverse ghosting). The images above were captured with the monitor set to 60Hz. The image itself (UFO) is soft and blurry, indicating a moderate degree of perceived blur related to camera (eye) movement. You can also see some trailing behind the object to varying degrees, depending on the ‘Overdrive’ setting used and the transitions being performed (background colour’). The ‘Off’ setting gives the most obvious conventional trailing, with the ‘Weak’ setting dampening this a fair bit. The ‘Light’ setting offers further improvement, with just a faint ‘powdery’ trail remaining. The ‘Medium’ setting yields further improvement at 60Hz, with the trailing as good as eliminated really. The ‘Strong’ setting introduces an obvious colourful trailing – overshoot or inverse ghosting, caused by excessive levels of grey to grey acceleration. With the refresh rate increased to 144Hz, as above, the perceived blur is significantly reduced. The UFO appears sharper and less blurry, with better distinction on some of its bodywork details. The ‘Off’ setting has a fair amount of trailing behind the object, particularly for the dark (top row) and medium (middle row) backgrounds. The ‘Weak’ setting cuts back on this significantly, with just a slight powdery trail remaining. The ‘Light’ setting cuts back on this just a little bit, whilst the ‘Medium’ setting yields slight further improvement. For the dark background there is no real visible trailing now, although the medium background and to a lesser extent light background shows a little bit of overshoot. The ‘Strong’ setting again introduces obnoxious levels of overshoot, with obvious bright and colourful trailing behind the UFO. Increasing the refresh rate again to 240Hz, with the test now running at 240fps, yields further improvement. The details on the UFO are now more sharply defined, with the white dots and segments of the body being more distinct. With the ’Off’ setting there is a fair bit of trailing behind the UFO, particularly for the medium background, which adds to the perceived blur. The ‘Weak’ setting offers significant improvement, with the conventional trailing reduced massively. There is some conventional trailing for the medium background in particular and a little bit of overshoot for the medium and light backgrounds. The overshoot is visible as a faint silhouette behind the object. The ‘Light’ setting gets rid of any remaining conventional trailing but slightly increases the overshoot (it remains very weak, however). The ‘Medium’ setting provides stronger overshoot, particularly for the medium background where there is a dark blue fringe behind the object. The ‘Strong’ setting provides very colourful and eye-catching overshoot whilst yielding no particular advantage in terms of perceived blur. Although this testing with TestUFO is fairly comprehensive and there’s a lot to absorb from the testing, it’s by no means a complete test. There are many more transitions between many different shade levels that are not assessed here, but which will crop up when gaming on the monitor. From this assessment, though, it seems that at 60Hz and 144Hz the ‘Medium’ setting is optimal with ‘Light’ a close second. At 240Hz, though, the ‘Medium’ setting introduces overshoot that’s just a bit too strong and therefore ‘Light’ is the preferred option. There is no real benefit to ‘Medium’ over ‘Light’ for these particular transitions. In practice we felt that the overshoot of ‘Medium’ outweighed any perceived benefits from slightly faster pixel responses over ‘Light’ at very high refresh rates. And indeed the ‘Light’ setting provided a decent performance regardless of refresh rate. The ‘Weak’ setting was not suitable for the highest refresh rates in our view due to some transitions appearing noticeably slower and a fair bit of additional trailing being introduced as a result. Last but not least, we take a look at the results with ULMB active. With ULMB active, you can see that the object itself is exceptionally crisp and detailed, getting progressively more so as refresh rate is increased. At 120Hz the details are very distinct. A good thing to focus on to get an idea of the clarity increase as refresh rate is increased is the triplet of white blobs on each segment of the UFO. At 100Hz they blend together and are not distinct (they are on the reference – possibly due to slight lower brightness or different exposure levels). At 120Hz they are distinct but still slightly broader and blended in than is ideal. At 144Hz they are sharp and distinct – compare this to the monitor running without ULMB active, even at 240Hz, and you’ll see the edge in motion clarity that ULMB offers even at a lower refresh rate. There is no conventional trailing, but there is a fair amount of overshoot visible. Due to the backlight strobing at a frequency matching the refresh rate of the display, the overshoot is sometimes visible as two discrete trails rather than a continuous blur as well. The overshoot is most noticeable with the medium background, perhaps marginally weaker at 144Hz if you look at the initial trail. The reference (Dell S2417DG, ULMB active) has a little less overshoot when compared to the medium background at the same refresh rate. But it isn’t a massive difference. As we explore later, the overshoot is certainly a feature when ULMB is active – not just on this model but all that use the technology. However; the reduction in perceived blur is still an advantage. On Battlefield 1 (BF1) the experience was very fluid indeed, where the frame rate kept up with the 240Hz refresh rate. The monitor is pumping out up to 4 times as much information every second as a 60Hz monitor, twice as much as a 120Hz monitor and ~1.67 times as much as a 144Hz monitor. This gives a superior ‘connected feel’ as you interact with the game world; your character movement on this game translates to movement or other changes within the game world rather seamlessly. The other key advantage of the monitor pumping out so much information every second is that it significantly decreases the time that the eye spends moving whilst tracking motion on the screen. This in turn massively reduces perceived blur. In both respects we did feel a difference compared to a fast 144Hz model (or indeed running this model at 240Hz), although the difference was not as pronounced as when stepping up from 60Hz to 144Hz. We wouldn’t say this provided a competitive edge and for most users, and they’d find it preferable to maintain a relatively low frame rate (i.e. closer to 144fps) with superior graphics settings vs. ~240fps with lower settings. For competitive gamers, though, the edge in terms of connected feel and lower perceived blur will be welcome. The other aspect to consider when it comes to perceived blur, pixel responsiveness, was also very pleasing overall on this monitor. The vast majority of pixel transitions were snappy enough to provide an optimal 240Hz experience, without noticeable trailing or indeed overshoot (using our preferred ‘Overdrive’ setting). There were some very minor weaknesses, but nothing that significantly impacted perceived blur levels. There was a small amount of faint ‘powdery’ trailing in places, such as during some high contrast transitions between very light and very dark shades. This was a very short, sharp and faint trailing that would escape the notice of most users and do little to impede their gaming enjoyment. This was preferable to the more noticeable overshoot that crept in using the ‘Medium’ overdrive setting, in our opinion. That isn’t to say there was no overshoot at all using our preferred ‘Light’ setting, but it was really very faint indeed. There was a slight semi-transparent ‘snail slime’ type trail behind some medium-dark objects such as dark grey buildings cast against a lighter sky. We didn’t find this at all eye-catching and it’s not something the vast majority of users are even likely to notice. Given the depth of analysis on BF1 above, we don’t have a lot to add about the experience on Dirt Rally. Whilst hardened race fans who use a proper controller (particularly a steering wheel) would appreciate the increase in ‘connected feel’ brought about by 240Hz at suitably high frame rates, this didn’t really translate for us whilst using the keyboard. Nonetheless, the decrease in perceived blur was a nice addition. We again felt that the increase from 60Hz to 144Hz (at corresponding frame rates) was more noticeable and beneficial than from 144Hz to 240Hz. Indeed, it was very difficult to maintain anywhere near 240fps on our system without killing the graphics so much that the game was barely recognisable. Looking more like an old console title than the Dirt Rally we know. There were no obvious weaknesses in pixel responsiveness nor any obvious overshoot. The same sort of very minor weaknesses we have already explored were there, perhaps most noticeable but still entirely unobtrusive at night where some of the more high-contrast transitions came into play. It’s very important to realise, though, that they were so minor that we had to concentrate to find them and would usually crash the car in the process. In other words; they’re unlikely to even be noticed by users just playing the game normally and we’re just mentioning them for completeness. We also tested our Blu-ray test title, which run at around 24fps and are therefore inherently limited in their fluidity. Nonetheless, the monitor did not impose any limitations in terms of pixel responsiveness as there was no noticeable trailing or overshoot related to imperfections there. The fact that 24 divides nicely into 240Hz was also beneficial in terms of reducing juddering when compared to 60Hz monitors running the same 24fps content. Some models exhibit what we refer to as ‘interlace pattern artifacts’, which are reasonably common on models with high refresh rates. These artifacts can also be referred to as ‘inversion artifacts’ or ‘scan lines’. Sometimes static interlacing patterns are visible, whereby shades are broken up into thin (often vertical) lines that alternate between a slightly lighter and slightly darker variant of the intended shade. Dynamic interlacing patterns may also be observed, sometimes appearing as a grid or mesh or an ‘interference pattern’ when motion is observed on the monitor. Whilst the AG251FG was free from obvious static interlace pattern artifacts, it did suffer from dynamic interlace patterns. When movement was observed on the screen, the image sometimes appeared to break up into an interference pattern composed of vertical pinstripes. We found it quite noticeable, but at the same time didn’t find it overly distracting and soon forgot about it when simply focusing on gaming. At 60Hz these patterns become more obtrusive, seeming to move on their own as a sort of shimmering interference mesh. It’s worth remembering that how obvious a user finds these patterns depends on the viewing distance, their eyesight and sensitivity to such things. Nvidia G-SYNC is a variable refresh rate technology that can be activated when specific compatible Nvidia GPUs are connected to compatible monitors (such as the AOC AG251FG). Our article on the technology explores how it works and the sort of benefits it can bring, so we won’t be repeating too much of that. Essentially the technology allows the monitor to dynamically adjust its refresh rate to match, where possible, the frame rate outputted by the GPU. When the two are in sync it gets rid of the tearing (VSync off) and stuttering (VSync on) that occurs when the two are desynchronised. An additional benefit for those who hate tearing and usually like to use VSync is a reduction in latency compared to ‘VSync on’ in the variable frame rate environment. As noted in the responsiveness section, though, we don’t have a way to accurately measure this. This monitor supports G-SYNC via DP 1.2 (DisplayPort), once connected to a compatible Nvidia GPU such as the GTX 1070 on our test system. Once connected up everything should, in theory, be automatically configured for you so G-SYNC is ready to use. There’s usually even a little notification icon in the system tray telling you that a G-SYNC compatible display is detected. To check everything is configured correctly, open Nvidia Control Panel and navigate to ‘Display – Set Up G-SYNC’. Ensure that the checkbox for ‘Enable G-SYNC’ is checked, then select your preferred operating mode. As the image below shows, this technology works in both ‘Full Screen’ and ‘Window’ modes, provided the correct option is selected for this. If the G-SYNC options seem to be missing from Nvidia Control Panel, this may be remedied by reconnecting the GPU or possibly connecting the monitor to a different DP output if there’s one available. If the options are still missing, reinstalling the GPU driver or updating this is recommended. Next you should navigate to ‘Manage 3D settings’. Here there are a few settings of interest, the first of which is ‘Monitor Technology’. This should be set to ‘G-SYNC’ as shown below. Assuming this is all set up correctly, you should also see ‘G-SYNC’ written beside the resolution and refresh rate at the bottom of the OSD. The second setting of interest is VSync, which can be set to one of the following; ‘On’, ‘Use the 3D application setting’, ‘Off’ or ‘Fast’ (GPU dependent). If you select ‘On’, VSync activates if the frame rate exceeds the maximum refresh rate supported by the monitor (i.e. the G-SYNC ceiling of 240Hz / 240fps). If you select ‘Off’ then the frame rate is free to rise in an unrestricted way, but the monitor will only go as high as 240Hz – tearing and juddering will ensue if the frame rate rises above this. In our experience there are some titles that actually seem to work incorrectly if a graphics driver-enforced VSync option is selected. Battlefield 1 is one such example, although this may have been some sort of bug with the graphics driver or current game version we were running. We found ‘Use the 3D application setting’ and selecting the option in-game works exactly as it should. The ‘Fast’ option is available on some newer GPUs, such as the GTX 1070 used in our test system. This enables a technology called ‘Fast Sync’, which only applies above the refresh rate and frame rate ceiling (>240Hz / 240fps). Below this G-SYNC operates as normal, whereas above this a special version of VSync called ‘Fast Sync’ is activated. This is a GPU rather than monitor feature so isn’t something we will explain in detail, but it is designed to reduce tearing at frame rates well above the refresh rate of the monitor. If you’re interested in this technology, which may be the case if you play older or less graphically demanding games at very high frame rates, you should watch this section of a video by Tom Petersen. If the frame rate drops below the lowest refresh rate supported by the monitor (i.e. the G-SYNC floor of 30Hz / 30fps) then the monitor sets its refresh rate to a multiple of the frame rate. If for example the game ran at 20fps, the monitor would set itself to 40Hz. This keeps stuttering and tearing from mismatches in frame and refresh rate at bay and is something that happens regardless of what you set VSync to. As we explore shortly, though, low frame rates are low frame rates regardless of the technology. So whilst it is always beneficial to have stuttering and tearing removed, it’s also beneficial to have an elevated frame rate where possible. It’s also worth remembering that G-SYNC can’t eliminate stuttering caused by other issues on the system or game environment such as insufficient RAM or network latency. We ran a broad range of game titles on the monitor and found G-SYNC working as intended on all of them. Rather than sharing our experience on each individual title, which would be rather tedious, we’ll instead focus on a single title; Battlefield 1 (BF1). This has a good range of graphical options and can be graphically rather taxing depending on the settings used. As such it allowed us to test the full spectrum of frame rates and refresh rates supported by G-SYNC on the AG251FG. Regardless of the graphics settings used, it was difficult to maintain a constant 240fps with our GTX 1070 – in fact sometimes the game was quite CPU limited, so even a more powerful GPU on our system wouldn’t have helped. With rather low settings, though, it was possible to get a fairly consistent 200fps+. Without G-SYNC, tearing and stuttering was not too pronounced at such high frame rates; but it was still there. It was certainly noticeable when we activated the technology. And indeed, we could detect that the technology wasn’t active when we thought it was (our fault, not the monitor). It was nice to have the niggling stuttering and tearing ironed out, certainly. If we opted for higher graphics settings or found ourselves in scenarios in the game that strained the whole system, there were times when frame rate dropped below this – sometimes closer to 100fps than 200fps. At these sorts of frame rates we found the stuttering and tearing without G-SYNC more pronounced and therefore found the technology even more beneficial. It just kept things flowing and was nice to have. Regardless of this, the drop in frame rate took its toll by noticeably increasing perceived blur and decreasing the ‘connected feel’. Granted, both elements remained relatively good – 100 – 200fps is hardly a low frame rate. If we pushed the graphics settings further and found the frame rate dipping below 100fps, sometimes closer to 50fps, the increase in perceived blur and decreased ‘connected feel’ became significant drawbacks regardless of G-SYNC. Then again, the removal of tearing and stuttering was of considerable benefit as well. Tearing and stuttering are things that that many users would find quite obnoxious at such low frame rates. At times the frame rate even dropped below 30fps, at which point the monitor set its refresh rate to multiples of the frame rate. This did indeed prevent tearing or stuttering from mismatches in the two, but the experience was quite painful to endure due to obvious lack of fluidity. We’d also like to add that the monitor was free from obvious overshoot even as the frame rate dropped, which is something we often see on G-SYNC models but not necessarily FreeSync models. To wrap up this section, we certainly enjoyed the addition of G-SYNC of this monitor and found it beneficial regardless of frame rate. We found the benefits most pronounced at frame rates that were a fair bit lower than the 240fps maximum supported by the monitor, however. At these very high frame rates we found tearing and stuttering noticeable but not overly bothersome, at least compared to lower frame rates. AMD users, who can’t use G-SYNC but can still benefit from the low input lag 240Hz screen, would likely find the experience quite decent at these nice high frame rates. We also found that, as frame rate dropped, particularly into the double digits, the increase in perceived blur and decreased ‘connected feel’ was a bitter pill to swallow. The lack of tearing and stuttering was still a nice addition, though. It’s worth remembering that sensitivity to tearing and stuttering varies, so some users will find the addition of G-SYNC to be essential, others will find it ‘nice to have’ and some will not really see or feel the benefit. ULMB (Ultra Low Motion Blur) is another proprietary Nvidia technology which can be enabled instead of G-SYNC on compatible models. This is a strobe backlight technology specifically designed to reduce motion blur using the mechanism described here. Essentially the backlight rapidly pulses on (‘on phase’) and off’ (‘on phase’), with the ‘on’ phases being much briefer than the ‘off’ phases. This strobing behaviour greatly reduces the amount of time that your eyes spend tracking motion on the screen. As it is eye movement that is the most significant contributor to perceived blur on a modern monitor, the perceived blur is greatly reduced. ULMB requires a compatible Nvidia GPU and we would again like to stress that this option can’t be activated at the same time as G-SYNC. ULMB can be enabled by first setting the monitor to 100Hz, 120Hz or 144Hz via Windows or the Nvidia Control Panel. The next step is to navigate to ‘Manage 3D settings’ in the Nvidia Control Panel and select ‘ULMB’ for ‘Monitor Technology’ as below. There is also a ‘ULMB’ setting in the ‘Extra’ section of the OSD of the monitor, which should be enabled – this generally happens automatically if the monitor is set to an appropriate refresh rate and driver option anyway. An additional setting called ‘Pulse Width’ can be configured in the OSD, which adjusts the length of the ‘on phase’. A lower setting reduces the length of the ‘on phase’, resulting in a dimmer image but potentially offering further improvement in motion clarity. Most users will find the clarity to be excellent even with the default setting of ‘100’, but given the fairly high brightness potential even with ULMB on this monitor, you may like to experiment with lower settings. The first sign that ULMB has activated successfully is that the screen will begin to flicker at a frequency matching the refresh rate, just like an old CRT. The image may appear a bit dimmer as explained earlier in the review, but it depends on the brightness setting you were using prior to activating it. If you open up the main OSD menu of the monitor you will also see ‘ULMB’ at the bottom, next to the current resolution and refresh rate. As soon as ULMB is active, the aforementioned flickering sets in. This is most noticeable at 100Hz, but still noticeable at higher refresh rates (sensitivity varies). In terms of brightness we felt the monitor did better than many models with strobe backlight technology enabled as we found it more than bright enough at ‘100’ brightness, even at 144Hz. In fact we settled for a lower brightness. It was clear (pun intended) from the UFO Motion Test pursuit photographs earlier on in the review that perceived blur was dramatically reduced with ULMB active. This was the case even at 100Hz but more so as refresh rate was increased. Because it provided the best ‘connected feel’ and lowest levels of perceived blur, plus the least flickering, we will focus our in-game testing for this section on 144Hz ULMB. We found the benefits shared amongst all of the game titles we tested, really, so will simply be focusing on Battlefield 1 (BF1). At 240Hz, without ULMB active, and provided the frame rate was suitably high, levels of perceived blur were already very low. Activating ULMB at 144Hz (with a matching frame rate) gave significant further improvement in this area, however. The level of detail that was sharply visible on the game, even when manoeuvring rapidly in a vehicle, was quite something. At the level we play at we found the clarity and perceived blur levels absolutely fine at 144Hz without ULMB (more so at 240Hz without ULMB), but we still noticed the significant step up with the technology active. It’s also interesting to see that the monitor supports 144Hz ULMB, as 120Hz was the limit for most monitors we’ve tested this technology on previously. This gave a slight potential improvement in both ‘connected feel’ and decreased perceived blur. It also marginally decreased flickering. So a nice but not exactly huge benefit there. There are several drawbacks to using ULMB, aside from the flickering – which some competitive gamers who gave for hours on end would not abide anyway. Firstly; there is a significant increase in the levels of overshoot compared to the optimal ‘Overdrive’ setting we used for our earlier testing. And indeed this setting is no longer adjustable. This is by no means unique to this monitor, but you can see bright and colourful overshoot in places much as demonstrated earlier on Test UFO. Some dark and dirty looking overshoot is also visible for some transitions. Secondly; the frame rate really has to match the refresh rate exactly for a pleasant experience. Stuttering (or indeed tearing and juddering) is painfully obvious if the frame rate departs at all from this, as the levels of perceived blur are so extremely low that these imperfections aren’t masked. There’s no G-SYNC to fall back with ULMB active. Last but not least; the ‘connected feel’ isn’t as good at 144Hz as it is at 240Hz. We’ve already explored this fact. There is no such thing as 240Hz ULMB on this monitor, so that is another sacrifice that users would have to make if they opt for ULMB. The preference for ULMB over G-SYNC, or the other way around, is quite an individual one. Most will probably prefer G-SYNC, especially given that this is a 240Hz monitor, but it’s nice to have ULMB as an option still. Having tested a number of monitors with ever-increasing refresh rate, it’s quite interesting to see what exceptional refresh rates like 240Hz really bring to the table. But first, we’ll consider other attributes which we consider important – those related to static image quality. The contrast performance was decent and much as we’ve come to expect from a modern TN panel. The static contrast was quite close to the specified 1000:1 and there was no ‘IPS glow’ or anything of that nature to mar the experience. There were perceived gamma shifts even from a normal viewing position, though, which revealed extra detail in dark areas lower down the screen. And masked some detail in dark areas higher up the screen. The screen surface was also the ‘usual’ medium matte anti-glare, providing a slightly grainy look to the image without harsh and smeary graininess. Being a TN panel, colour reproduction suffered from the usual viewing angle related pitfalls. Even from a normal viewing position you could see that saturation was weaker lower down the screen, whilst depth was excessive higher up the screen. Overall, though, the monitor was quite well set up out of the box. Unlike some high refresh rate TN models, average central gamma was more or less where it should be – so it avoided the obvious ‘washed out’ look that plagues some models. Although we had no cause to use them in our testing, 3 gamma settings are included as well so users can adjust this to a degree if they’re unsatisfied with the default setting. This is clearly a monitor built for speed, though, and really it was very impressive in terms of responsiveness. Input lag was very low, lower than on the ViewSonic XG2530 that we tested shortly before this one. Pixel responsiveness was nicely tuned as well, with the vast majority of pixel transitions were performed fast enough for optimal 240Hz performance. There were only a few minor weaknesses, but nothing that hampered our enjoyment of the exceptionally fluid 240Hz experience. G-SYNC also worked much as we hoped it would to rid the experience of tearing and stuttering where frame rate parted ways with refresh rate. The pixel responsiveness remained quite well tuned even as frame rate dropped, too, free from obvious overshoot. This is something that hampers many models that use Adaptive-Sync and hence AMD FreeSync. The alternative operating mode for the very lowest levels of perceived blur, ULMB, also featured. This worked in much the same way we’ve seen previously. There was plenty of brightness, more so than we usually see with ULMB, whilst 144Hz was also supported to give a bit of a boost over 120Hz. In summary, this monitor delivered on its promise of being exceptionally responsive. It was very capable of delivering a solid 240Hz performance, with little compromise, for users of both AMD and Nvidia GPUs. The green camp can also benefit from G-SYNC or ULMB, which are of course key features of the monitor. The usual TN image quality compromises aside, it delivered quite decent image quality overall as well. As is pretty much expected in a monitor of this class, ergonomic flexibility was also pleasing – with small additions like a retractable headphone hook and sideward facing USB 3.0 ports as well. Some may find the resolution rather restrictive, dislike the TN panel or simply scratch their head over the price. Then again, for competitive gamers or those whom value responsiveness above all else this monitor is certainly a strong contender. The bottom line; an exceptionally responsive monitor with some nice Nvidia-specific features and decent image quality once you accept it’s ‘still a TN panel’ – the restrictive resolution and price may turn some users away, though.

Luminance uniformity table

Luminance uniformity map
Contrast in games and movies
Lagom contrast tests
Colour reproduction
Colour gamut

Colour gamut test settings
Colour in games and movies
Viewing angles
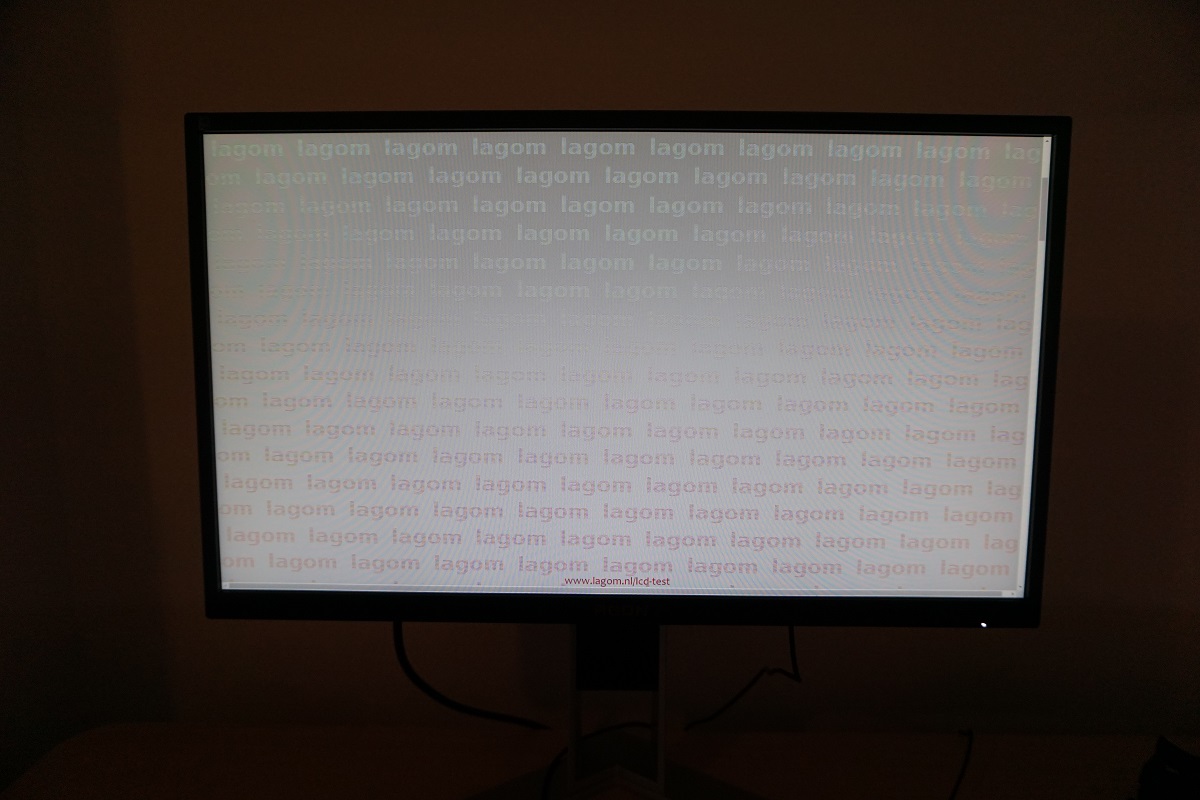
The video below shows the results of the Lagom text test, a mixed desktop background and dark desktop background from a variety of viewing angles. You can see obvious shifts in the Lagom text striping as viewing angle is changed. For the mixed desktop background, there are pronounced contrast and brightness shifts and even some colour inversion vertically at extreme angles. For the dark background there is a silver or golden sheen that blooms out more noticeably from sharp angles. We refer to this as ‘TN glow’, which isn’t visible from a normal viewing position and is never as intense as ‘IPS glow’ from a given viewing position. All of these viewing angle characteristics are typical for TN models.
Responsiveness
Input lag
Perceived blur (pursuit photography)
Responsiveness in games and movies
Interlace pattern artifacts
G-SYNC – the technology and activating it
Enable G-SYNC
Set Monitor Technology to G-SYNC
Set VSync according to preferences
G-SYNC – the experience
ULMB – the technology and activating it
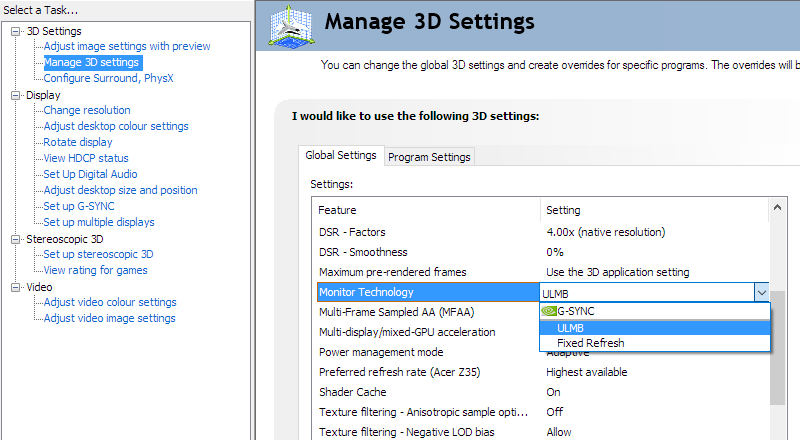
Set Monitor Technology to ULMB
ULMB – the experience
Conclusion
Positives Negatives Good default setup without problematic central gamma, avoiding the ‘washed out look’ of many of its 144Hz counterparts
The usual TN viewing angle limitations, which affect colour consistency and affect perceived gamma and saturation and different areas of the screen
Decent contrast performance overall, as expected for a TN model with a reasonable static contrast ratio and no ‘IPS glow’ to hamper the experience Perceived changes in gamma affect visibility in dark areas at different points of the screen. The slightly grainy screen surface also affected the apparent clarity of lighter shades The input lag is low and the monitor is well tuned for a good 240Hz experience, in terms of pixel responsiveness. G-SYNC and ULMB also work as intended, giving some Nvidia users some nice bonuses to the gaming experience
Some slight weaknesses in pixel responsiveness, but nothing to worry about or that most of users would notice – even competitive gamers Fairly unfussy design for a gaming monitor and good ergonomic flexibility. Although expensive, it does undercut competing 240Hz G-SYNC models by a fair bit
The OSD is not as feature-rich as some models. Expensive for a Full HD TN model
![]()

