Author: Adam Simmons
Date published: October 9th 2012
Table of Contents
Introduction
Samsung have really come into their own when it comes to the styling of their monitors. Their ‘7’ and ‘9’ series 3D and ‘Smart’ models show a unique and adventurous styling that has been turning a lot of heads. Prior to that they launched models such as the P2450H and XL2370 which really stood out from their competitors both outside and in. Their ‘business’ and ‘professional’ line-up has traditionally had quite a sensible and somewhat plain look in comparison. They broke the mould just a little bit with the SA850 series which was the first of their monitors to showcase their new PLS (Plane to Line Switching) technology. This panel technology is designed to compete with LG’s increasingly ubiquitous IPS (In-Plane Switching) technology by offering strong colour reproduction characteristics.
The company’s newest ‘Professional’ offering, the Samsung S27B970D (or SB970), combines this no-nonsense PLS technology with a sleek and eminently stylish design. With a combination of polished aluminium and edge-to-edge glass the SB970 is designed to be the centrepiece and talking point of the whole system. But features and specification certainly haven’t taken a back seat. As we explore below there are a lot of ‘talking points’ from a technical point of view, but how does this translate when it comes to the all-important performance? This exactly what we intend to find out.
Specifications
The monitor features a 27″ PLS panel with WLED backlight and 2560 x 1440 resolution. This gives the monitor wide viewing angles (178 degrees specified) and a native 8-bits per subpixel colour output. The monitor also features a 16-bit LUT (Look-Up Table) and supports hardware calibration to correct for gamma, colour and screen uniformity. As we explore each unit comes with some degree of factory calibration already – and Samsung promises a minimum of 10% deviation between the brightest and darkest point on the screen when running this calibration.
There’s also grey to grey acceleration, with a 5ms grey to grey response time quoted. This provides some flexibility by enhancing the motion performance and broadening the potential scope of the monitor. It is clear that this is designed to be a high-end monitor, with a price tag to match. There is of course a lot more to this monitor than its basic on-paper specifications. Nonetheless the key ‘talking points’ of the specification have been highlighted in blue for your reading convenience.
Features and aesthetics
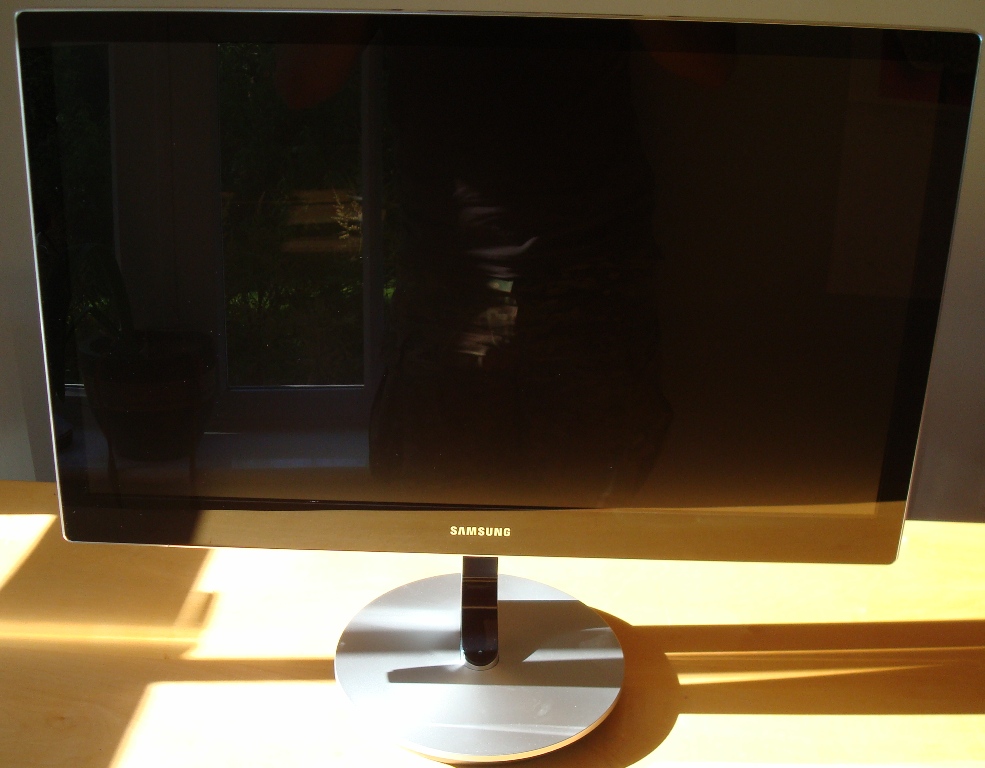
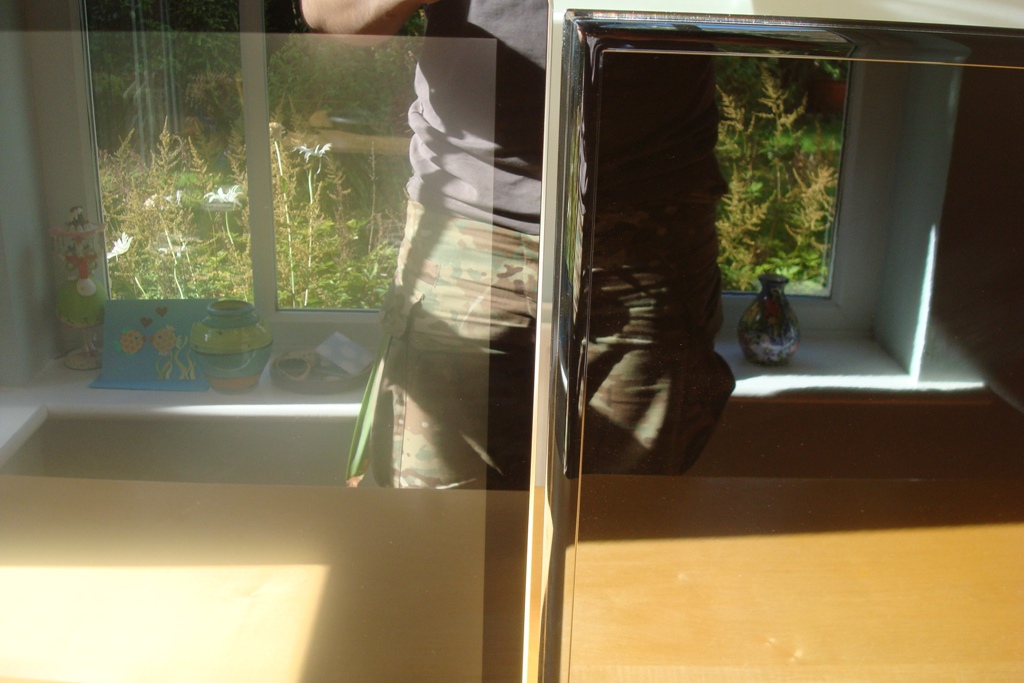
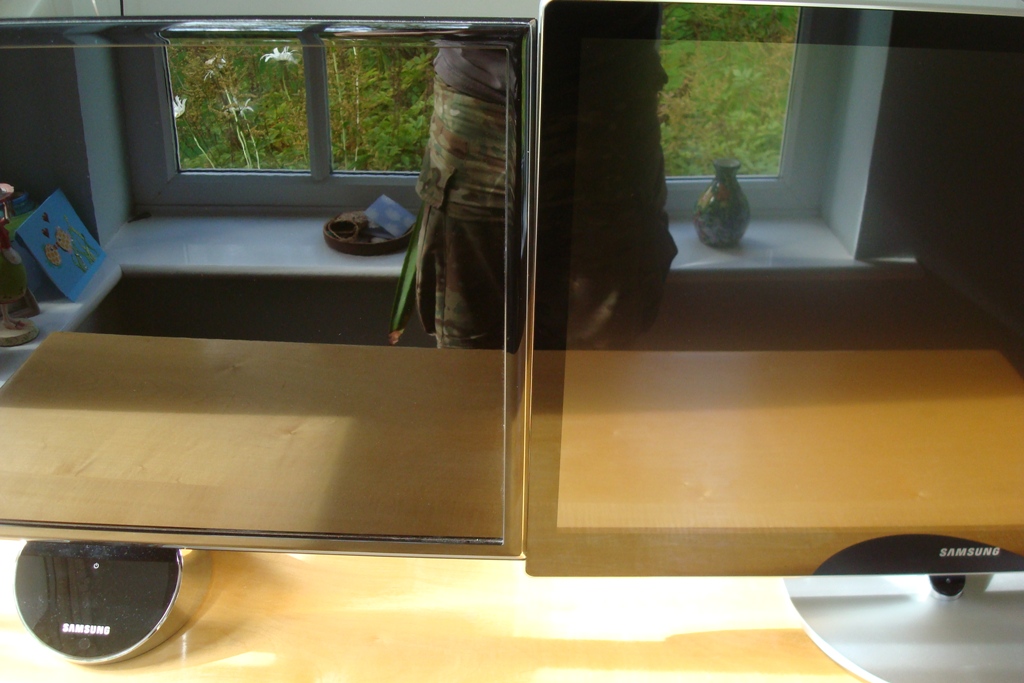
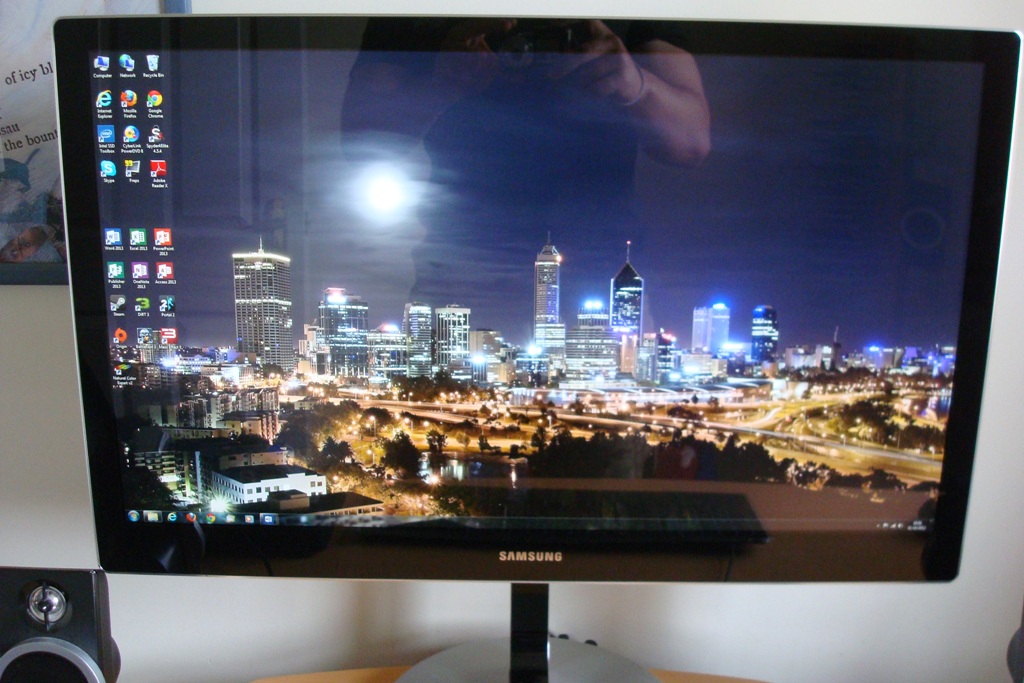
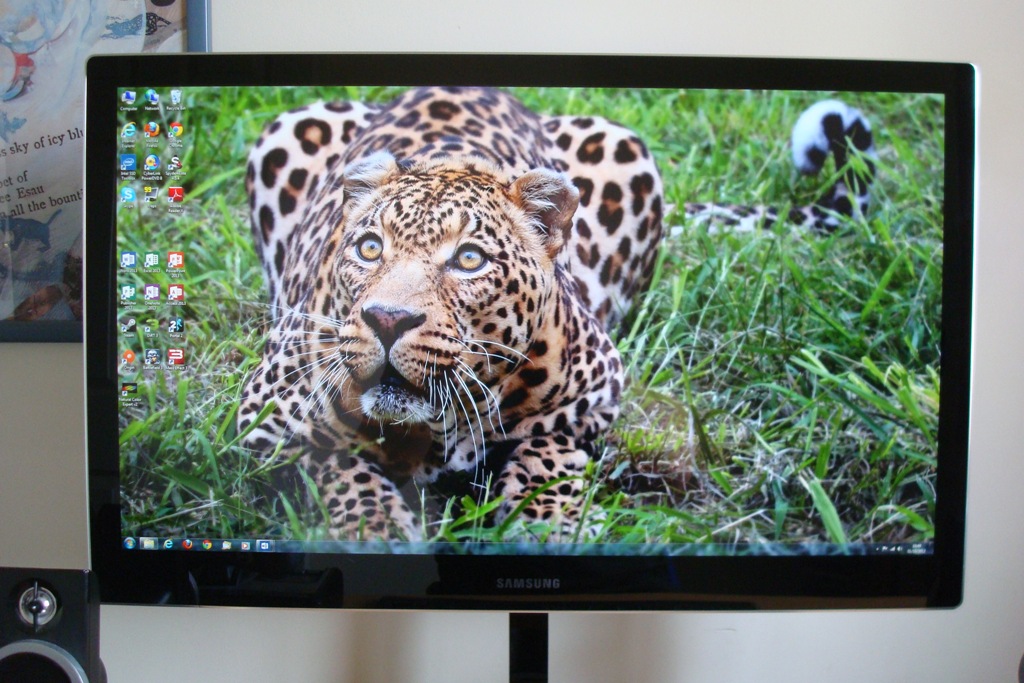
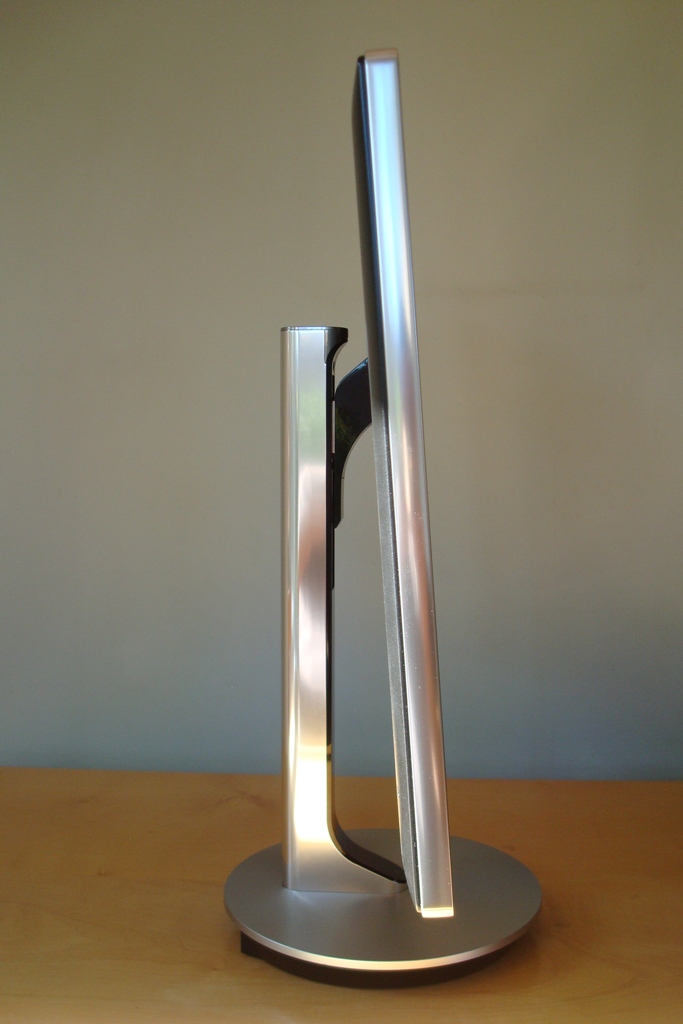
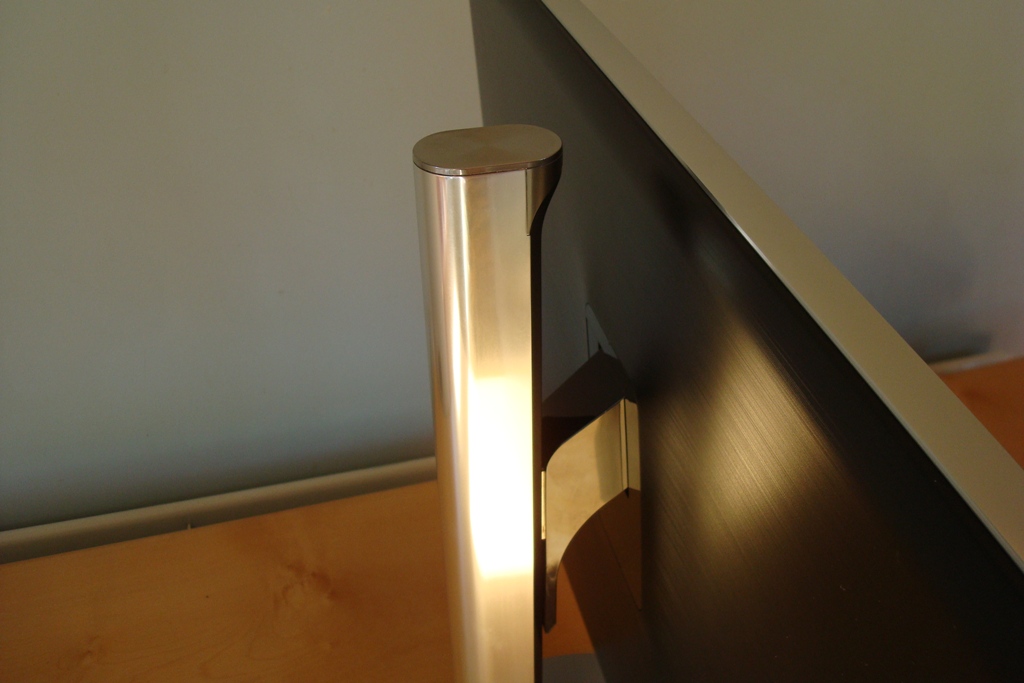
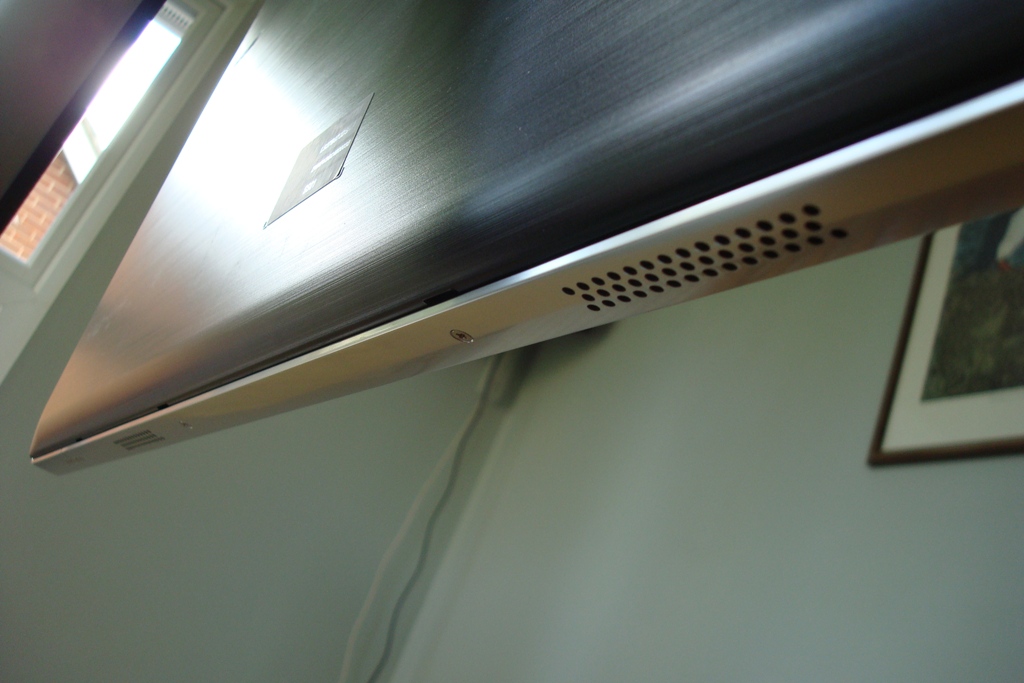
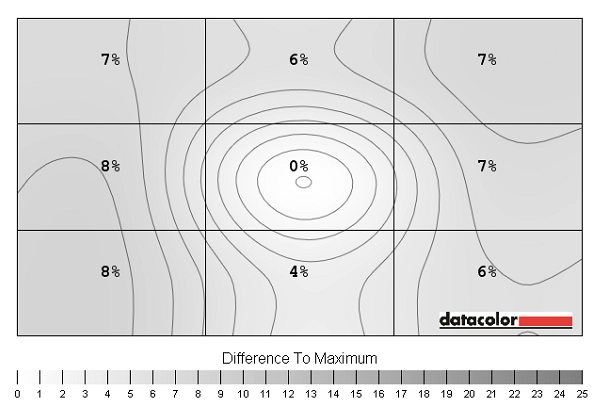
“Elegant”, “stylish”, “beautiful” and “stunning” – all words people have used to describe the Samsung S27B970D. The front of the monitor features a seamless edge-to-edge glass coating. The bezel is slightly thicker than you would see on some other recent models (around 23mm at the side) to make sure this glass cover remains firmly in place. That doesn’t really detract from the premium look, especially with the attractive layer of machined aluminium surrounding the screen. The first image shows the SB970 with its ‘Crystal Clear’ glass next to the SA750 with ‘Ultra Clear’ anti-reflective surface treatment. The second image shows the monitors reversed to account for slight differences in lighting across the room. The ‘Ultra Clear’ surface has been explored in various articles and reviews on the website and has been shown to offer superior reflection reduction characteristics compared to some other typical glossy surfaces. It appears that, if anything, the ‘Crystal Clear’ surface is even more effective at combating reflections. We had hoped to provide a comparison with the Apple LED Cinema Display which features an untreated glossy surface with no additional anti-reflective or anti-glare properties – but this was required for some work elsewhere. To show how things appeared in more realistic and workable conditions we have included the photographs below which show the monitor displaying a dark image on the desktop and then a mixed image on the desktop. Light is coming in through a side window on a fairly bright day but there is no strong direct light hitting the screen. These photos were taken using our ‘test settings’ and show that reflections are reduced when the screen is on and there isn’t a window facing the screen – this is particularly true when it’s displaying brighter content as the second image illustrates. If you look carefully at the monitor when it’s switched on you can actually see a very faint misty texture on the lightest colours. There is probably good reason other reviewers didn’t mention or even notice it. It is exceptionally fine (less noticeable than on the lightest ‘semi glossy’ screen surface out there) and doesn’t really detract from the excellent clarity of the screen. This is still very much a glossy screen and the suitability of this in your working environment should be considered. Further down the screen you will find the circular stand base. This is topped with a silver matte plastic finish. This gives an appearance of brushed metal but is more durable and scratch-resistant. The touch-sensitive OSD (On Screen Display) controls are also found here, on the stand neck; source select (top left), menu (bottom left), up/contrast and brightness/volume (top right) and down/’Color Mode’ select. They are illuminated by ‘ice white’ LEDs that glow brightly for 60 seconds then become significantly dimmer. The power button is also touch sensitive but stays fully illuminated when the monitor is on and blinks when it is in a low power state. It isn’t bright enough or close enough to the screen to be distracting. The buttons are fairly responsive but a bit counter-intuitive in their operation; the menu button becomes ‘back’ and source select becomes ‘enter’. This seems to defy logic and takes a bit of getting used to. The video below gives a rundown of the main features of the menu and also the two ‘quick menus’ accessible using the up and down arrows. If connected via HDMI or DisplayPort the down arrow opens up a volume control menu whereas if connected via DVI it opens up a contrast and brightness menu. At the side of the monitor the premium look really shines through. The machined aluminium runs right around the edge of the screen and the stylish polished aluminium stand can be seen behind. The screen itself is sleek and elegant – it is the LED backlight, an external power converter and electronics situated in the base to thank for that. At the right side of the monitor’s base you will find 2 USB 2.0 ports. It would have been nice to see USB 3.0 ports like you get on the SA850 but perhaps there are electronic complexities preventing this. The overall design means that the stand is an integral part of the monitor, is not detachable and does not support VESA mounting. The stand allows the screen to be tilted around 15 degrees backwards (and a mere 2 degrees forwards) and adjusted in height by 4 inches (100mm) using a sliding mechanism. The sliding action of the S27B970D’s stand was relatively stiff whilst the tilt was surprisingly smooth on our test sample. The attachment mechanism that attaches the screen to the stand is a sort of ‘free floating’ design. Although we didn’t fear anything would break the screen does wobble considerably if you knock it as shown in the video below. The screen and stand itself was still very solidly constructed, which was nice to see. The rear has a brushed metal texture, but is actually plastic. This does help reduce weight slightly and is more scratch resistant – it looks the same and you wouldn’t know it was plastic unless you touched it. The pole-like stand neck itself, as mentioned previously, is polished aluminium and is on full show here. At the left of the rear face is a Samsung logo and at the bottom right a Kensington lock socket. The full model code, serial number and version (revision) can be seen on a label located between the stand and the screen. Also located at the rear are the inputs; USB 2.0 up (‘PC in’), DisplayPort 1.1, Dual Link DVI-D, MHL-capable HDMI 1.4 and DC (power) input. A slight niggle here is that the rim of the stand actually protrudes out above the ports making access a bit tricky. There isn’t a huge selection of ports but the important display inputs are there. It is fair to say that there isn’t really room for anything else but perhaps a slight reshape of the rear of the stand or even pushing the ports back a bit would have been practical. Worth a mention are the 7W stereo speakers neatly tucked away on the underside of the screen at either side of the stand (as shown below). These allow sound output through DisplayPort and HDMI and are also useful for outputting sound from mobile devices connected to the monitor. The HDMI port features ‘MHL’ (Mobile High-Definition Link) which means that compatible smartphones and suchlike can have their audio-visual content outputted on the big screen whilst being charged up. This worked as advertised on the Samsung Galaxy S2 we tested but it was a bit of a hassle given the port location, really. The speakers are surprisingly good as far as built-in ones go. They offered a good range of volume and gave fairly crisp treble and mid-range sound. The low notes were not particularly ‘bassy’ but weren’t hollow either – it also seems you can put the speakers at maximum volume without significant distortion. Whilst they can’t compare to a good pair of larger and more powerful standalone speakers they are still some of the best we’ve heard on a monitor. The Samsung S27B970D comes factory calibrated to help achieve desirable criteria for image editing such as a 6500K white point and a gamma curve fitting the 2.2 standard. In the ‘Standard’ and ‘sRGB’ image presets some additional adjustments have been made to improve colour accuracy and according to Samsung each unit “undergoes an expert hour-long adjustment process before it reaches your home or office”. Retail units are each given their own factory calibration certificate which is unique to each unit and show how, according to Samsung’s measurements, it meets various desirable image criteria. Unfortunately this certificate was not provided with our review sample but we have been assured that each and every unit undergoes this unique calibration process and a printout of results, unique to each unit, is provided in the box. To get the best results on your specific system with respect to your graphics card, monitor and lighting conditions it is always best to perform your own calibration with a colorimeter, spectrophotometer or similar calibration device. Usually this is done by modifying the graphics card’s LUT (Look Up Table) by creating an ICC or similar ‘profile’ to work out what information the graphics card needs to send to the monitor for the monitor to output a given shade. The SB970 can also be hardware calibrated using the supplied ‘Natural Color Expert 2’ software and a compatible device – see page 19 of this document for the fairly restrictive list of compatible devices. This allows direct and very precise programing of the monitor’s 16-bit LUT (Look-Up Table) to profile and correct for even slight discrepancies in colour and shade attributes. A notable advantage of this is that the calibrated profile is assigned to a preset on the monitor (named ‘Calibration’) that persists on any program, including ones that would usually override, ignore or misinterpret normal GPU ICC/ICM data. ‘Natural Color Expert 2’ also allows you to perform hardware-based uniformity compensation to compensate for even very minor differences in luminance between various points of the screen. This kind of correction is done by Samsung at the factory but there can be further changes proceeding this as the monitor makes its way into your home and office and is used. Unfortunately we didn’t have a compatible calibration device to hand at the time of review so were unable to make use of this feature. The display enthusiasts over at TFT Central have provided an excellent rundown of this functionality, however. We were quite keen to see how the monitor performs natively using the settings in the OSD, using both the Spyder4Elite and a keen eye. If the claims and measurements made at ‘the factory’ are correct then there would be little need for further correction for the purposes of our testing. With the exception of ‘Cinema’ the presets on the S27B970D all seemed well thought out and offered strong performance – pretty much nailing the promised 2.2 gamma and 6500K white point targets across the board. There’s no need to add much to the discussion of the ‘Cinema’ preset which seems a bit misplaced (as if film watchers like their image to look simply wrong for some reason) but we did find the gamma curve particularly bizarre. It would certainly go some way to explaining what we saw but it really gives you an idea of just how wrong the ‘Cinema’ image is. The images below allow a comparison of the gamma curve between this mode and ‘High Bright’ which has far superior gamma tracking. In the remaining modes colours were very well represented, appearing most accurate but relatively restricted in their vibrancy in the sRGB preset. Unfortunately this mode did reduce contrast a fair bit (as we explore later) but not to levels that make it at all unusable. The ‘Standard’ preset incorporates the full factory calibration but does not restrict the colour gamut – contrast is reduced slightly but this preset is surprisingly well balanced overall. You are also able to adjust the gamma between ‘1.6’ and ‘2.7’ in increments of ‘0.1’ and the colour temperature between ‘4000K’ and ‘10,000K’ in 500K increments (or set the colour channels individually). We are pleased to report that the monitor responded exactly as it should to changes in either value and was spot on whichever gamma or white point you selected. The ‘High Bright’ preset, which was used as the basis for our test settings, provided a lovely ‘pop’ to the image but was very bright by default. Vibrancy in this preset was strong without colours becoming poorly represented or shade range being crushed. The native colour gamut, glossy screen surface and brilliantly balanced gamma and white point really helped this mode to achieve a pleasant image for our testing. You can still adjust the colour channels individually if you need to but the white point and gamma presets are not available in this mode. All we did to form our test settings was to lower the brightness to ‘64’ as below: Contrast= 75 (lower dulls the image, higher bleaches the high-end) Preset= High Bright The luminance of ‘black’ and ‘white’ was measured under a range of settings using a KM CS-200 ‘Chroma Meter’ and the resulting contrast ratio calculated. Assume default settings are used unless otherwise stated – with dynamic contrast disabled and factory preset brightness in all cases. The greatest white luminance, lowest black luminance and highest recorded contrast ratio have been highlighted in black and results from our test settings in blue for convenience. The strongest contrast performance was observed on ‘High Bright’ colour mode, averaging 942:1 during testing. This is similar to what you would see on some of the strongest IPS performers out there for contrast, which is good. Entering ‘Standard’ mode applies further factory calibration correction to the image. The contrast dropped accordingly to average 791:1, which is still very decent. The sRGB preset takes these corrections further by restricting the colour gamut to fit the sRGB space more tightly. Unfortunately contrast takes a fairly significant hit in this mode, averaging 561:1 in our testing. This doesn’t make the monitor at all unusable but it does reduce low end shade distinctions somewhat. Those with a compatible calibrator can get around this by performing a hardware calibration and setting the colour gamut coordinates manually (see the link just above the table in the calibration section). The S27B970D reached a peak luminance of 290 cd/m2 in the ‘High Bright’ and ‘Cinema’ presets at maximum brightness. This isn’t as bright as some comparable monitors will go but offers more than enough brightness for most users and is very close to the specified 285 cd/m2. The minimum luminance of around 60 cd/m2 was recorded at 0 brightness in both ‘sRGB’ and ‘Standard’ and gives a 225 cd/m2 luminance adjustment range which is good. Although not really required on this calibre of monitor a dynamic contrast setting is also available when running in ‘High Bright’. This rapidly adjusts the screen brightness according to the mix of light and dark on the screen. It seems to lock the contrast at 100 which produces a bit of an oversaturated and not particularly rangy look – but it’s there if you want to use it. Regardless of the mode you are using we can confirm that the backlight of the SB970 is not PWM (Pulse Width Modulation) regulated and does not rapidly pulse on and off to reduce brightness below maximum. This is good news for individuals who are sensitive to the rapid flickering of PWM and may find backlights that use that approach to dimming uncomfortable. It is also important to consider variation in luminance across the screen. We observed no noticeable backlight bleed even in a pitch black room. There was, however, a silver-blue sheen of what we would dub ‘PLS glow’ – a characteristic seen on any modern IPS or PLS model of this size. This becomes more pronounced off angle but on a monitor of this size it can also be seen from a normal sitting position at the bottom corners in particular. You can’t see this effect under brighter conditions but the underlying detail doesn’t magically reappear either – you can see this effect illustrated in the ‘Viewing angles’ section of the review. It is also important to consider lighter colours and how they can be affected by variation in luminance across the screen. This is best exemplified by measuring the luminance of pure white at various points on the screen. The Spyder4Elite colorimeter is able to measure the luminance of 9 equidistant white quadrants running along the screen from top left to bottom right. It then calculates the percentage difference between each quadrant and the brightest point. The tables below show the readings and percentage difference between each quadrant and the brightest point under our test settings and under ‘Standard’ mode, respectively. The uniformity of our unit was excellent under our test settings, showing single-digit luminance variation between the brightest point (219.5 cd/m2 at ‘quadrant 5’ in the centre) and all other quadrants. The greatest deviation occurred at ‘quadrant 7’ towards the bottom left of the screen (201.3 cd/m2) and the lowest deviation at ‘quadrant 8’ to the right of that (211.6 cd/m2). Under ‘Standard’ mode the uniformity compensation adjustments, which are made by Samsung at the factory, are applied. Results here were simply outstanding ranging from under 1% deviation and just under 2% deviation from the brightest quadrant (centre). In other words there was a mere 4.4 cd/m2 difference between the centre (‘quadrant 5’) and the least bright point on the screen (‘quadrant 2’, above the centre). We observed similar results in the sRGB preset which is also calibrated in this way. As mentioned in the calibration section you can perform further luminance uniformity correction yourself if you have a compatible calibration device. For those that prefer graphical representation of data the visual contour maps below combine these results with extrapolated intermediate values. On these maps the lighter the shade of grey the higher the luminance – so the central region (‘quadrant 5’) appears the lightest shade of grey with darker greys representing relatively low luminance readings. You can see from this representation just how even the backlight is, particularly under the ‘Standard’ preset. The contrast performance of the Samsung S27B970D was also assessed using some familiar game and Blu-ray movie titles. Battlefield 3 was first up and was displayed with the kind of visual atmosphere the directory intended – with some real flashes of brilliance. Explosions, gunfire, the blinding sun of the day and artificial lights of the night all had a bright and brilliant purity. The low-end was also good, for the most part, with even some minor detail visible. There was a slight weakness towards the corners (particularly the bottom corners from a normal seated position) due to the ‘PLS glow’ but this wasn’t all that extensive really. Performance was excellent on our second game test title, Dirt 3, especially on bright colours such as the dazzling and pure-looking lights breaking through the darkness of night. Fireworks in the night sky, backfire from car exhausts and the flashing cameras of spectators were also eye-catching. All major detail and some minor detail was visible in dark areas – but some minor detail such as radiator grills and small switches within the car were not entirely visible. The peripheral sections (particularly near the bottom corners) again appeared slightly flooded at the low end due to the ‘PLS glow’ but this didn’t really hamper the overall experience for us. We also fired up the 2009 edition of the Blu-ray movie title ‘The Girl with the Dragon Tattoo’. There were no real contrast problems on this film. The only minor criticisms would be a slight loss of detail at the very corners of the picture (‘PLS glow’) and some particularly dark shades such as a deep brown iris surrounding a black pupil not being quite distinct enough. These weaknesses are present on all IPS and PLS models, though, and all of the important detail and most subtle detail was visible. It was also nice to see how uniform and ‘bleed free’ the backlight was in these dark scenes whilst the high-end shone through with a bright and rangy quality – an enjoyable experience, overall. To round off this section we will talk about our observations on the Lagom LCD tests for contrast, which are good for pinpointing even minor weaknesses in contrast. The Samsung S27B970D’s colour gamut (red triangle) was compared to the sRGB reference space (green triangle) under our testing settings and the sRGB preset using a Spyder4Elite colorimeter. Using our test settings this 2D representation of the colour gamut shows excellent coverage of sRGB and indeed a bit beyond this in blue, red and green. Setting ‘color mode’ to sRGB restricts the colour gamut to fit more tightly with the sRGB standard and is the only preset which does this. The difference is evident when switching between sRGB and another preset as shades become more saturated and you can start noticing shades that are very ‘pure’ and go beyond the most saturated shades of the sRGB space. This is not the same as the sort of heavy oversaturation that can occur when using a wide colour gamut monitor on non-colour-managed applications and actually worked very nicely for out testing. For those wanting the highest degree of colour accuracy tight sRGB coverage through either this preset or by specifying the coordinates in a hardware calibration is preferred. We assessed the colour performance of the monitor using our usual game and movie titles. First up was Battlefield 3. This was perhaps not the best showcase for colour diversity due to the specific aesthetic the developers were going for – but it looked as good as we’ve ever seen it. The environments were rich with shades looking as intended. The neon green, blue and red markets were suitably intense whilst some other vibrant elements within the game really caught our eyes (in a good way). Small sunflowers are found in the grass on some levels, for example, and were an absolutely stunning yellow that reflected their real-world counterpart beautifully. Fires raging in the background of some levels also showcased a nice variety of rich yellows and oranges. Last but not least was the eye-piercing cyan and azures of the engineer’s blowtorch as it repaired a vehicle – quite mesmerising. Our second game test title, Dirt 3, allowed the Samsung to really shine. The vibrancy of certain colours could be seen on menu screens, adverts around the track and of course the car paintjobs. There were lashings of colour with a good solid look to them – as if they were painted onto the screen. Of particular note were the bright pinks and yellows, brilliant bright greens and exceptionally full and deep reds. Remarkably deep blues could also be observed. Unlike on the Series 8 PLS models these did not all appear ‘chemically’ (like copper sulfate) but showed good range and depth. Amongst these bright colourful shades were some excellent natural- looking environments. The Finnish forests in particular showed a pleasing variety of greens, from muted minty greens to more lush and vibrant shades. Golden brown hues were also blended seamlessly along with a good range of woody tones. The S27B970D also put in a keen colour performance on our Blu-ray test titles. The Girl with the Dragon Tattoo was first up. Skin tones were appropriately saturated and nicely varied – the subtle variety of greens, browns and sky blue shades in the environment also impressed. Brightly colour objects in the film also showed excellent shade variety and a good (and appropriate) level of vibrancy. Our second film test title was Futurama: Into the Wild Green Yonder. This was a festival of colours with impressive range and variety. Subtle differences between skin tones and certain elements of the background could be observed. Furthermore, large areas of an individual colour showed pretty much perfect consistency. Some of the more vibrant shades such as bright blues and violets, neon greens and deep reds were fairly spectacular, too. It was evident from our testing that the variety and consistency of colour shades is strong on the SB970D. We used the Lagom LCD tests for viewing angles to look at this more specifically and look for any weaknesses that could prove problematic for colour-critical workflows. The monitor’s WQHD (2560 x 1440) resolution gives you plenty of pixels to play with (1.77 as many as the common 1920 x 1080 resolution) and can allow you to make efficient use of your desktop space as demonstrated here. The tight pixel pitch and glossy screen surface combine to offer superb clarity which is excellent for image processing and also enhances textures in many games. You also need some extra graphics grunt to push the pixels in demanding 3D applications such as games and for some users they may be tempted to switch to a lower resolution (such as 1920 x 1080) for this purpose. The monitor is able to use ‘interpolation’ when running at non-native resolutions such as 1920 x 1080 to ensure all of the screen’s 2560 x 1440 pixels are used. This is never as sharp as running the Full HD resolution on a native 1920 x 1080 display where each pixel is displaying its own distinct information without ‘crossover’ and so the performance of the S27B970D on the game titles we tested was no surprise. All of the titles were tested (including Dirt 3, Battlefield 3 and Mass Effect 3) had a soft look and lacked any sort of real crispness to textures. This is the kind of thing you’d have to see first-hand as it’s very difficult to capture properly in a photograph or movie. The other aspect to consider is the running of non-native resolution content such as 1080p Blu-rays. The monitor will use a process called upscaling to output such content on the display when it is running at its own native WQHD resolution. We can’t speak for how the monitor up-scales ‘external device’ as we didn’t test this specifically, but in theory it should handle 1080p fine over HDMI by upscaling to 2560 x 1440 @ 24Hz. The upscaling performance of Blu-ray movies on the PC to fit the native resolution (at 60Hz) was excellent, though, and much of the native sharpness of the film was maintained. There is a slight loss of sharpness compared to watching the monitor on a native ‘Full HD’ display but the image still looks remarkably sharp, detailed and undistorted. The S27B970D gives the user three ‘Response Time’ settings to choose from; ‘Normal’, ‘Faster’ and ‘Fastest. Using PixPerAn (Pixel Persistence Analyser) and a camera at high ISO it is possible to see how the monitor performs a typical set of rapid grey to grey transitions in each mode. For the images below the ‘tempo’ on PixPerAn was set as high as possible to showcase rapid motion and the response time mode was set from its slowest to its fastest settings, respectively. Setting the response time to ‘Normal’ gave a relatively bold primary trail and a very slight secondary trail. Setting it to ‘Fastest’ provides a fainter primary trail with no further trailing visible, indicating that the pixel overdrive had properly kicked in. Using the ‘Fastest’ setting created a muddied primary trail and an inverted secondary trail (inverse ghosting). This indicates that the overdrive impulse had been applied too strongly and too much voltage was being applied for these transitions, causing the pixels to ‘overshoot’ their desired target state. Such artifacts were visible when gaming using this mode, so we stuck with the default ‘faster’ setting for our subjective testing. On our first game test title, Battlefield 3, the screen exhibited a consistent and reasonably mild blur that was most pronounced when strafing past objects. This did not prove particularly distracting as the scene maintained a decent degree of sharpness. Turning gently in a fast vehicle increased the degree of blur whilst rapid circling created a dizzying effect. Despite this there was no significant texture breakup or any noticeable overdrive trailing, even during such fast-paced antics. Our second game test title was the popular driving game Dirt 3. We could observe a mild to moderate blur during the rally, trailblazer, rallycross and landrush events. This did not seem to obscure the course enough to cause any real problems. On the gymkhana discipline the blur became far more pronounced, particularly during rapid spins. The experience became quite dizzying – which is rather appropriate really. In the Blu-ray film titles we tested the monitor’s pixel transitions and overdrive didn’t seem to impede performance. The limited frame rate (around 24fps) at which the movies run does limit the fluidity and speed of motion, however. We also measured the input lag of the monitor, which isn’t of consequence for movie watching but is a major factor affecting how responsive the monitor ‘feels’ to the user when gaming or just using the mouse on the desktop. Using a similar method to our other recent reviews we measured an average of around 20ms (1.25 frames) of input lag on the Samsung S27B970D. Many users will be able to tolerate this and find the monitor provides a good experience on their games – others will find this too high. Samsung’s PLS technology is relatively new to the market and not as widely adopted or indeed as familiar to consumers as LG’s IPS technology. To all intents and purposes, however, the underlying technology and strengths and weaknesses of the image are much the same. The Samsung S27B970D is the company’s latest flagship monitor and the first and currently only glossy monitor to make use of the PLS panel type. With its edge-to-edge glass covering, machined aluminium surround and solid and shiny aluminium stand Samsung have certainly pushed out the ‘style boat’ on this one. Seeing as the SB970 is designed primarily for high-level colour processing and imaging tasks such photo editing it is what goes on ‘under the hood’ that is really important. With such a stylish bit of kit there is always that niggling thought at the back of your mind that maybe all of the effort is put into the design and appearance rather than the real substance. As soon as the monitor was up and running those negative thoughts evaporated. The monitor is capable of producing a brilliantly vibrant, punchy and dynamic image through a combination of factors; the glossy screen surface, underlying panel technology and its slightly generous colour gamut. If that is the kind of thing you’re looking for then the ‘High Bright’ preset really does deliver with its ‘full-on’ colour experience. For entertainment purposes, which the brunt of our review was focused on, this mode was really everything we were looking for. The colours were certainly lively but also showed exceptional range and consistency. What’s more, even in this operating mode, the gamma and white point was set up to perfection at the factory – leading a very balanced image and no real inclination to try to change things. But for users looking for accurate colours it’s the presets that have undergone the complete ‘factory fine-tuning’ that should appeal. The ‘Standard Mode’ offers colour correction based on factory adjustments to the monitor’s internal 16-bit LUT and also applies uniformity compensation adjustments to the backlight for improved luminance consistency across the screen. The ‘sRGB’ mode does all of this but bases everything very tightly around the sRGB colour gamut – the native colour gamut is a little broader than this, but still doesn’t go into wide colour gamut territory. The downside of these extra levels of correction is that they drop the contrast – significantly so for the sRGB mode. Users who want to get the very best colour accuracy would no doubt be wanting to perform a calibration on their own system with their own hardware device. The S27B970D supports hardware calibration (provided you have a compatible device) which would allow you to achieve excellent sRGB colour performance without such a significant drop in contrast. Contrast in the broader sense is never a real strength of PLS or IPS technology and there were the usual caveats with the peripheral and off angle ‘glow’. The overall contrast performance was very good, though – but it was the excellent gradation performance and uniformity of the screen across the spectrum of light and dark colours that was particularly impressive. Even under our test settings (using ‘High Bright’ mode without specific uniformity compensation) the deviation in luminance across the screen was very low – both visibly and according to measurements. On the modes where uniformity compensation is applied the results were nothing short of exceptional – with some of the lowest deviation we’ve seen on an LCD monitor. Although clearly not its primary purpose, the monitor can also be used for gaming. Samsung has applied some quite solid grey to grey acceleration under its default ‘Faster’ mode which improves the pixel responsiveness without introducing any sort of artifacts or ‘inverse ghosting’. They also offer two modes either side of this – ‘Normal’ which uses minimal grey to grey acceleration and ‘Fastest’ which ramps up the grey to grey acceleration and unfortunately introduced some artifacts in our testing. It is nice to have a bit of flexibility as different modes may work better in different applications. We did record a moderate amount of input lag which may put some people off but given the feature rich OSD, scaling and image processing capabilities of the monitor this is hardly surprising. Its price is high (around £800 or $1200 at time of writing) but we do feel that those looking for a stylish monitor with high-end features and excellent colour performance should give the Samsung S27B970D careful consideration.
The outer screen surface is what Samsung dubs ‘Crystal Clear’ glass, whilst the surface of the screen itself has a mild anti-glare treatment. The images below show the SB970 beside the S27A750D. The photos were taken on a bright day with light shining directly onto the screens – and of course the monitors are both switched off. This is really to demonstrate some differences between the reflectivity of these two glossy surfaces in a completely uncontrolled lighting environment.
SB970 on the left
SB970 on the right
A dark desktop
A mixed desktop
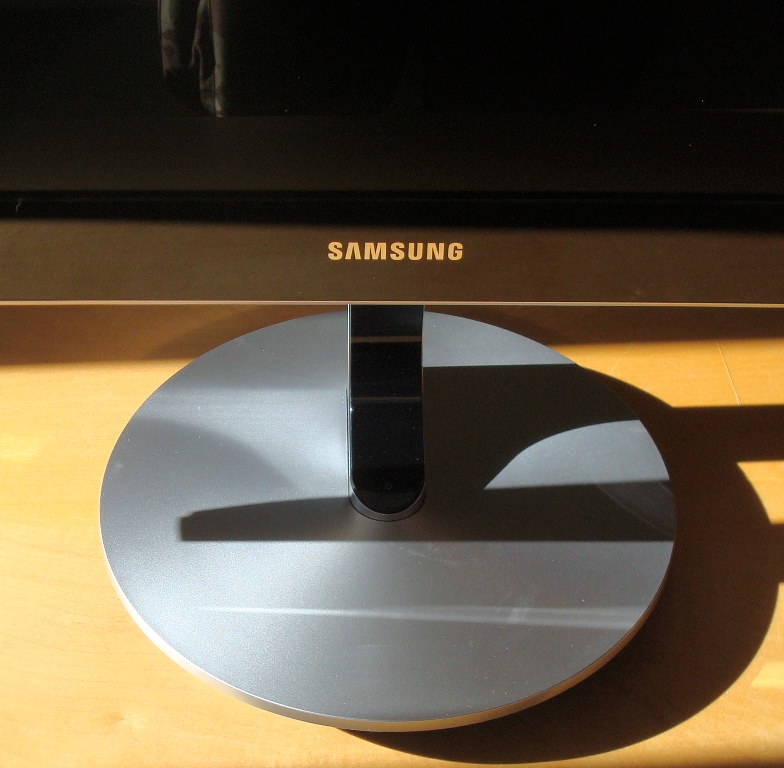
The base

The OSD controls
Elegance
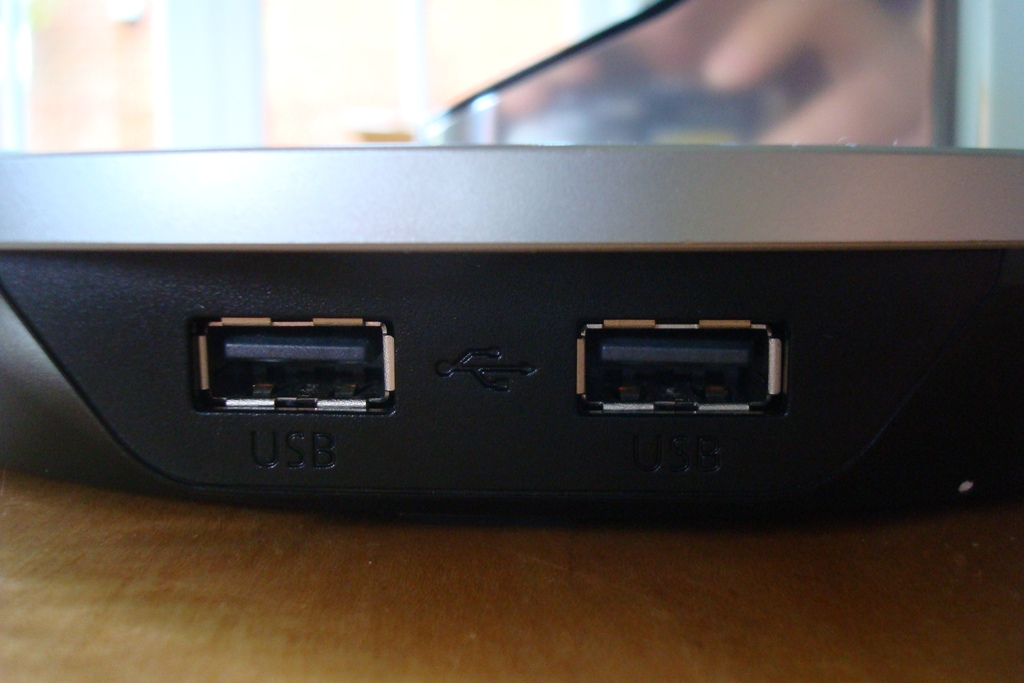
USB ports at the side
Stand adjustment mechanism
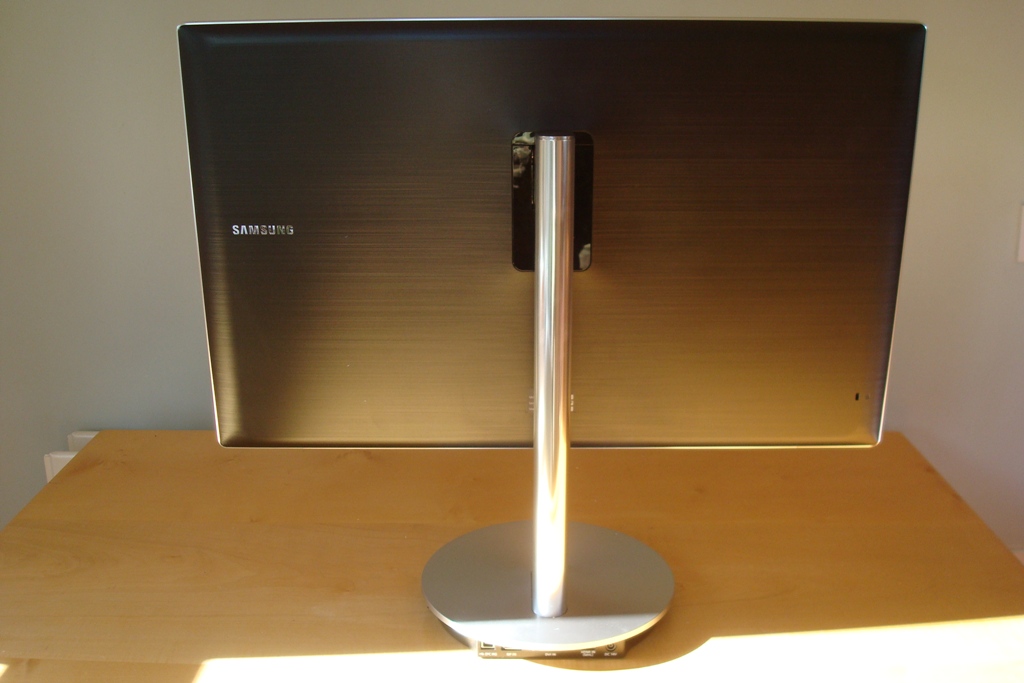
Rear of the monitor

A few ports
Some decent speakers neatly tucked away
Calibration
Color Mode (Preset)
Gamma (central average)
White point (kelvins) Notes Standard
2.2 6488K Image is rich, varied and very nicely balanced. Colours are vibrant but don’t appear too heavily saturated or out of place. Practically flawless gradation performance and no ‘crushing’ issues. High Bright
2.2 6495K Lives up to its name – very bright. Colours are very rich and vibrant without looking place and with excellent range and variety. Strong gradation performance and slightly improved contrast over ‘Standard’ mode.
Cinema 2.5 6443K Bright with heavy oversaturation of colours – such that shade range is significantly reduced. Poor gradation performance as a result and crushing at the high end, although contrast is relatively good. sRGB 2.2 6486K Image appears more muted both in terms of luminance (brightness is set to ‘52’ by default) and colours. As explored later colour gamut is restricted appropriately but contrast takes a hit in this mode. Test Settings
2.2 6491K See below – basically ‘High Bright’ mode with reduced brightness.
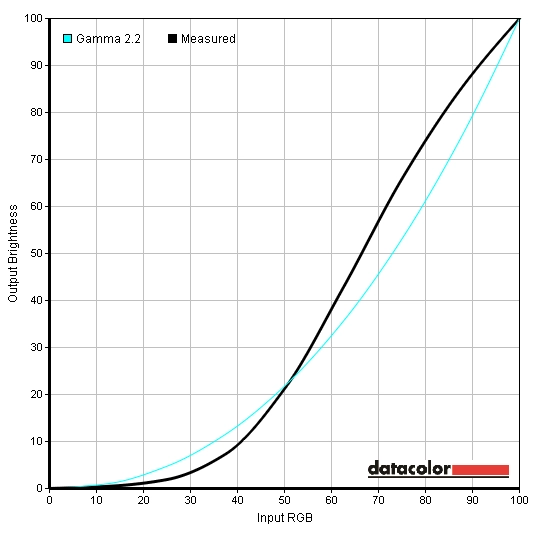
Gamma curve for Cinema - wonky
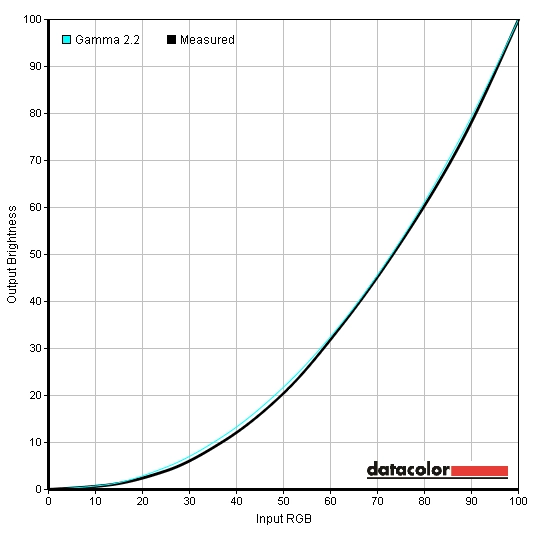
Gamma curve for High Bright - nice
Brightness= 65 (according to preferences and lighting)
It is always worth remembering that on some monitors the GPU (particularly AMD vs. Nvidia) can have quite an influence on the image. The connection type used to connect the monitor can also change things, particularly HDMI cables on some monitors and Nvidia GPUs. For this review the main graphics card in our system was the AMD Radeon 7950, connected using the supplied DVI cable. A DisplayPort cable can also be used to output the native resolution, if you prefer – this outputted exactly the same image on our test system. We also briefly used an Nvidia 600 Series GPU connected in the same way to see if it would adjust the settings we would use or greatly change our observations. The image performance was essentially very similar making the above settings and observations valid for both vendors.
Contrast and brightness
Monitor Profile White luminance (cd/m2) Black luminance (cd/m2) Contrast ratio (x:1) ‘Standard’, 100% brightness 246 0.31 794 ‘Standard’, 80% brightness 210 0.27 778 ‘Standard’, 60% brightness 174 0.22 791 ‘Standard’, 40% brightness 136 0.17 800 ‘Standard’, 20% brightness 98 0.12 820 ‘Standard’, 0% brightness 61 0.08 763 ‘High Bright’, 100% brightness (default brightness)
290 0.3 967 ‘High Bright’, 65% brightness (test settings) 218 0.23 948 ‘High Bright’, 0% brightness 73 0.08 913 ‘Cinema’ 290 0.31 935 ‘sRGB’, 100% brightness
245 0.42 583 ‘sRGB’, 52% brightness (default brightness) 155 0.28 554 ‘sRGB’, 0% brightness 60 0.11 545
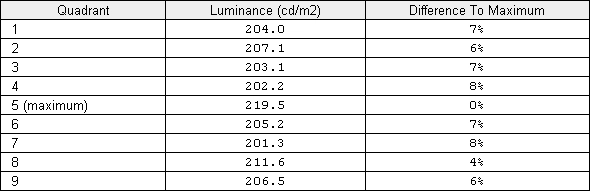
Luminance uniformity table (test settings)
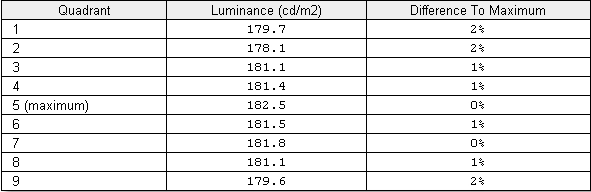
Luminance uniformity table ('Standard' mode)
Luminance uniformity map (test settings)
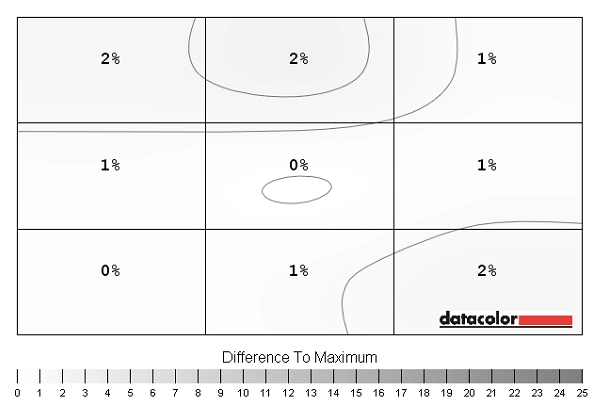
Luminance uniformity map ('Standard' mode)
Colour reproduction
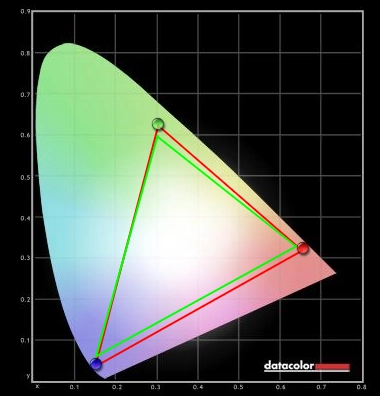
Colour gamut test settings

Colour gamut sRGB preset
Viewing angles
The Lagom text appeared a predominantly blended grey without distinct green and red transitions, indicating that the S27B970’s gamma curve has little viewing angle dependency. The video below demonstrates the sort of shifting that can occur not only on the Lagom text test but also a mixed and a dark desktop background when you move yourself ‘off-angle’. This kind of variation is not a problem when you are viewing the monitor directly in-front but should be considered if you wish to view the screen from various other angles. Compared to weaker panel types for viewing angle (particularly TN) the changes in the image are far more subtle and only really come into play from pretty sharp angles. Rather than pronounced colour shifts and inversion you tend to get more of a shift in contrast on mixed images. On the dark desktop background, recorded in a dark room, you can see the silver flashings of ‘PLS glow’ which are most pronounced on the video ‘off angle’.
Interpolation and upscaling
Response times

Ghosting 'Normal' mode

Ghosting 'Faster' mode

Ghosting 'Fastest' mode
Conclusion
Positives Negatives Good contrast and gradation performance with excellent clarity from the resolution and glossy screen. Superb luminance uniformity on our unit
PLS glow, reflections from the glossy surface – mild antiglare layer does reduce this slightly but introduces a ‘fine mist’ texture if you look carefully
Excellent colour performance with good preset flexibility. Spot-on gamma and white point, additional adjustments on ‘sRGB’ and ‘Standard’ and excellent vibrancy in ‘High Bright’ mode Significant contrast drop when switching to ‘sRGB’ mode, native gamut in all other modes extends some way past sRGB without reaching a specific extended colour space
Beautiful styling and some high-end features such as a programmable 16-bit LUT and hardware-based uniformity compensation adjustments
No tilt or pivot adjustment. Base-mounted electronics mean stand is a permanent feature of the monitor and can’t be removed for VESA mounting
Well-implemented grey to grey acceleration with additional overdrive options to suit specific applications and tastes Moderate input lag may put some users off, so might the pixel performance of PLS technology compared to some TN models. And so might the price
![]()

