Author: Adam Simmons
Date published: April 15th 2013
Table of Contents
Introduction
AOC are not as well-known as many other monitor manufacturers, but they certainly know how to achieve that crucial combination of style, performance and affordability. The AOC i2369Vm is the latest monitor in the company’s ‘Value’ line. Despite it setting itself firmly as a budget option it uses the latest ‘AH-IPS’ technology to give slender bezels and a competent colour performance. It all seems very promising ‘on paper’, but how does it all hold together in practice? That is what we will find out.
Specifications
The monitor uses a 23” AH-IPS panel with a WLED backlight, 60Hz refresh rate, 250 cd/m2 maximum luminance (typical) and 1920 x 1080 resolution. As usual for an IPS panel you get 178 degree viewing angles whilst AOC also provide grey to grey acceleration with a quoted 5ms grey to grey response time. The monitor is only just coming onto the market in the UK at time of writing where it is expected to cost around £140 including VAT which is very reasonable. Price and availability in the US is not known at time of writing.
The key ‘talking points’ of the specification have been highlighted in blue.
Features and aesthetics
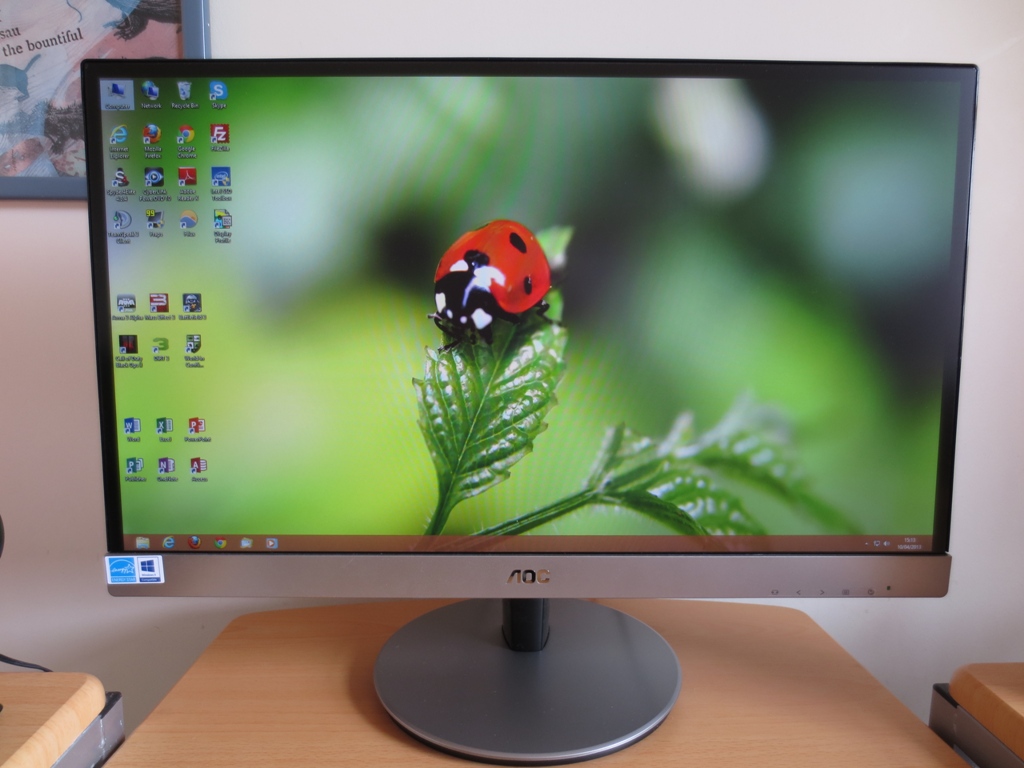
From the front the AOC i2369Vm’s slender bezel design can be seen. The monitor has a matte silver finish to the stand and bezel – not glossy black as shown in many earlier press shots. For clarity – there aren’t two distinct colour options here and all units will use matte silver plastic in place of glossy black plastic. The screen surface is light to medium matte. It is ‘lighter’ (has a lower haze value) than the notoriously ‘grainy’ surfaces used on most older IPS models. It is not as light as the semi-glossy surfaces seen on some PLS models and higher end AH-IPS models such as the 2560 x 1440 resolution 27” displays.
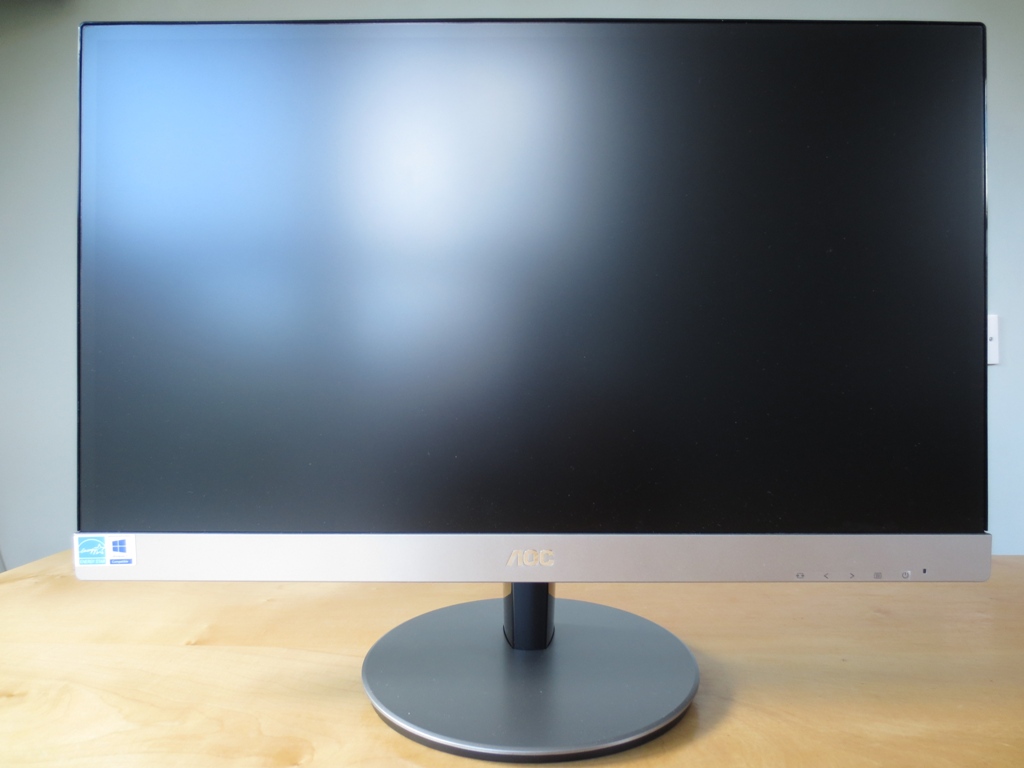
When the monitor is switched on you can see that there is a dark grey border (inner bezel component) around the image at the top and sides as well as a thin black plastic rim (outer bezel component). The total bezel thickness is a mere 10mm at the top and sides. The bottom bezel is 27mm thick and includes the OSD (On Screen Display) controls towards the right. The control buttons are good old-fashioned tactile ones found on the underside of the monitor. The labels are found on the front. Due to a production fault with our review unit these were printed onto a temporary sticky label but on actual production models they are printed properly printed onto the bottom bezel.
The main menu (shown in the video below) is well laid out, spread horizontally across the screen in quite a widescreen fashion. The icons that label the main sections are a bit aliased but you can still see what they are supposed to be – and the accompanying text is very clear. Some functions are later on but it’s worth highlighting a couple that don’t get a mention elsewhere. In ‘Color Setup’ there is something called ‘DCB’ (Dynamic Colour Boost) mode. This accentuates (oversaturated) specific colour groups such as greens, reds or blues to make certain aspects of an image stand out. The ‘Picture Boost’ section is all about controlling something called ‘Bright Frame’. This allows you to select a rectangular portion of the screen and independently set its brightness and contrast. You could make a video that you’re watching on a webpage or an in-game map stand out more, for example. Finally in ‘OSD Setup’ there is a break reminder feature. You get a reminder to take a break every hour with this function enabled. This is cumulative and resets if you turn the monitor off then on again – there is no proximity sensor or anything ‘smart’ like that.
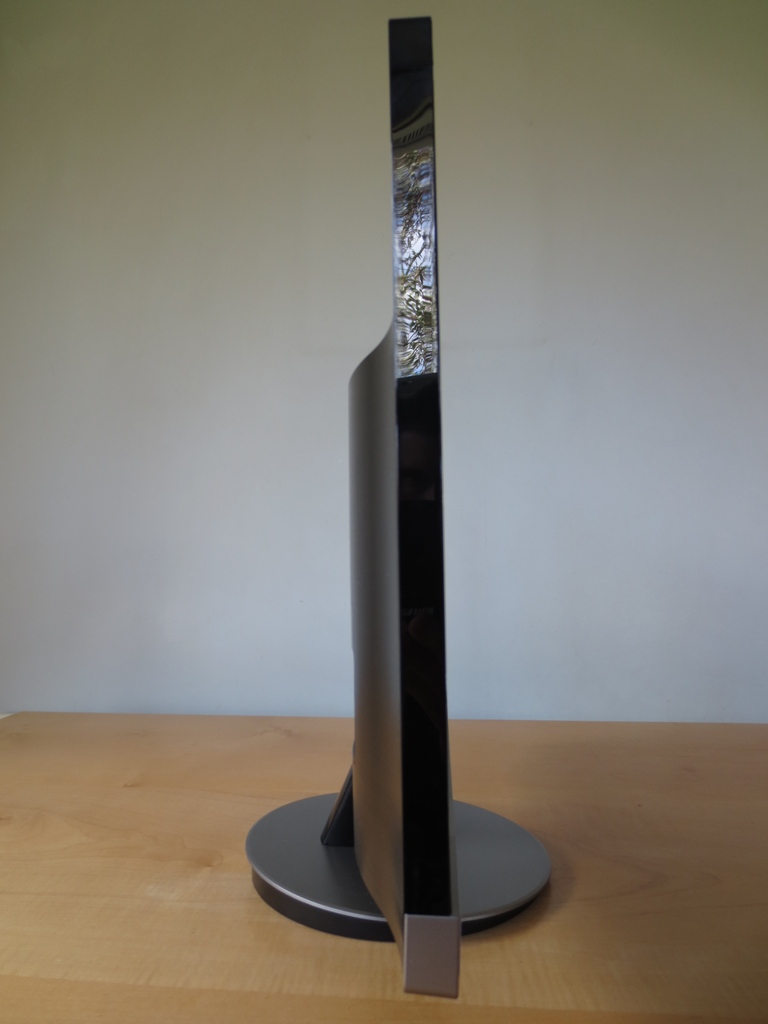
At the side the monitor is fairly slender. It is 14mm at thinnest point and 17mm at the bottom (including the bottom bezel ‘lip’). It lumps out in the middle to around 43mm.
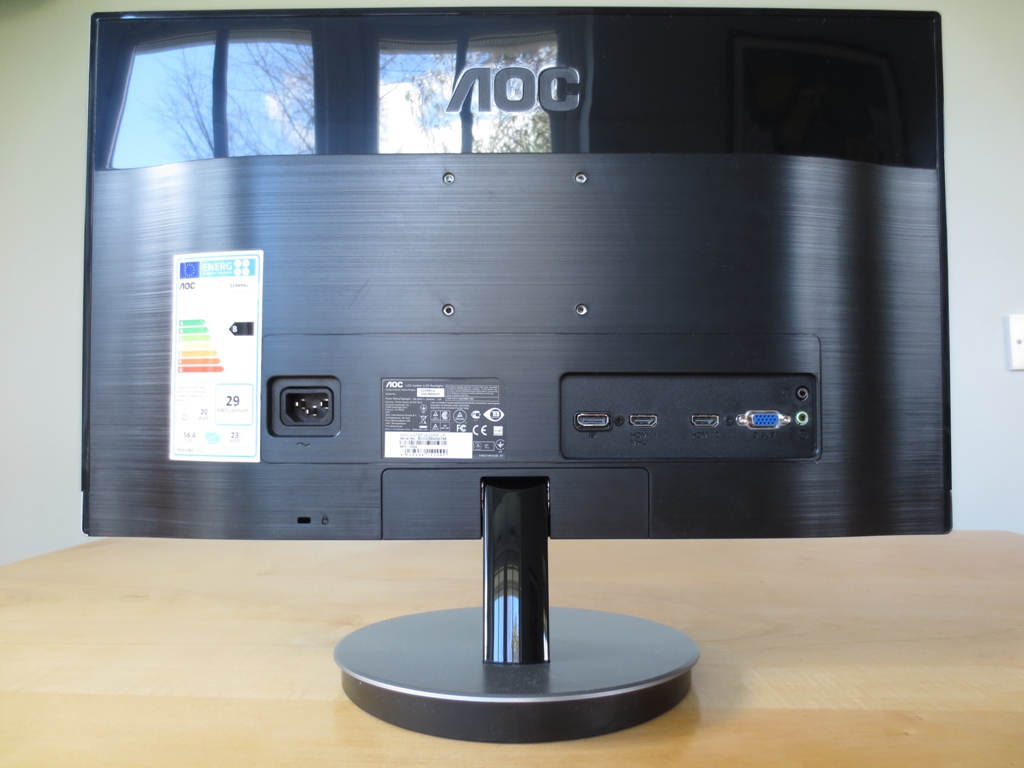
From the rear you can see why it lumps out like this. There are 75 x 75mm VESA holes for alternative mounting, an AC power input (and therefore an internal power converter) and the ports. Interestingly the monitor includes a DisplayPort input alongside 2 HDMI ports (one with MHL capability), VGA, a headphone jack and audio input. The DisplayPort in particular is a nice addition rarely seen on a ‘budget’ model such as this. The MHL (Mobile High-Definition Link) allows the monitor to display the visual content of a compatible smart phone and also charge it. Audio can be outputted from a smartphone (via MHL) or any other device via HDMI, DisplayPort or the audio input on the monitor. This audio can then be sent out via the headphone jack or through the monitor’s internal speaker. The speaker is a simple low-power affair with very little bass. Volume levels were decent although there was noticeable distortion beyond a volume level of 60. The sound obviously can’t compare to a decent set of standalone speakers but the speaker is there to provide simple sound output if you need it. If you don’t – it doesn’t make a peep (or buzz) and is completely inactive.
Calibration
Testing the presets
This monitor doesn’t actually have any real ‘presets’ to speak of, which we don’t feel is necessarily a bad thing. Its version of presets are ‘Eco Modes’ which simply alter brightness. Instead of testing these out we tested its 3 ‘Gamma’ settings and maintained default settings elsewhere. The only exception to this was that we disabled ‘DPS’ (Dynamic Power Saving) which is a sort of weak and gentle dynamic contrast mode that’s enabled by default. We used some familiar desktop backgrounds, icons and a range of familiar applications (including the Lagom.nl website) to judge things by eye. We also used a Spyder4Elite colorimeter to further assess image performance.
Our main system used for this review uses an AMD Radeon 7950 which was connected using the HDMI cable AOC supplied for us. There are a few tweaks you will need to make when using HDMI, which isn’t a fault of this monitor, specifically, but a problem with the graphics driver defaults. The graphics card essentially recognises anything connected via HDMI as a TV rather than a monitor which means that a suboptimal signal is sent out. On our AMD GPU we were able to increase contrast slightly and eliminate an annoying dithering effect on whites by changing the ‘Pixel Format’ to RGB instead of the default of YCbCr. Open Catalyst Control Centre and navigate to ‘My Digital Flat-Panels –> Pixel Format’. You then change from the default ‘YCbCr 4:4:4 Pixel Format’ to ‘RGB 4:4:4 Pixel Format PC Standard (Full RGB)’. This setting is shown in the image below.
![]()
We also briefly tested the monitor using an Nvidia GTX 670 just to see if there were any obvious colour differences. As usual the Nvidia card sent out completely the wrong colour signal to the monitor, washing out colours and hugely reducing contrast. To rectify this and make everything look as it should for PC use the following steps should be taken in Nvidia Control Panel.
If you want to avoid having to do these little tweaks in the graphics driver then make use of the monitor’s DisplayPort. We tested this and found everything set up optimally by default, as you’d expect from a PC-only connection. The table below gives readings for white point, average central gamma and some general observations for each ‘Gamma’ setting. To reiterate, ‘DPS’ was disabled but everything else was kept at default. The table also shows the results from our ‘test settings’ which are described subsequently.
| Setting | Gamma (central average) | White point (kelvins) | Notes |
| Gamma1 | 2.2 | 6711K | Image is very bright, rich and nicely varied with decent vibrancy. A slight cool green tint to the image but no issues with over (or under) saturation or crushed shades. |
| Gamma2 | 2.1 | 6651K | Slightly reduced tint but light shades appear overly bright in relation to darker shades which appear a bit ‘underdone’. |
| Gamma3 | 2.1 | 6733K | Increased vibrancy with notable oversaturation in places. Green tint remains similar to ‘Gamma1’. |
| Test Settings (see below) | 2.2 | 6478K | More comfortable brightness, better colour balance (no tint) with good rich look and decent vibrancy. |
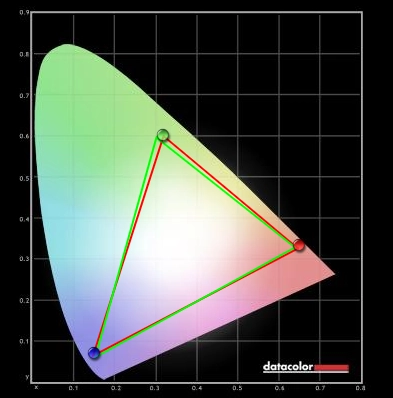
The 2369Vm offers three separate gamma modes. The default setting (‘Gamma1’) produces a nicely balanced image. There was a slight excess of blue and green in the image on our unit, with a white point of 6711K. The gamma tracking was excellent, firmly at 2.2 with very little deviation. The graph below demonstrates this. Switching to ‘Gamma2’ knocks off the balance a little by intensifying light shades at the expense of dark shades. The green-blue tint was reduced somewhat. The graph below shows the gamma behaviour using this mode, where an average of 2.1 was achieved. ‘Gamma3’ produces some noticeable oversaturation in places, giving the image an even more vibrant (but less natural and accurate) look. The gamma behaviour in this mode is similar to ‘Gamma2’ with a little more deviation in some mid-tones. Overall we were quite happy with the out of the box performance for AOC – it was clear that only a few minor adjustments were necessary. For our test settings we used the default ‘Gamma1’ setting, disabled the ‘DPS’ mode, reduced brightness and made some slight colour channel alterations. Please note that each individual unit will differ slightly and our settings should only be used for reference. The out of the box settings are actually good enough that most users may well be happy enough simply reducing the brightness a bit. Be sure to go easy on the colour channel adjustments as even slight reductions in each channel (1 notch) produced a fairly dramatic effect on the image. Contrast= 50 Gamma= Gamma1 Color= User Define Red= 50 Green= 46 Blue= 49 Using a Konica Minolta CS-200 ‘Chroma Meter’ we measured the brightness of white and black on the monitor using a range of brightness settings and ‘Gamma’ settings. From this the resulting static contrast ratio was measured. In all cases ‘DPS’ (Dynamic Power Saver) was disabled. Unless stated otherwise assume default settings were used. The highest white luminance, lowest black luminance and highest contrast ratio recorded are highlighted in black. Values under our test settings are highlighted in blue. The AOC i2369Vm gave a good static contrast performance, averaging 1058:1 across all the brightness settings tested for ‘Gamma1’. Switching gamma mode had no detrimental impact here with 1055:1 recorded under ‘Gamma2’ and 1064:1 using ‘Gamma3’. Our test settings involved some colour channel adjustments, reducing contrast slightly to 956:1 which is still good. The maximum luminance recorded was spot on the 250 cd/m2 specified whilst the minimum white luminance recorded was 76 cd/m2. This gives a comfortable adjustment luminance range to play with of 174 cd/m2 with sensible values available for both bright and dimly lit rooms. There are two dynamic contrast settings available on the monitor which allows the backlight to dim or brighten in response to the image. Because the backlight is controlled as one unit (BLU) and most images are mixed in nature this is sort of a compromise. The main dynamic contrast mode is called ‘DCR’ (Dynamic Contrast Ratio). This provides fairly gradual adjustments to the backlight intensity, tending towards fairly high brightness even during mixed images. You can’t change the brightness, contrast or gamma mode with this feature enabled but can access all other adjustments. The ‘DPS’ (Dynamic Power Saver) feature which we’ve mentioned a few times already is another dynamic contrast setting which gives full access to all settings. It provides slightly more rapid but not too pronounced changes in brightness to reflect the overall makeup. It actually allows you to set the brightness yourself, which is the peak it will reach for the brightest (whitest) images. Because it is designed to save power it only dims from there, dimming most for the darkest (blackest) images. Because it is fairly gentle and the changes are not too dramatic for mixed images you may not even notice that the DPS setting is enabled by default on the monitor. That’s a good thing, really. Although not fans of dynamic contrast modes this is one of the more flexible and usable ones we’ve seen. The AOC i2369Vm uses PWM (Pulse Width Modulation) dimming to reduce backlight brightness to any value below 100%. This is extremely common on modern monitors. The backlight switches on and off extremely rapidly with a decreased pulse frequency decreasing brightness. Some users are sensitive to this, particularly for the potentially ‘stronger’ flickering at lower brightness. Some users can experience visual discomfort as a result of this whereas others either don’t notice are aren’t adversely affected. This isn’t something to worry about ‘by default’ but it is something to be aware of. The video below shows this flickering as captured by a high sensitive camera. Here it manifests itself as strobing lines rather than the rapid flicker some users will see with their eyes. Observing an entirely black screen in a dark room revealed slight backlight bleed and some minor clouding. The bottom left was the worst offender here but there was nothing particularly bothersome, which is good. The most noticeable issue was the notorious ‘IPS glow’ which is typical for this panel type. This is related to the light behaviour in IPS matrices and manifests itself as a sort of silvery blue and orange sheen that appears to move as you move your head. Despite being most noticeable off angle it still persists from a normal viewing position, particularly near the corners of the screen. The effect of this is explored deeper into the review. People don’t tend to spend a lot of time staring at a black screen in a dark room, so it’s important to consider the uniformity of lighter colours as well. To assess this we used a Spyder4Elite colorimeter to measure the luminance of 9 equidistant white ‘quadrants’ laid out across the screen from top left to bottom right. The table below shows the luminance recorded at each quadrant and the percentage difference between a given quadrant and the brightest point. The luminance uniformity was pleasing. The maximum luminance was in the centre of the screen (‘quadrant 5’) where 172.6 cd/m2 was recorded using our test settings. The most significant variation from this was observed left of centre (‘quadrant 4’) where the screen was 10% dimmer at 155.4 cd/m2. Elsewhere deviation was a single percentage point away from the central value, most commonly 6%. The lowest deviations occurred at the top central region (‘quadrant 2’, 4% deviation at 165.6 cd/m2) and the top left (‘quadrant 1’, 1% deviation at 171.1 cd/m2). Uniformity can vary between units but this is very pleasing to see for any class of monitor, not least a budget model. The contour map below gives a graphical representation of this variation. The lighter the grey, the higher the luminance. Contrast performance on Battlefield 3 was respectable overall. Visibility in dark areas was good with even some fairly minor details visible. Towards the corners of the screen, and to a lesser extent the central flanks, PS glow drowned out some this detail. The high end hand plenty of brightness and good distinctions of closely matched shades. Light and light textures had a bit of a grainy look to them from the screen surface, though. On Dirt 3 low-end (dark) detail was again good in most cases with all important details visible. There was some loss in peripheral sections (particularly corners) due to IPS glow but nothing game breaking. The slightly grainy look at the high-end prevented lights looking ‘pure’ but there was plenty of brightness. We also tested the Blu-ray of the latest Bond film Skyfall. Contrast was good on this title. Whites and light colours, again, had a slightly grainy look to them from the screen surface but were appropriately bright and varied without bleaching. No important details were missing at the low-end, either. Some minor details were missing in places, particularly towards the corners of the screen. Due to the ‘ultra wide’ aspect ratio there were black bars around 30mm thick at the top and bottom of the screen. These covered the areas most affected by IPS glow from a normal seated position. On the plus side this meant the picture itself was largely unaffected. On the minus side the black bars didn’t look entirely black. The final part of this section looks at the Lagom contrast tests, highlighting even small weaknesses in contrast performance. The following observations were made on the i2369Vm. The AOC i2369Vm’s colour gamut closely mirrors the sRGB colour space, as you’d expect given its standard WLED backlight. The image below shows the colour gamut of the monitor under our test settings (red triangle) compared to the sRGB reference (green triangle). There is a touch of under-coverage on some green shades and slight over-coverage of other green shades. Overall though, a very close match. Battlefield 3 looked very much as it should. Colours were displayed with good richness and variety with some particularly impressive earthy browns and crisp golden greens. Some of the deeper colour, such as strong oranges and dark reds, also had appropriate fullness without appearing the wrong shade. The ‘neon’ in game markers and bright elements such as fires and flares didn’t have the sort of ‘pop’ you might see on a glossy screen but still looked fairly vibrant. Dirt 3’s environments looked rich, natural and very much as they should. Greens had good depth and richness with some impressive golden brown tones in the mix. This richness was also reflected by the car paint jobs and advertising around the courses. Deep reds and orangs were particularly impressive. Deep blues were also good, although some blue shades could have been a touch deeper. Neon pinks, greens and cyans didn’t ‘pop’ as much as they sometimes do nor did they have that smooth painted on look. This is again down to the screen surface. Such observations aside, the colours were certainly not washed out and the AOC presented colours well on this title. We also tested our Blu-ray film titles. Futurama: Into the Wild Green Yonder is a particularly good test for colour reproduction as it features large areas of solid colour and a dazzling variety of shades. The AOC displayed these shades very well, displaying deep shades and bright neon shades with a good vivid look. Pastel shades looked appropriately muted by comparison and again showed strong variety. The consistency of shades was also excellent; individual shades appeared as they should regardless of their position on the screen. The Blu-ray of Skyfall had a strong range of colours and an appropriately natural (believable) look. The range of muted greens and earthy browns certainly aided this. Skin tones, most of the greens of vegetation and the brickwork of buildings also showed appropriate tone and saturation. Some of the more notable vibrant elements in this film include the neon lights of Shanghai at night. These looked vivid and lively despite lacking the vibrant ‘pop’ and purity that you would see on a decent glossy monitor. The strong colour consistency was demonstrated further in Lagom’s viewing angle tests. The following was observed. We used a modified ‘camera and stopwatch’ type method to gauge an estimation of the level of input lag on the monitor. The basic method involves a camera at high shutter speed capturing a running on-screen stopwatch (with millisecond accuracy). The stopwatch is displayed simultaneously on the monitor being tested and a monitor of known input lag. Traditionally the monitor of known input lag is a CRT display that does no image processing and can be considered input lag free. To help improve the accuracy of this test we take an average from over 120 readings and compare with multiple monitors of known signal processing delay. This gives a greater number of milestones to work from and helps narrow down the input lag more reliably. On the AOC i2369Vm we measured under 4ms (less than quarter of a frame) of input lag, which is excellent. Although felt responsiveness is determined by other factors as well (such as refresh rate) that’s certainly one less thing for gamers to worry about. To help analyse the pixel response performance of the monitor we used a handy little tool called PixPerAn (Pixel Persistence Analyser). We selected the fastest ‘tempo’ on this tool to create very rapid motion. A highly sensitive camera was used to capture any trailing on the monitor that results from the pixel responses (changing state from one colour to another). The monitor offers configurable pixel overdrive settings. The images below show overdrive set to ‘Off’, ‘Weak’, ‘Medium’ and ‘Strong’, respectively. With overdrive disabled (‘Off’) you can see a bold primary trail and faint secondary trail. The ‘Weak’ setting actually provides a good degree of acceleration to many pixel transitions. In this example the secondary trail becomes pretty much invisible whilst the primary trail is weakened. Looking at a broader range of pixel transitions, as we do shortly, you can actually see a significant improvement over the ‘Off’ setting. Despite its name the overdrive is quite strong and effective – there is a degree of overshoot (inverse trailing) in some instances, but this is reasonably light. The ‘Medium’ setting is the monitor default and provides even greater acceleration. In this snapshot you can see a sharpening and brightening of the trail – indications of moderate overshoot. Essentially the mild overshoot using the ‘Weak’ option now becomes somewhat stronger and more widespread. The ‘Strong’ setting gives significant overshoot and as demonstrated by PixPerAn is not a suitable setting to use really. For our testing (below) we set overdrive to ‘Weak’ as we felt this offered the best balance. Users should feel free to experiment with the other settings to see what works best for them. On Battlefield 3 a moderately low degree of trailing was observed whilst running about on foot. The trails were short and sharp rather than extended and smeary. It was clear that effective overdrive was being used. There were instances of fairly weak overdrive trailing, mostly manifesting itself as a sort of partially transparent glow around certain contrasting colours. A dark grey building set against a bright blue sky, for example. Ramping up the pace of action by zipping about in a vehicle increased apparent trailing, as you might expect. At this fast pace the degree of sharpness maintained was about as good as you would see on a 60Hz LCD. The refresh rate and perceived blur became overriding limitations rather than the pixel response times. Overall, then, a competent performance from the AOC on this title. The refresh rate and perceived blur limitations were also apparent during the rapid spins of Gymkhana on Dirt 3. Here there was a significant level of blur – but no real weaknesses that you wouldn’t observe on even the fastest 60Hz LCDs. During races on this title there was some trailing even during fairly gentle cornering. The track maintained quite a good degree of sharpness, though, and no extensive ‘smearing’ or extended trails were evident. There was some mild overshoot in places, again manifesting itself most often as a partially transparent ‘glow’. There was also a degree of dark overdrive trailing on transitions between dark and very dark greys (colours). This was blended in well and we didn’t find it at all distracting. It is worth noting that different people have different sensitivities to overdrive trailing. It is quite mild in the i2369Vm using the ‘Weak’ setting and less distracting, we feel, than the trailing it replaces. It would be nice to have a setting some way between ‘Off’ and ‘Weak’. Really, though, the overdrive is far more effective than what you usually see on a budget (or sometimes even a higher end) IPS monitor. We also tested responsiveness on our Blu-ray movie titles. The fluidity here was limited by the low frame rate of around 24fps at which they are shot and run. This essentially broke up the action in such a way that there were no weaknesses evident from either pixel transitions or overdrive artifacts. If you did observe overdrive artifacts during films you could always disable overdrive with no negative consequences. The native pixel transitions on modern IPS monitors are fast enough for movie viewing even without pixel overdrive enabled. Disabling overdrive, should you wish to, is a nice flexibility that you have on the AOC. The AOC i2369Vm is in many ways an impressive monitor, not least for the image quality on offer at such a low price. The monitor provided a rich and fairly well balanced image straight from the box with excellent gamma performance. There was a slight colour imbalance (green tint) on our unit but the flexible and well-laid out OSD allowed this to be easily rectified. The variety and consistency of colours made for a rich and rewarding gaming and movie experience. The matte screen surface didn’t provide quite the same vibrant punch as a glossy (or semi glossy) one, but the image was far from being bland or washed out. The contrast performance very good by many measures and essentially up there with many of the stronger IPS panels we’ve seen. There was the usual IPS glow to contend with but this is just one of those trade-offs that applies to all IPS and PLS panels on the market today. The image was clearer and less grainy than some of the older IPS models (such as the Dell U2312HM), which is good to see. We do feel LG could have gone a bit further here, reducing the haze value a bit more and essentially making the matte surface even lighter. The image was not as ‘clean’ as that provided by some of the higher end AH-IPS panels such as the 27” WQHD models or indeed Samsung’s ‘semi glossy’ PLS surface. Still, that’s something for LG to consider and isn’t something AOC themselves are in control of. The responsiveness of the i2369Vm was mostly pleasing. There was very little input lag and good flexibility with the strength of pixel overdrive (grey to grey acceleration). Even using the ‘Weak’ setting, which is the lowest available level of acceleration after ‘Off’, there was some inverse ghosting in places. This was relatively mild, though, and despite its name this setting was anything but weak. The acceleration was effective enough to reduce trailing to some of the lowest levels we’ve seen on an IPS monitor. With pleasing image performance, strong responsiveness and attractive pricing the monitor already has a lot going for it. Then there are a few other nice additions to consider such as very slender bezels, an MHL-capable HDMI port and a DisplayPort input. Unlike HDMI, DisplayPort is a PC-only input and it means the GPU will send out the correct colour signal without any ‘tweaking’ of the graphics driver. A really nice package here from AOC and a worthy choice for any budget-conscious user.
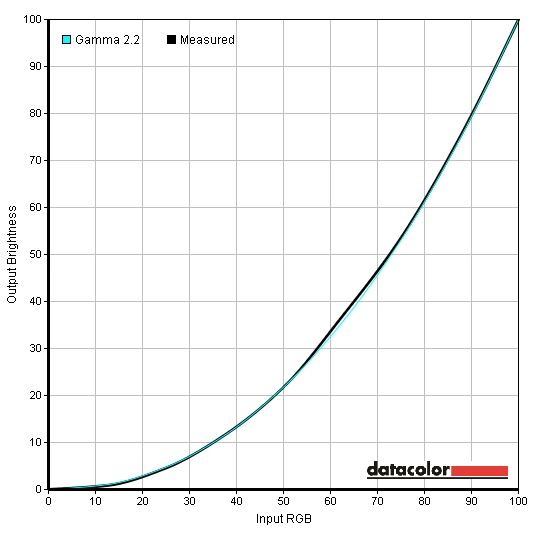
Gamma curve 'Gamma1'

Gamma curve 'Gamma2'

Gamma curve 'Gamma3'
Test Settings
Brightness= 66 (according to preferences and lighting)
Contrast and brightness
Contrast ratios
Monitor Profile White luminance (cd/m2) Black luminance (cd/m2))) Contrast ratio (x:1) ‘Gamma1’, 100% brightness 250 0.24 1042 ‘Gamma1’, 80% brightness 216 0.20 1080 ‘Gamma1’, 60% brightness 182 0.17 1071 ‘Gamma1’, 40% brightness 147 0.14 1050 ‘Gamma1’, 20% brightness 112 0.11 1018 ‘Gamma1’, 0% brightness 76 0.07 1086 Test Settings
172 0.18 956 Gamma2
232 0.22 1055 Gamma3
234 0.22 1064
PWM (Pulse Width Modulation)
Luminance uniformity
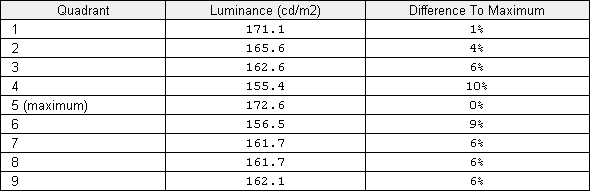
Luminance uniformity table
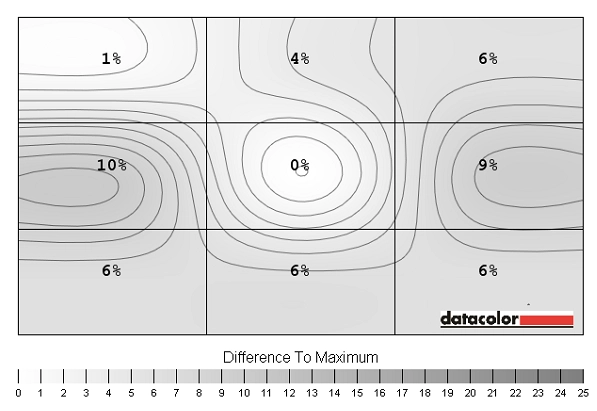
Luminance uniformity map
Contrast in games and movies
Lagom contrast tests
Colour reproduction
Colour gamut
Colour gamut test settings
Colour in games and movies
Viewing angles
To help illustrate the viewing angle performance of the monitor we took a video of the Lagom text test, a mixed desktop background and dark desktop background from a variety of viewing angles. Slight differences that can be observed even from a normal seated position are difficult to capture on camera but more significant shifts ‘off centre’ can be captured quite readily. The video shows a strong performance overall without any significant colour shifts or inversion. The dark background (final third of the video) demonstrates the aforementioned IPS glow.
Responsiveness
Input lag
Pixel responsiveness

Trailing Overdrive 'Off'

Trailing Overdrive 'Weak'

Trailing Overdrive 'Medium'

Trailing Overdrive 'Strong'
Responsiveness in games and movies
Conclusion
Positives Negatives Pleasing colour reproduction with good richness, strong shade consistency and excellent gamma tracking
Matte screen surface eats away at vibrancy slightly
A very good static contrast performance putting it up there with some of the best IPS models out there The matte screen surface gives a slightly grainy appearance to light colours – it’s lighter (lower haze value) than some older IPS models but not quite ‘semi glossy’ Very low input lag and highly configurable pixel overdrive with some good strong acceleration even using the not-so-aptly named ‘Weak’ overdrive setting
Some overdrive artifacts (overshoot) even using the ‘Weak’ setting – relatively mild but still there
A nice design overall with very slender bezels, touches of fingerprint-resistant matte silver (plastic), VESA mounting capability and a DisplayPort input
Stand offers only tilt adjustment and is fairly wobbly if you touch the monitor (to adjust the OSD settings, for example)
An excellent price Not available in the United States (unless imported) at time of writing
![]()

