Author: Adam Simmons
Date published: November 23rd 2016
Table of Contents
Introduction
Whilst initial high refresh rate models were restricted to TN (Twisted Nematic) panel technology, we’ve recently seen a few high refresh rate models making use of alternative panel types. This includes 27” 144Hz AHVA (Advanced Hyper-Viewing Angle) panels with a 2560 x 1440 resolution, an IPS (In-Plane Switching) type technology designed for superior colour consistency and viewing angle performance compared with TN. These AHVA panels are used on a relatively small number of models currently, including the ViewSonic XG2703-GS. The AOC AGON AG271QG makes use of the same AHVA panel, providing a potentially attractive mixture of responsiveness and image quality. To further entice gamers, this monitor includes support for Nvidia G-SYNC and a 165Hz refresh rate. We put this screen to the test using a range of ‘real-world’ applications, including games and movies, and see if it’s as good in practice as it is on paper.
Specifications
This model features a 27” AU Optronics AHVA (Advanced Hyper-Viewing Angle) panel, an IPS-type panel supporting a 165Hz refresh rate. This offers true 8-bit colour per channel with a 4ms grey to grey response time specified. Some of the key ‘talking points’ have been highlighted in blue below.
Key talking points of the specifications are highlighted in blue below.
Features and aesthetics
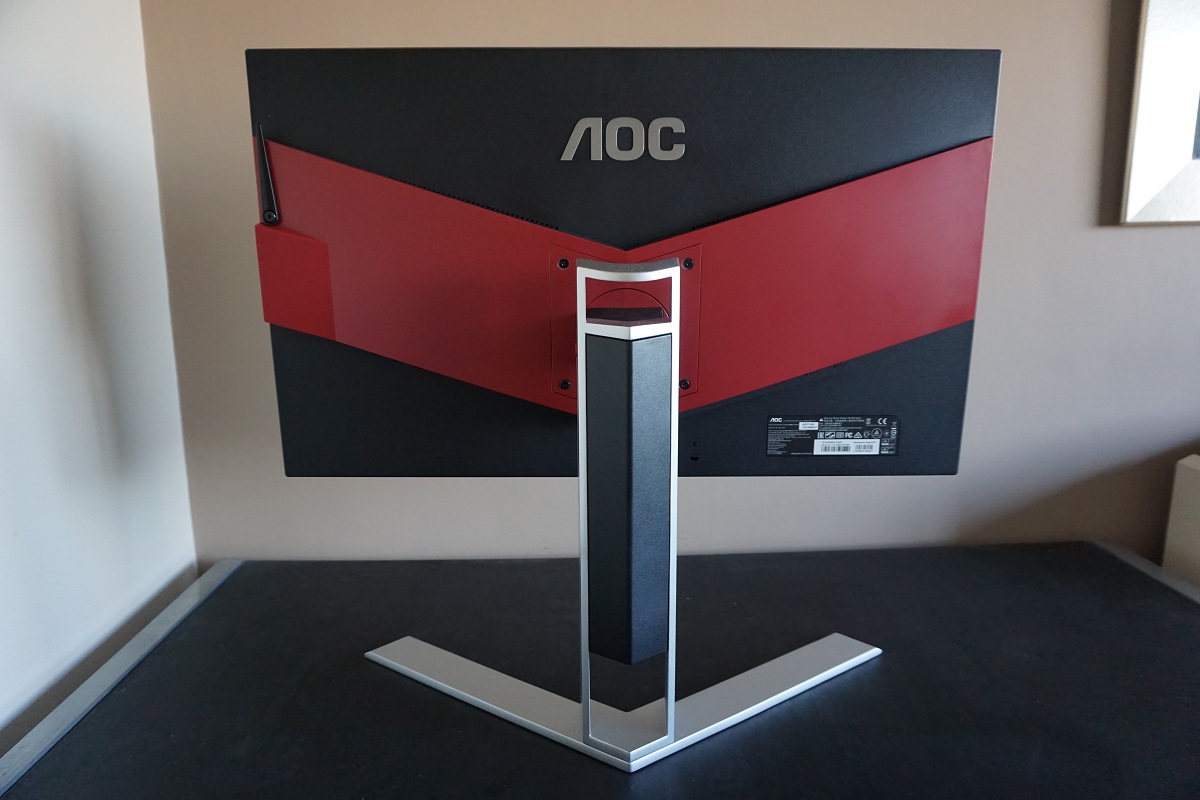
The monitor has a reasonably understated (but still interesting) look for a gaming monitor. The bezels cover the panel border pretty much entirely, in contrast with some modern designs that feature a reasonably prominent panel border and a very slender outer bezel. The bottom bezel has a brushed texture effect whereas the remaining bezels are plain matte. The included stand offers excellent stability and is quite heavy-duty, comprising powder-coated metal with a forked stand base. As explored later, the screen surface used here is light matte anti-glare.
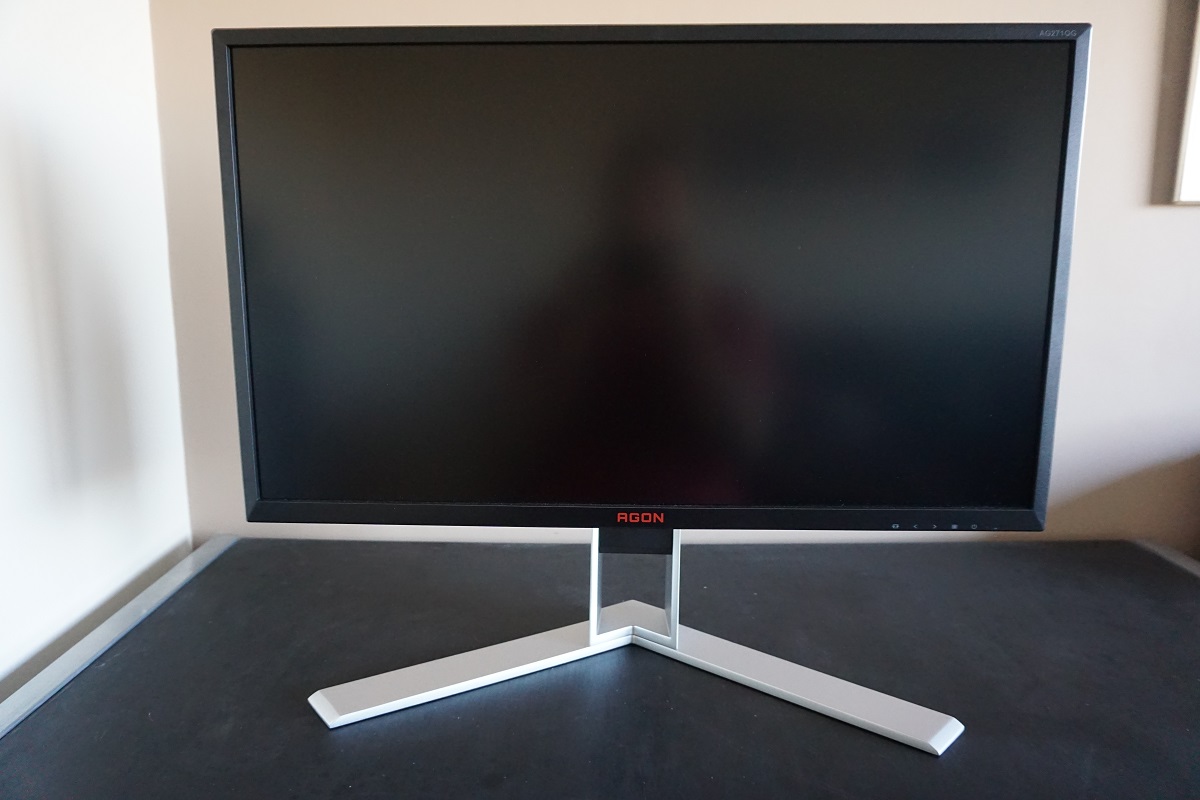
The dark red of the AGON logo, central to the bottom bezel, is really the only splash of colour on the front of the monitor. Aside from in the image, when it’s turned on of course. Towards the bottom right of this bottom bezel you can see some painted OSD (On Screen Display) control button labels. The controls themselves are pressable rather than touch-sensitive buttons which face downwards. The video below runs through this OSD menu system.
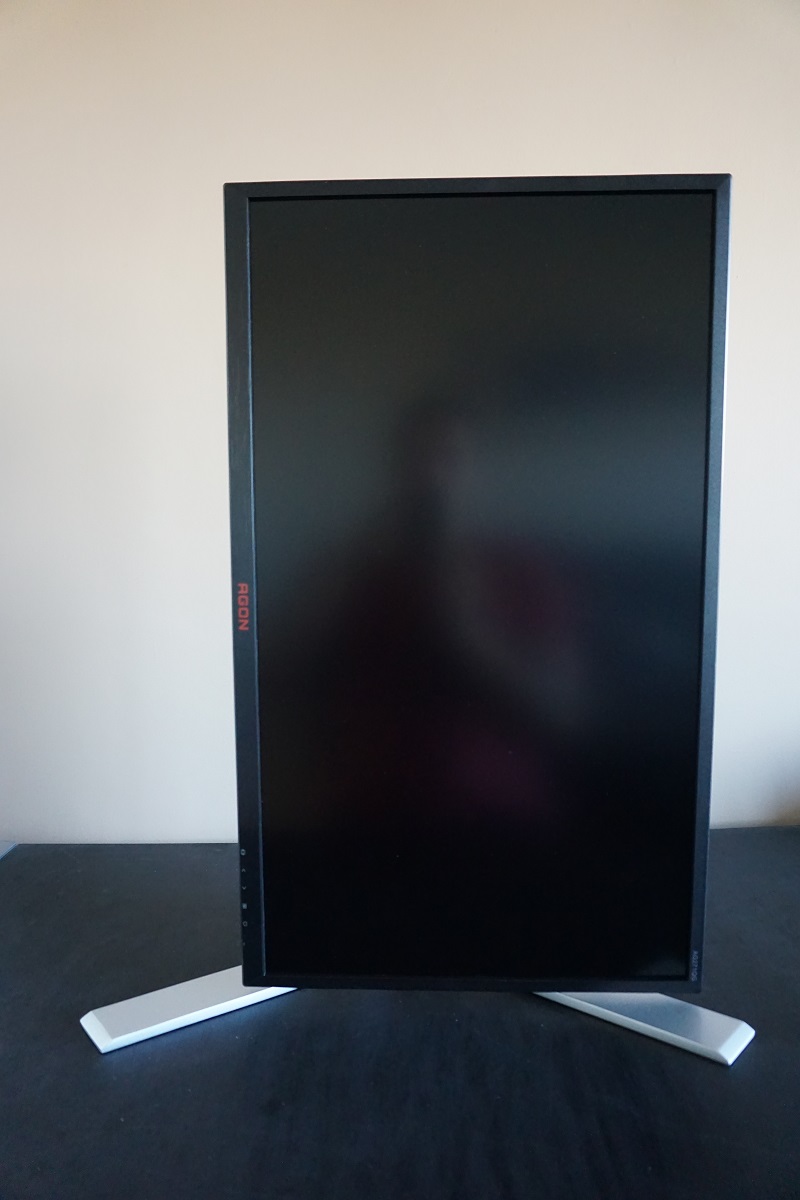
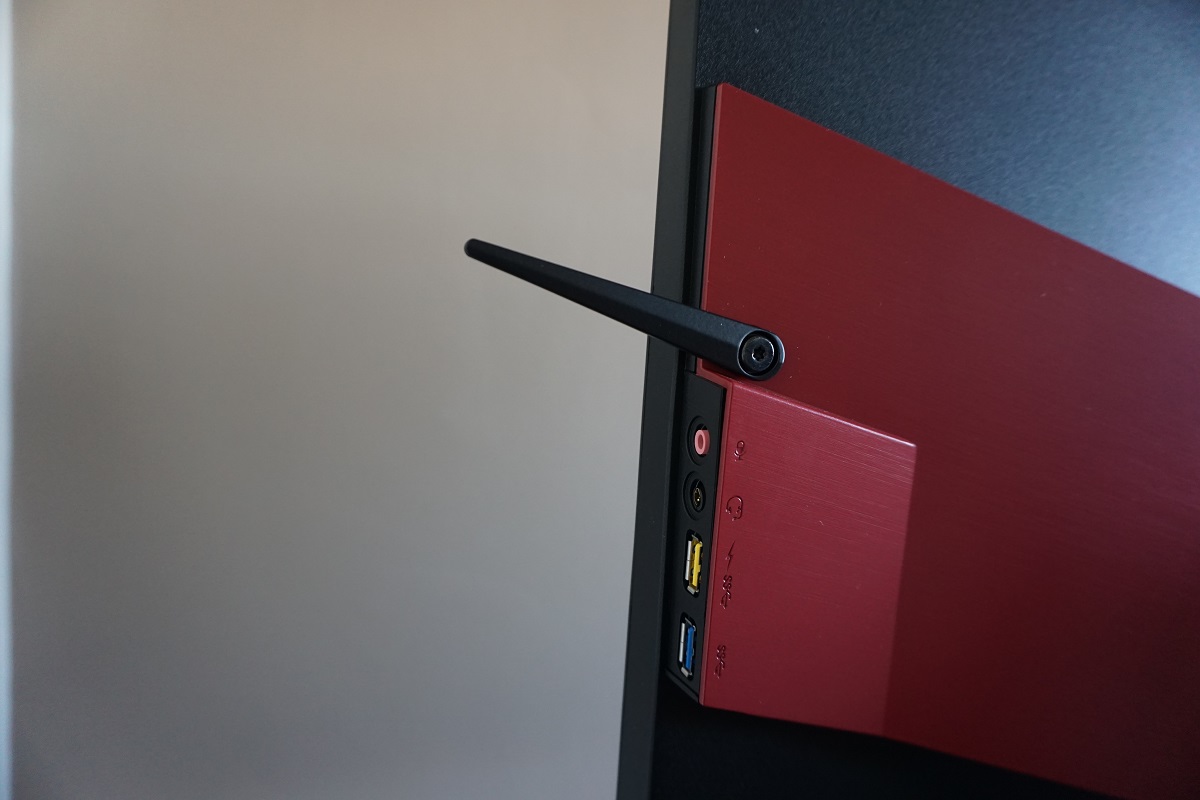
From the side the screen is quite svelte – ~16.5mm (0.65 inches) at thinnest point, bulking out centrally. At the right side of the monitor there is a retractable headphone hook, which is a bit like an aerial that you can move down so that it sticks out at the side. There is also a 3.5mm microphone jack, 3.5mm audio output and 2 USB 3.0 ports (yellow supports fast-charging). The solid stand is also clearly visible from this orientation. There is a sliding scale to aid height adjustment (and preferred adjustment points) along the right side as well, with a small red plastic triangular marker. The stand offers full adjustability; tilt (3.5° forwards, 21.5° backwards), swivel (20° left, 20° right), height adjustment (130mm or 5.12 inches) and pivot (90° clockwise rotation into portrait). At lowest height the screen clears the desk by ~71mm (2.80 inches) with the top of the screen ~438mm (17.24 inches) above the desk surface. The total depth of the monitor including stand is ~235mm (9.25 inches).
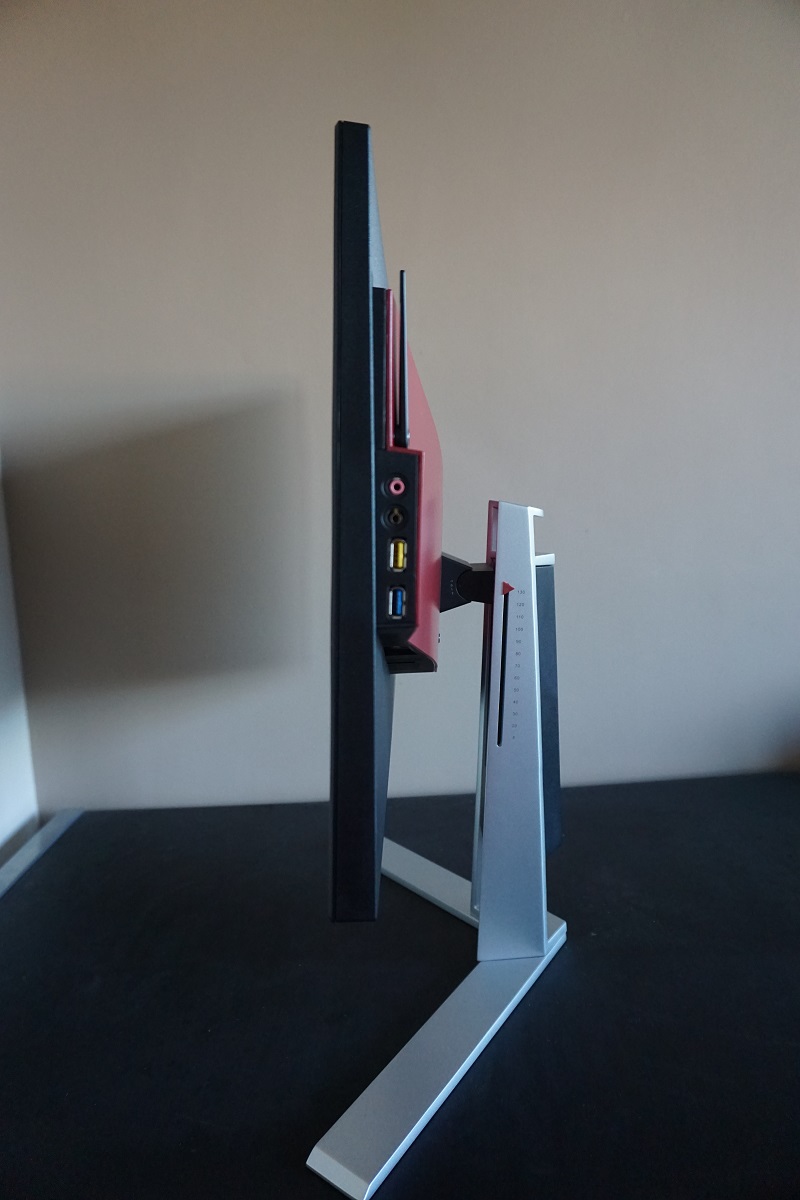
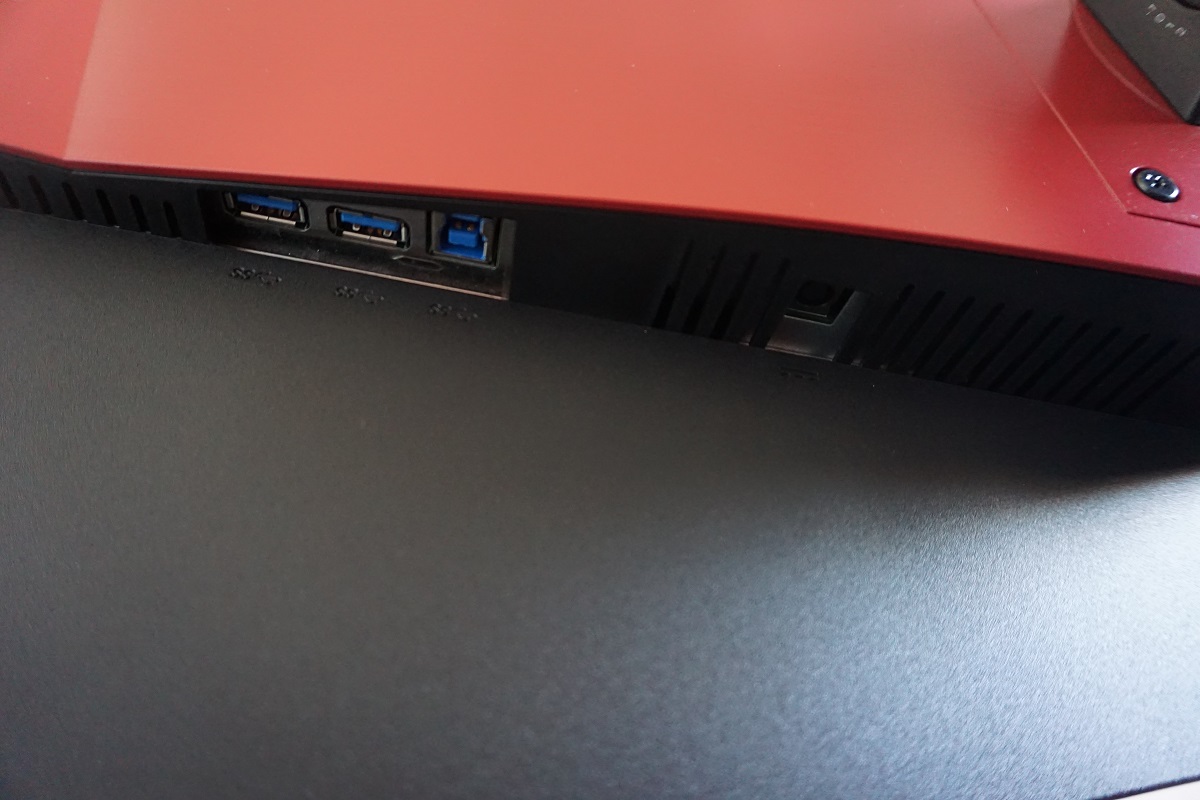
The rear of the screen adds a splash of colour in the form of dark red brushed-effect matte plastic ‘wings’, which run through the central region of the monitor. The stand attaches centrally via 100 x 100mm VESA, with a special plate included to allow an alternative VESA 100 solution to be used instead. Note that the screws which are used to attach the stand to the stand are black, located in a small bag that should be stuck to the protective wrapping around the stand. 2W speakers are included for basic and fairly low-quality sound output, with a range of down-firing ports. To the left of the stand base, as viewed from the rear, there are 2 USB 3.0 ports (plus upstream) and a DC power input (external power brick). To the right of the stand base there is; DP 1.2a (supports G-SYNC), HDMI 1.4 and a 3.5mm microphone jack. There’s also a Kensington lock socket beneath this port area.
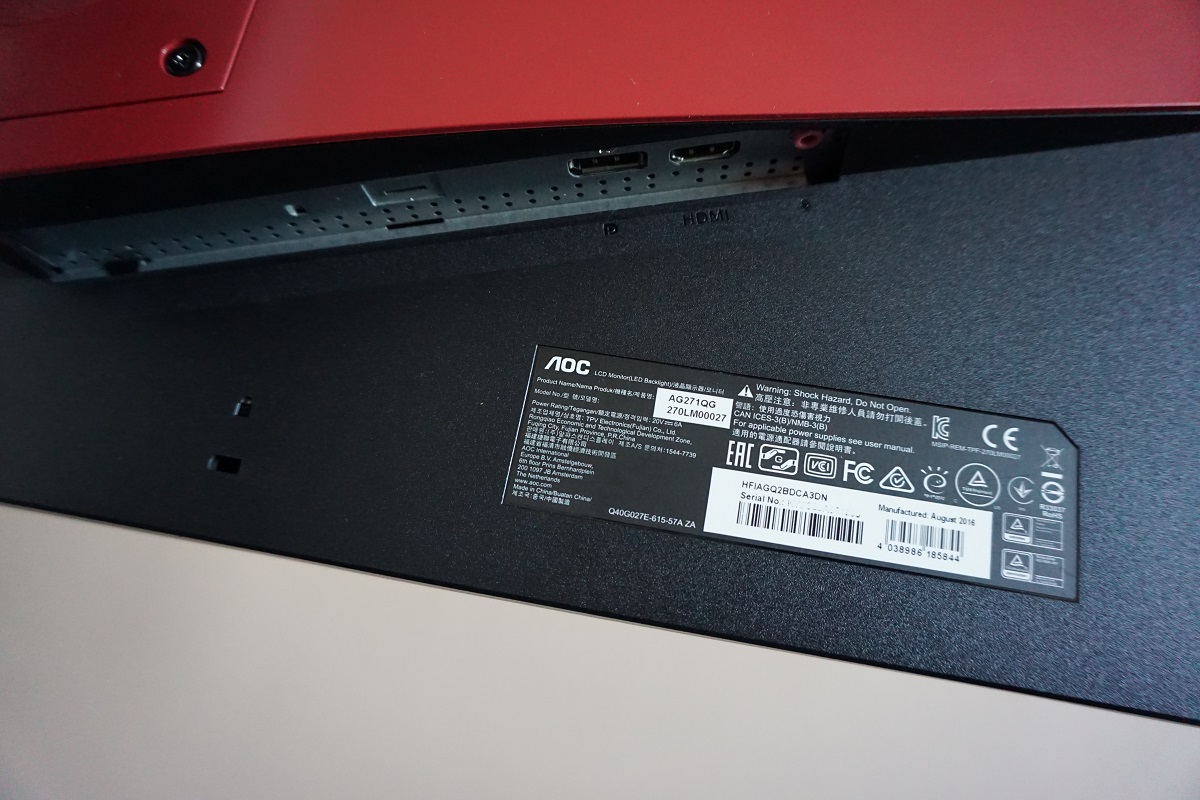
DP 1.2 must be used to access the full capabilities of the monitor, including 165Hz and Nvidia G-SYNC. The latter also requires a compatible Nvidia GPU to be used. The HDMI 1.4 port is simply there for compatibility with other devices such as games consoles. Standard accessories include the power cable, DP cable, HDMI cable, USB 3.0 cable and 3.5mm audio cable.
Calibration
Subpixel layout and screen surface
A light matte anti-glare screen surface is used on this monitor, with a smooth surface texture to keep the image free from obvious graininess. The low haze value (‘light’) element of this also aids the vibrancy potential of the monitor, whilst it still maintains good glare-handling characteristics to avoid the sorts of reflections you’d see on a glossy screen. Regardless of screen surface, it’s important to think about your lighting environment and avoid light hitting the screen directly, where possible, or very high levels of ambient light.
![]()
The subpixel layout of the monitor is the standard RGB (Red, Green and Blue) stripe, shown in the image above. This is the most common layout and the one which modern operating systems including Microsoft Windows and Apple’s MacOS are configured to handle properly by default. As a Windows user there is no need to run through the ClearType wizard, although you may still wish to do so according to preferences. And as a Mac user you needn’t worry about text fringing issues caused by less usual subpixel layouts.
Testing the presets
As we explored in the previous section, the monitor offers quite a cut-down OSD. This is quite typical for G-SYNC monitors and was certainly the case with the AOC G2460PG. As such there are no presets included, but there are a few adjustments that can made in terms of colour temperature (and colour channels) as well as the usual 3 gamma settings. In the table below we provide key readings (gamma and white point) and observations using a range of different settings. The readings were taken using a Datacolor Spyder5ELITE colorimeter. Our test system used an Nvidia GeForce GTX 1070 G-SYNC compatible GPU, connected via DisplayPort. Windows 10 is used on this system with the monitor connected to the PC without additional drivers or ICC profiles loaded. The monitor was left to run for over 2 hours before readings were taken. Aside from for our ‘Test Settings’ assume any setting not mentioned was left at default. The exception to this is that the refresh rate was set to 165Hz (where ULMB was disabled) as this was used for most of our testing. Unlike on some monitors, increased refresh rates did not impair image quality. For testing with ULMB active, brightness was increased from the default ‘90’ to ‘100’.
| Monitor Settings | Gamma (central average) | White point (kelvins) | Notes |
| Gamma1 (Factory Defaults) | 2.3 | 6886K | Very bright but a rich look to the image with strong shade variety and consistency. The image has a blue-green bias and some shades have a little extra depth due to gamma handling, but nothing excessive for general use. |
| Gamma2 | 2.1 | 6882K | The image appears more faded in places, with the adjustments to gamma sapping some shades of depth. Still looks rich (and very bright) overall. |
| Gamma3 | 2.5 | 6879K | Excessive depth in places due to gamma handling with poor distinctions between dark shades. |
| Color Temp. Normal | 2.3 | 7379K | Somewhat dimmer than factory defaults but still very bright with an obvious cool tint to the image. |
| Color Temp. User | 2.2 | 6907K | Noticeably dimmer than factory defaults with weaker contrast. The neutral colour channel position on this monitor (i.e. point of optimal contrast) is actually ‘65’ for each channel as per factory defaults, but ‘User’ defaults to ‘50’ for each channel – be aware of this when making adjustments. |
| Low Blue Light = 20 | 2.3 | 5369K | This is an effective ‘Low Blue Light’ setting, which significantly weakens the blue colour channel and hence decreases blue light output from the screen. The image is somewhat dimmer than default and noticeably warmer-looking, especially once you first switch and your eyes haven’t adjusted. It’s appropriate for relaxing evening viewing where stimulating blue light should be reduced. |
| ULMB @ 120Hz | 2.2 | 7044K | The image is significantly dimmer than factory defaults with a mild flickering induced (like a 120Hz CRT). The backlight strobes at 120Hz. Sensitivity to this flickering and indeed the brightness varies between individuals, but both elements become less noticeable once your eyes adjust. |
| ULMB @ 100Hz | 2.2 | 7178K | As above with slightly more obvious flickering and marginally higher perceived brightness. The backlight now strobes at 100Hz. |
| ULMB @ 85Hz | 2.3 | 7115K | As above, but flickering is now even more obvious and to our eyes uncomfortable. Perceived brightness is increased a fair bit as well – the longer ‘on’ period and lower frequency (85Hz strobe) accounts for these differences. |
| Test Settings (see below) | 2.3 | 6460K | As factory defaults with much more comfortable brightness and better white point balance. The image appears rich and varied with strong consistency (unlike TN alternatives where saturation levels weaken lower down the screen). |
Out of the box the monitor was very bright but quite well balanced overall – the image appearing far more vibrant than it did washed out. The consistent shades that you’d hope for from an IPS-type panel were also apparent, without the obvious gamma and saturation level shifts occurring when viewing different sections of the screen. There was a slightly cool-green bias to the image but nothing severe and easy enough to correct with colour channel adjustments. Although gamma did not track perfectly as ‘2.2’ under any setting, the default gamma mode provided decent gamma performance with a little sagging to ‘2.3’ for some mid-shades. This gamma setup is certainly good enough for the intended uses of the monitor and in fact some users would appreciate the little bit of extra depth and vibrancy to some shades. The image below shows the gamma tracking under our ‘Test Settings’. The monitor also includes a ‘Low Blue Light’ slider which can be set between ‘0’ (off) and ‘20’ (maximum effect) in single unit increments. At maximum level in particular, and especially when coupled with reduced brightness, this proved effective and we do appreciate having this sort of setting for relaxing evening viewing. We would have liked an easy way to toggle this setting. This is something which some other manufacturers, such as BenQ, have mastered by integrating the setting into presets that can be easily enabled and disabled without even entering the main OSD. It is also applied on top of other ‘Color Temp.’ settings, which is good in terms of flexibility but potentially a bit confusing. It is especially confusing if you use the ‘User’ setting, as activating ‘Low Blue Light’ knocks down the blue colour slider a bit, but this change is only visible after re-entering the menu. The setting provides a much stronger effect than simply manually setting the blue colour channel to this value, though, so it seems to just be a quirk in the system. If you want to preserve any customisations made to the ‘User’ settings, we’d advise switching to the ‘Warm’ setting and then changing the slider for ‘Low Blue Light’. We are also aware that some users will be curious about the ‘sRGB’ setting for colour temperature which was not mentioned in the table. This was not featured as it is identical to the factory defaults but with far less flexibility in what the user can control (including locked and high brightness levels). Our test settings involved significant reductions to brightness and some adjustments to colour channel to better balance things for 6500K without noticeable green bias. As noted earlier the gamma tracking on the monitor is perfectly adequate and in some respects quite attractive for the intended purposes of the monitor. Given this, inter-unit variation and some of the drawbacks mentioned in this article we will not be providing any ICC profiles for this monitor. For colour-critical work where absolute gamma precision is preferred there’s really no substitute for calibrating your own individual unit with a colorimeter or similar device – and downloading somebody else’s ICC profile can simply be counterproductive. Anything not mentioned here was left at default, including contrast which is set to ‘50’ by default (or ‘45’ with ULMB active. We’ve included the ‘Overdrive’ setting here just for reference, even though the default setting was used. Color Temp. = User Red= 65 Green= 61 Blue= 61 Overdrive= Medium Refresh rate= 165Hz We used a BasICColor SQUID 3 (X-Rite i1Display Pro) to measure the luminance of black and white, from which static contrast ratios were calculated. This data is presented in the table below, with the settings featured in the calibration section explored alongside different brightness levels. Aside from the exceptions mentioned in the calibration section, assume things were left at default. Blue highlights in this table show the results under our ‘Test Settings’. Black highlights on the table indicate the highest white luminance, lowest black luminance and peak contrast ratio recorded.
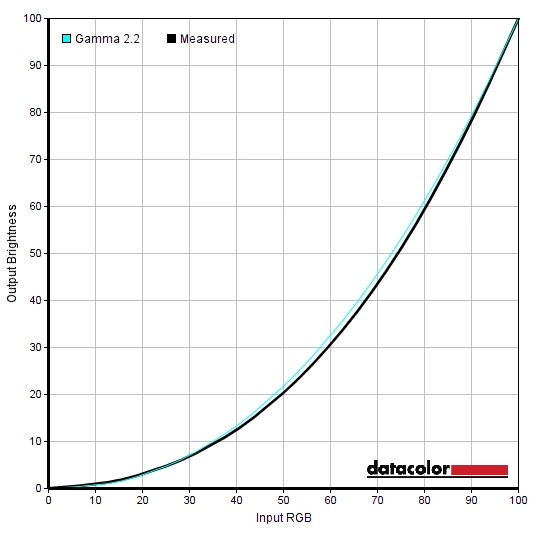
Gamma 'Test Settings'
Test Settings
Brightness= 32 (according to preferences and lighting)
Contrast and brightness
Contrast ratios
Monitor Settings White luminance (cd/m²) Black luminance (cd/m²) Contrast ratio (x:1) 100% brightness 384 0.32 1200 80% brightness (Factory Defaults) 331 0.28 1187 60% brightness 273 0.23 1187 40% brightness 207 0.17 1218 20% brightness 131 0.11 1191 0% brightness 42 0.04 1050 Factory Defaults (90% brightness) 358 0.30 1193 Gamma2 360 0.30 1200 Gamma3 358 0.30 1193 Color Temp. Normal 314 0.30 1047 Color Temp. User 207 0.30 690 Low Blue Light = 20 348 0.30 1160 ULMB @ 120Hz 129 0.12 1075 ULMB @ 100Hz 140 0.13 1077 ULMB @ 85Hz 174 0.17 1024 Test Settings 163 0.15 1087
The average contrast ratio with only brightness adjusted was 1171:1, which is pleasing for a non-VA LCD panel. Under our ‘Test Settings’ static contrast remained respectable at 1087:1, with similar values recorded using factory defaults and ULMB active. Impressively, even with the strongest ‘Low Blue Light’ setting contrast remained strong at 1160:1. The lowest contrast recorded was using the ‘User’ setting (690:1), which as explained in the calibration table was due to it using ’50’ for each channel rather than the neutral ‘65’. The peak luminance recorded in the table was an impressive 384 cd/m² and the minimum white luminance a relatively dim 42 cd/m². This provided a luminance adjustment range of 342 cd/m² without loss of contrast.
PWM (Pulse Width Modulation)
This monitor does not use PWM (Pulse Width Modulation) at any brightness level. DC (Direct Current) is instead used for backlight brightness regulation at all brightness settings. The backlight is therefore flicker-free at all brightness levels, which will come as welcome news to those worried about side-effects associated with PWM usage.
Luminance uniformity
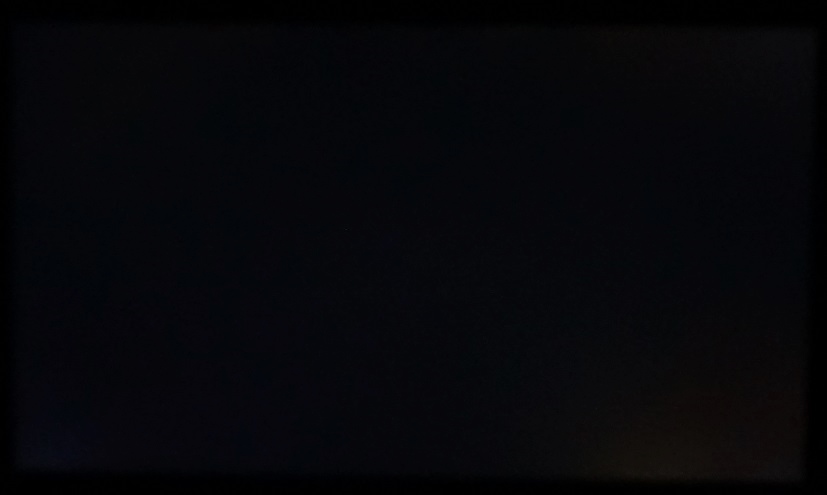
We observed a black background in a dark room and could see some backlight bleed, particularly as a sort of ‘spotlighting’ towards the bottom right corner. As is usual for IPS-type panels (including AHVA as used here), there is also a silverish or slightly yellow ‘glow’ that varies depending on viewing angle. This can be seen from a normal viewing position towards the bottom corners of the screen in particular. Unlike backlight bleed, it is not something that varies between individual units. It ‘blooms out’ more noticeably from a variety of viewing angles and its effects are explored later on in the review. There’s also a video showing how this glow is perceived from a variety of viewing angles. The photograph below was taken from a few metres back and perfectly central so that this ‘AHVA glow’ was not captured, instead offering an accurate reflection of how the backlight uniformity excluding this glow appeared for dark content.
We’d again like to stress that backlight bleed varies between individual units, although models using this panel seem somewhat more susceptible than average to moderate backlight bleed. We’d also advise caution when trying to assess or compare ‘backlight bleed’ of our unit to others on the internet. Users tend to post hugely over-exposed photographs, often taken relatively close to the screen and therefore capturing ‘AHVA glow’ as well as any backlight bleed. These do not accurately represent ‘backlight bleed’ or overall dark uniformity as the eye sees it.
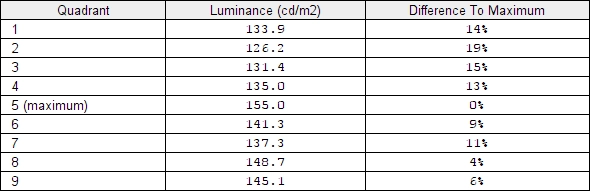
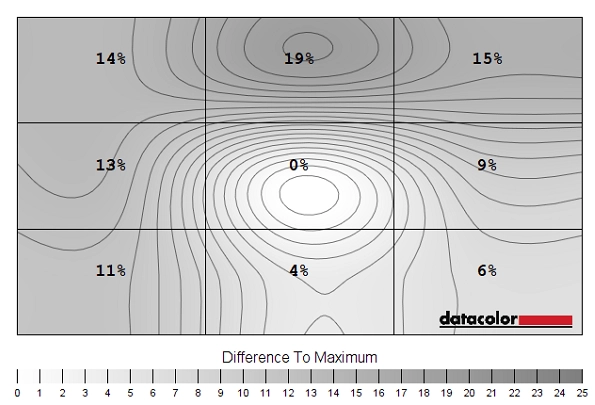
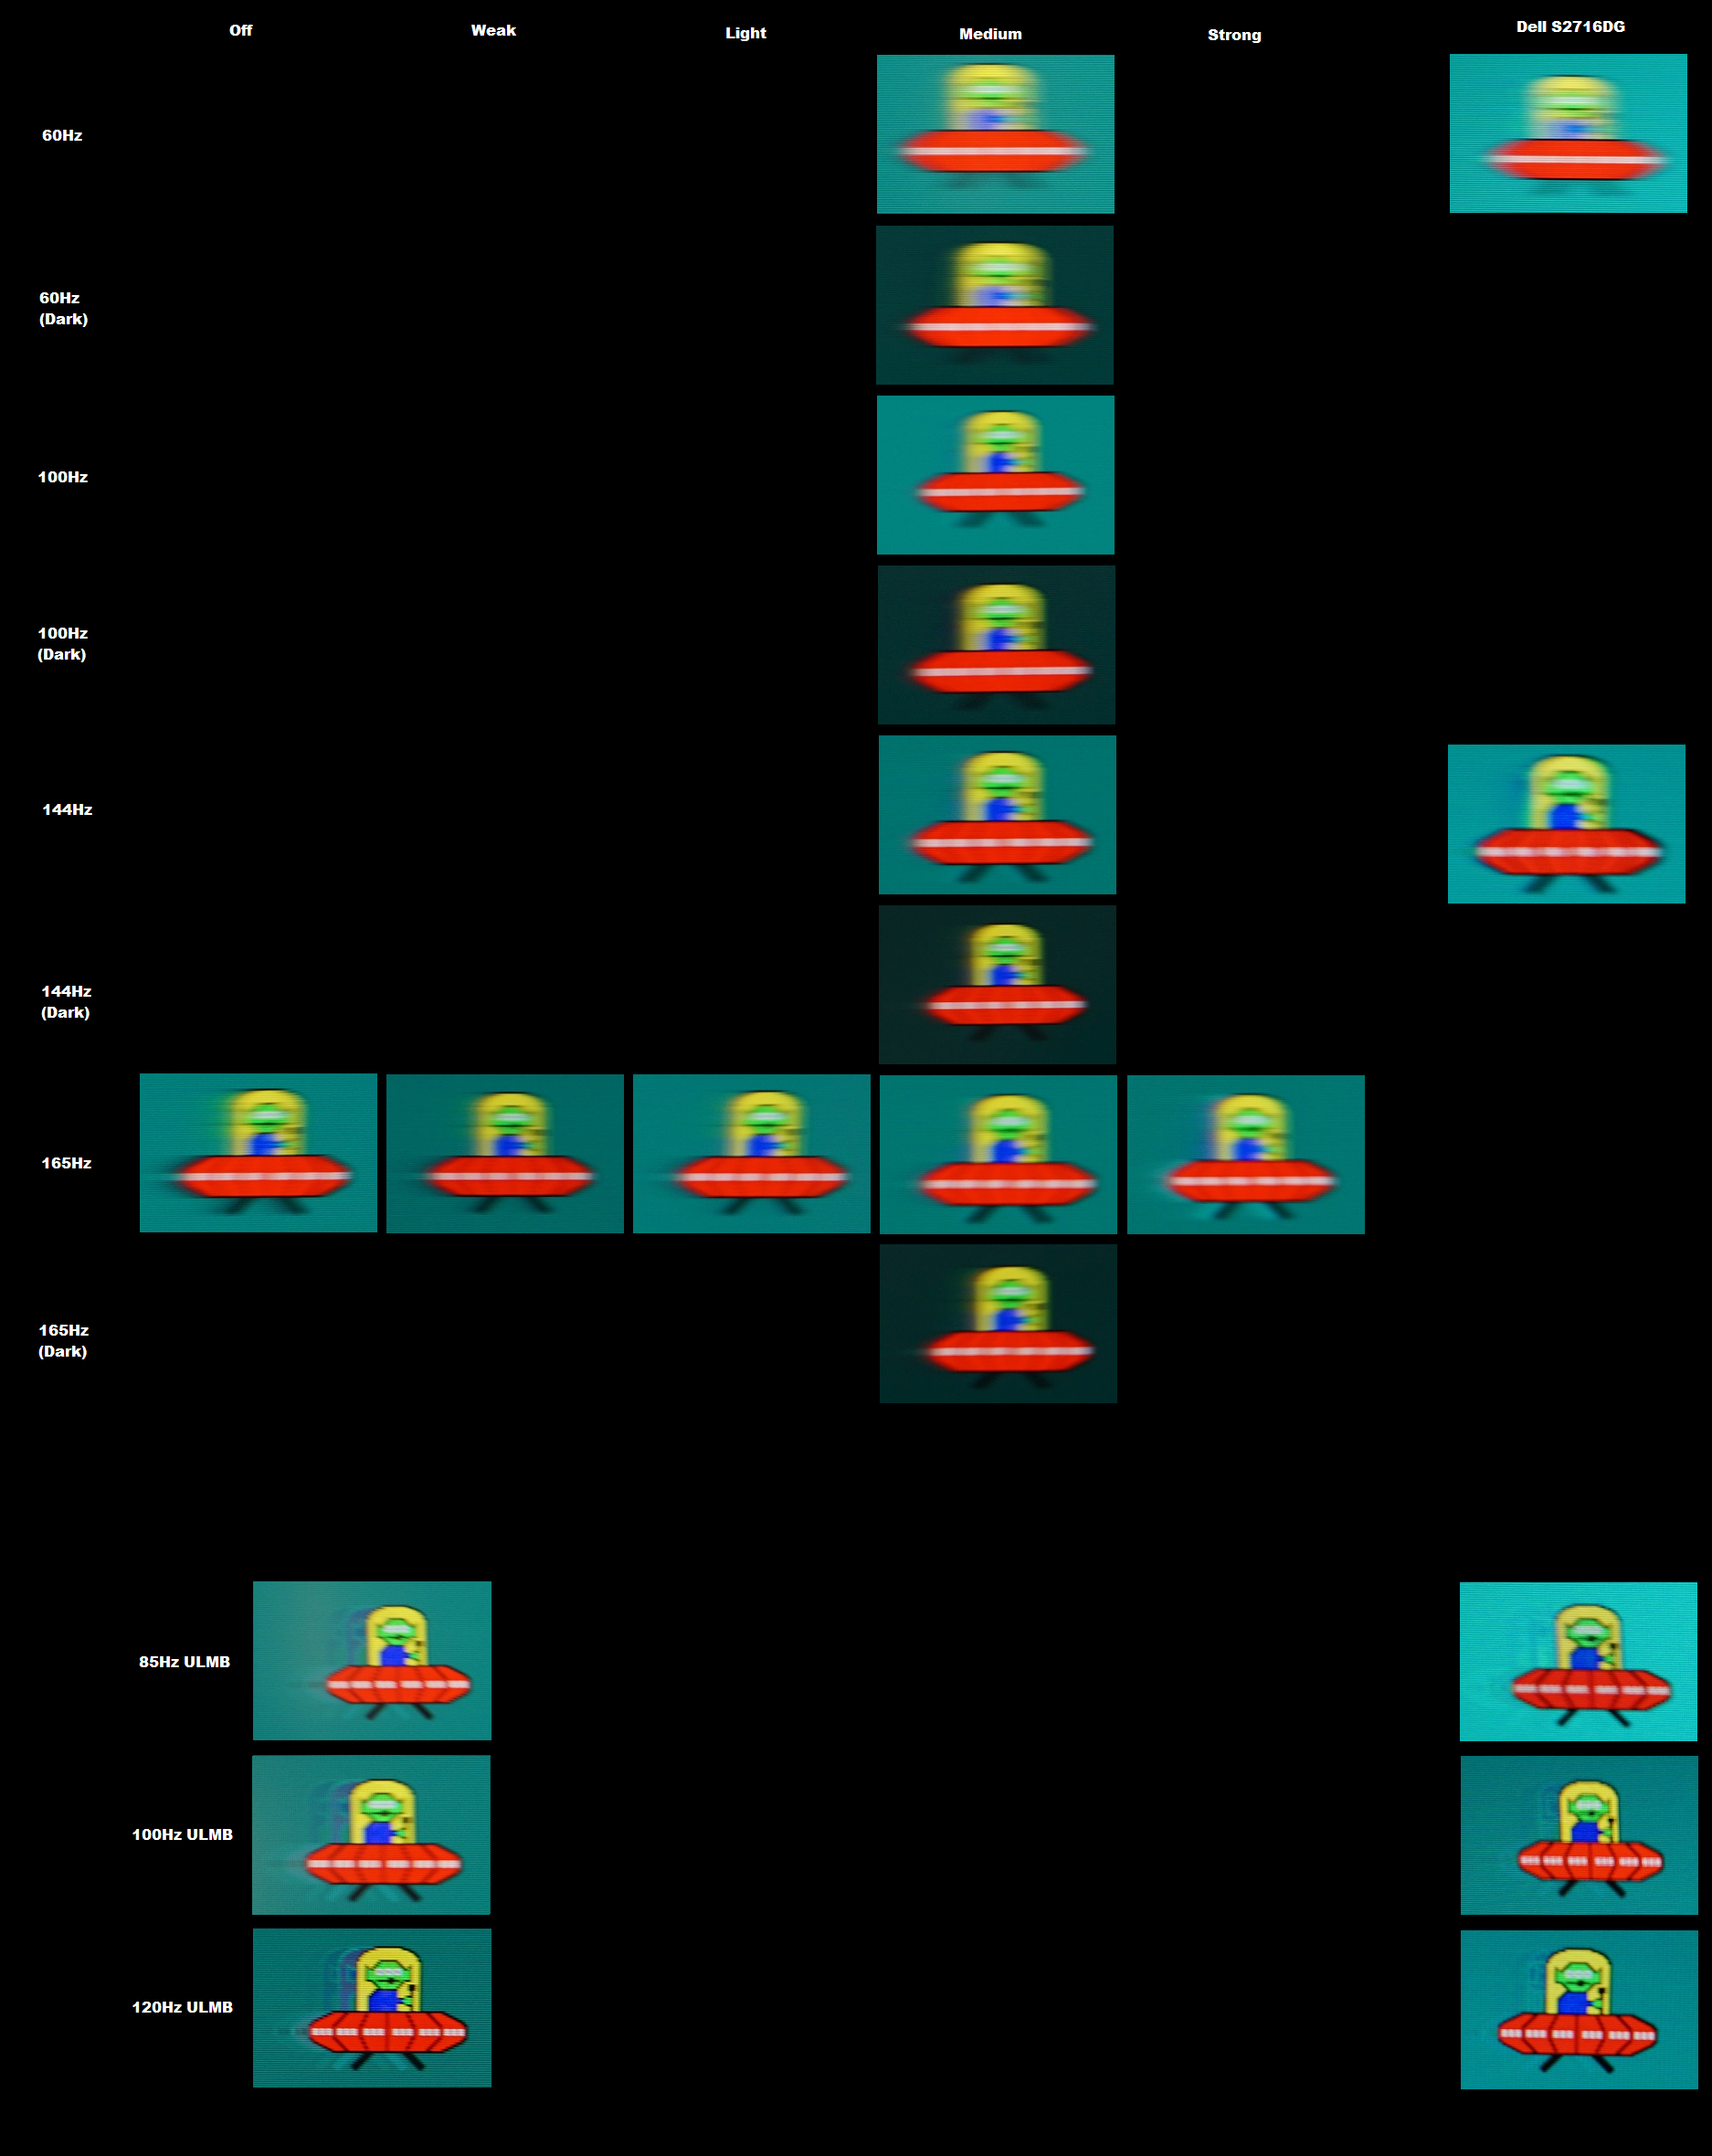
The Spyder5ELITE was also used to analyse the uniformity of white, by measuring the luminance of 9 equidistant white quadrants running from the top left to bottom right of the screen. The table below shows the luminance recorded at each quadrant alongside the percentage deviation between each given quadrant and the brightest point recorded. The luminance uniformity of the screen was variable, but reasonable overall. The brightest point recorded was ‘quadrant 5’ in the centre of the screen (155.0 cd/m²). The greatest deviation from this occurred at ‘quadrant 2’ above centre (126.2 cd/m² which is 19% dimmer than centre). Elsewhere deviation between a given quadrant and the brightest point was 4-15%. It’s important to remember that uniformity varies on individual units and you can expect deviation beyond the measured points. The contour map below represents this information graphically, with darker greys representing lower luminance and hence greater deviation from the central point than lighter greys. Deviations in colour temperature (white point) were also analysed, with measurements taken using the same 9 quadrants. Deviations here are assigned DeltaE values, with higher values and darker shades on the map representing higher deviation from the 6500K (D65) daylight target than lower values and lighter shades. Here, a DeltaE >3 is considered significant deviation that most users could notice quite readily by eye. The results here were reasonable overall. The point closest to 6500K was towards the bottom left of the screen. There were significant deviations between this point and the top right and right central region (DeltaE 3.4). No further significant deviations were detected and indeed if quadrants were all compared to the central quadrant there would be no significant deviations recorded. Interestingly this and indeed the luminance uniformity in general followed quite a similar pattern to that observed on our ViewSonic XG2703-GS sample, which does use the same panel but is of course a different monitor. On Battlefield 1 (BF1) the monitor provided quite a decent contrast performance overall. The level of detail in dark areas, such as dimly lit building interiors, was good for the most part. Unlike on TN models, there weren’t pronounced changes in perceived gamma which give extra unintended detail further down the screen and extreme loss of detail further up the screen in dark scenes. There was some loss of detail peripherally due to a combination of ‘AHVA glow’ and backlight bleed, particularly towards the bottom right of the screen as viewed from a normal viewing position. This created a bit of a flooded look here, eliminating fine detail in dark scenes such as vegetation leaf structure and cracks in wooden floorboards. Bright elements contrasted well with the darker interior spaces in particular – muzzle flashes, explosions and that sort of thing stood out quite well. The relatively smooth screen surface ensured such elements did not appear overly grainy, too. On Dirt Rally the contrast was decent overall. Again, detail levels in dark areas were good overall, aside from the regions affected by ‘AHVA glow’ or backlight bleed where a fair degree of detail was lost. This game features some particularly dark ‘night’ tracks to race on and the atmosphere (i.e. depth of dark shades and distinction of brighter shades amongst that) was certainly not as good as on a decent VA model. As mentioned above, the monitor was also free from the perceived gamma changes that affect TN models. Brighter elements stood out quite well in dark surroundings and lighter shades appeared relatively smooth thanks to the light matte screen surface. We also assessed contrast using the Blu-ray of Star Wars: The Force Awakens. This film is a good test for contrast as it features plenty of very dark scenes lit up by bright elements such as light sabers, flames and explosions. Again, the contrast was clearly not on par with decent VA models (nor would you expect it to be) and there were some weaknesses near the corners due to ‘AHVA glow’ and patches of backlight bleed. This was mainly ‘absorbed’ by the black bars at the top and bottom of this 16:9 letterbox film. Regardless of this, bright elements stood out nicely against darker surroundings and the film was enjoyable to watch with a fairly dynamic look to it. We used Lagom’s contrast tests to further analyse contrast performance and help identify issues that may not have been identified during other testing. The following observations were made. The AOC AG271QG’s colour gamut (red triangle) was compared to the sRGB reference colour space (green triangle) as shown below. The monitor offers complete (100%) sRGB coverage, with a touch of over-extension in the green corner of the diagram,in particular. This means gives the monitor the potential to faithfully reproduce shades within the sRGB space, with a little extra native vibrancy. This gives the monitor the flexibility it needs for colour-critical work (especially after calibration) and invites just a bit of extra richness to some shades which works well for general usage and entertainment purposes. Colour reproduction was strong on BF1. The in-game environments appeared natural, with a good richness and consistent to earthy brown colours. The green palette was also impressive, which helped give vegetation an enticing and believable look. There were some surprisingly rich and vibrant (but not overblown or obviously oversaturated) greens coupled with some much more subtle, muted shades. The richness was maintained throughout the screen, without the sort of saturation losses further down the screen or excessive depth higher up the screen that accompanies TN models. The skin tones of characters in the game appeared appropriately saturated as well, perhaps just a touch deeper than intended in places thanks to the ‘2.3’ average gamma but disturbingly so. There was also an excellent richness, warmth and intensity to orange and red tones which made fire and explosions all the more lively. Colour reproduction was strong on Dirt Rally. The racing environments looked natural and much as they should, with rich golden and earthy browns and a pleasing palette of rich and more muted greens. Shades also maintained their saturation levels throughout the screen, helping bring out subtle shade variations and giving shades their own unique identities. The car paint jobs and advertising around the track showed off some quite vibrant shades as well, such as electric blues, bright reds and highlighter yellows and greens. These again maintained their vividness throughout the screen, avoiding the ‘faded’ look that TN models of this size would give if observing the shade near the bottom of the screen. We also assessed colour reproduction on the Blu-ray of Futurama: Into the Wild Green Yonder, a particularly good test for this due to large patches of individual shades being shown. The strong colour consistency helped bring out an excellent variety of subtly different pastel shades, for example for character skin tones which sometimes differ only slightly between characters. It also helped neon colours (pinks, purples, greens etc.) and appear vibrant regardless of where on the screen they were shown. There were some good deep purples, greens and reds on display as well with their full depth being realised throughout the screen. We used Lagom’s tests for viewing angle to more closely analyse colour consistency and viewing angle performance. The following observations were made from a normal viewing position, with eyes around 70cm from the screen. We used a small tool called SMTT 2.0 and a sensitive camera to compare the AG271QG’s latency to a range of screens where the latency is known. Over 30 repeat readings were taken to help maximise accuracy. Using the method, we measured 3.40ms (just over 1/2 a frame @165Hz) of input lag. This value is influenced both the element of input lag you ‘see’ (pixel responsiveness) and that which you ‘feel’ (signal delay). It indicates that the monitor has an extremely low signal delay which shouldn’t bother even sensitive users. We don’t have the necessary equipment to accurately measure input lag with G-SYNC active, but subjectively speaking the input lag felt very low indeed with G-SYNC running. As covered in the OSD video earlier, there is an ‘OverClock’ feature in the ‘Extra’ section of the OSD The panel used is a native 144Hz panel, but you can get the monitor to ‘overclock’ its refresh rate to 165Hz. We noticed no negative consequences in doing so with our unit, which is why we used this refresh rate for most of our testing. Most units and systems should support this properly, but if not be mindful that the DisplayPort cable you’re using could potentially cause issues here. The DP cable length and quality can have an impact on this sort of capability. DP is a digital signal and there is no such thing as ‘revisions’ of a cable (DP 1.1, DP 1.2 etc.), but even so it is a somewhat sensitive signal at elevated bandwidths. This means a long cable or ‘poor quality’ cable can cause dropouts where bandwidth requirements are high (i.e. 2560 x 1440 @ 165Hz). We used both the DP cable included in the box and a ‘Cable Matters’ 6ft cable which we had to hand and had no issues with this feature. In our responsiveness article the key factors surrounding the responsiveness of a monitor are explored. Chief amongst these is the notion of perceived blur, contributed to in part by pixel responsiveness and also (often in larger part) by eye movement as you track motion on the screen. A method of photography that uses a moving camera, called pursuit photography, is also explored here. This allows one to capture and compare the motion performance on monitors in a way which reflects not just the pixel behaviour of the screen but also the influence of eye (camera) movement. The following images are pursuit photographs taken using the UFO Motion Test for ghosting. The test was set to run at its default speed of 960 pixels per second – this is a good practical speed for taking such photographs. Both the middle row (medium cyan background) and top row (dark cyan background) were tested to highlight some differences in pixel responsiveness depending on the shade depth involved in the transitions. The monitor was tested at 60Hz, 100Hz, 144Hz and 165Hz. It was also tested with ULMB active at 85Hz, 100Hz and 120Hz. All ‘Overdrive’ settings on the monitor were tested (‘Off’, ‘Weak’, ‘Light’, ‘Medium’ and ‘Strong’), but only at 165Hz. This was because these settings had a similar effect on pixel responsiveness (and hence trailing in these images) regardless of refresh rate, so it was unnecessary to waste time photographing all refresh rates with every ‘Overdrive’ setting. Dell S2716DG reference shots are also shown in the final column, acting as a reference with very snappy pixel responses. Note that any interlacing on these images is moiré from the camera and not caused by the monitor itself. At 60Hz, there is significant blur caused by eye movement which, as you might expect, is not influenced by the background colour. This makes the UFO appear soft and broad. Things are very close to the reference (Dell S2716DG) with just a tiny hint of trailing that’s barely visible either by eye or in the photo. At 100Hz the object itself becomes significantly narrower and more focused, signifying an appreciable decrease in the level of perceived blur. There is a little bit of overshoot (inverse ghosting) introduced as well, a dark shadow-like trail perhaps most noticeable on the dark background. At 144Hz the main image becomes clearer and narrower again which reflects a further reduction in perceived blur. The slight overshoot is similar to 100Hz for the medium background but manifests itself differently for the dark background. It is actually a lot weaker and mixed with a touch of conventional trailing. At 165Hz we get an appreciation of the effect of the ‘Overdrive’ setting. This is selectable at all refresh rates (with ULMB disabled) but as mentioned previously follows a similar pattern regardless and hence was only specifically analysed here at 165Hz. The actual main object looks similar to 144Hz with just a touch more focus in the image. The difference is subtle, as you might expect given that the refresh rate is only boosted by 21Hz. With ‘Overdrive’ set to ‘Off’ there is significant trailing behind the image. With the ‘Weak’ setting this is reduced and with ‘Light’ reduced further. Using the ‘Medium’ setting reduced this so it was very faint, at least with the medium background. There was a bit more trailing visible on the dark background and again this was largely conventional trailing rather than overshoot. It seems that the pixel responses for the transitions featured here actually slow down a bit at 144Hz and just a touch more at 165Hz, compared to 100Hz. Although not featured here, 120Hz is similar to 144Hz in this respect. Going back to our analysis at 165Hz we’ll just briefly mention the ‘Strong’ setting. The image here speaks for itself really, there is obvious bright overshoot trailing behind the object – this is there at all refresh rates and for various transitions not shown here. Making this setting essentially useless, as is almost invariably the case for the strongest overdrive setting on a monitor. With ULMB active perceived blur is massively reduced. You can see the details on the objects are already rather distinct at 85Hz, becoming even more distinct as refresh rate is increased. The object is a clear and distinct ‘thing’ now. There is considerable overshoot behind this, however, which is fragmented due to the fact the monitor is ‘strobing’. This overshoot is stronger than on the S2716DG, especially at 100Hz and 120Hz where there is quite an obvious purple initial ‘trail’. This is because a very strong level of pixel overdrive is required to boost the pixel transition speed sufficiently, in most cases, for optimal performance under ULMB. Going back to our analysis with ULMB disabled, it is quite clear that ‘Medium’ is the optimal ‘Overdrive’ setting on this monitor. The results are by no means perfect but are still quite respectable, especially given the panel type. The results here largely reflect what we observed on the ViewSonic XG2703-GS using its optimal ‘Advanced’ response time setting. Although we didn’t specifically capture pursuit photographs with the dark cyan background, we certainly observed performance there and analysed such transitions more broadly. As with the AOC, such pixel transitions were somewhat slower than for transitions between predominantly lighter shades. The ViewSonic was a touch faster for some of these dark transitions than the AOC, but not alarmingly so. As we explore, this monitor certainly got plenty of benefit from the high refresh rates that it supports. On BF1, where the frame rate kept pace with the 165Hz refresh rate, the monitor provided an excellent ‘connected feel’ with the game world. The in-game character reacted very swiftly to user input and the movements within the game world were fluid and flowing. Perceived blur was decreased massively compared to at lower refresh rates (or frame rates), a stark comparison with 60Hz or 60fps in particular. The monitor delivers 2.75 times as much information every second, hugely reducing the time that the eye spends moving and reducing perceived blur in games like this just as demonstrated in TestUFO earlier. This made tracking and engaging enemies on this game considerably easier. Although we tested primarily at 165Hz, we did spend some time testing at other refresh rates as well just to get a feel (and look in) at how the monitor behaved. Jumping up from 60Hz to 100Hz made a huge difference to us in the fluid feel and look to the game, with a slight bump up at 120Hz and then another step up at 144Hz. 165Hz again provided an advantage over 144Hz on this monitor, albeit a fairly slender one. Regardless of refresh rate, there were no interlace pattern artifacts (pixel inversion issues) present when gaming. Overall the monitor made good use of the 165Hz refresh rate as many pixel responses were snappy enough to keep obvious trailing at bay. Many transitions were completed without any obvious trailing or noticeable overshoot, although there were a few weaknesses where dark shades were involved. On darker maps or shaded areas such as dense forests or dark buildings cast against a brighter sky, you could see some of these transitions come into play. There was a light ‘mist’ rather than any obvious bold trailing, like what was demonstrated with TestUFO earlier. Again, this was slightly more pronounced than on the ViewSonic XG2703-GS– but only slightly. The result was a level of perceived blur that was a bit higher than fast 144Hz models like the Dell S2716DG, even when considering the 144Hz vs. 165Hz aspect with a matching frame rate. Most objects on the game are ‘detailed’ by a combination of dark elements (cracks, crevices, shadows, marks etc.), so you do get a bit of extra perceived blur compared to fast high refresh rate TN models. This is most noticeable when moving in a fast vehicle, for example in an aircraft– the fine details are not quite as sharply focused as on the S2716DG. On the flip side the AOC was free from obvious overshoot, unlike the S2716DG. And we would reiterate again that the experience blew lower refresh rate models (particularly 60Hz) out of the water, regardless of how amazing their pixel responsiveness might be. We don’t have much to add from our testing on Dirt Rally, but it is interesting to explore what the high refresh rate brings to other genres of game such as this. By leveraging high frame rates, the ‘connected feel’ was again excellent. User input was translated to action (i.e. movement of the vehicle) at a level that no lower refresh rate LCD can match, regardless of input lag. The very low input lag of the AOC certainly played its part to round off this feeling, but the refresh rate itself and frame rate of the content is crucially important as well. The elevated frame rates ‘supported’ by the monitor greatly reduced perceived blur when racing around the tracks. This certainly didn’t miraculously improve our performance, but it gets details within the environment, other cars and the road looking clearer during movement. A nice bonus. Again, the perceived blur was slightly higher than on the Dell S2716DG, even with its lower 144Hz @ 144fps. But worlds away (in a good way) from 60Hz LCDs, regardless of panel type. As on Battlefield 1 there was no obvious overshoot to speak of. We also tested Blu-rays from a responsiveness perspective, with the monitor running them correctly without any issues related to pixel responsiveness. The fluidity of action is greatly restricted by the frame rate of such content (~24fps). Ideally the refresh rate would be set to match this – and you can set the monitor to 24Hz (or 23Hz, which could work for some content) which works to minimise judder. Judder is also reduced by ensuring that the frames can divide evenly into the refresh rate, giving refresh rates such as 120Hz and 144Hz an advantage over 165Hz for 24fps film content. G-SYNC is a variable refresh rate technology developed by Nvidia, which can be used on specific monitors (including the AOC AG271QG) when connected to a compatible Nvidia GPU. In our article on the technology, we look at what G-SYNC does and how that benefits the user. We won’t be repeating this in depth and would instead urge you to read that article, but we will provide a basic summary here. G-SYNC compatible displays such as the AOC have a proprietary ‘G-SYNC board’ in them which replaces their usual scale and some of the assistive electronics. G-SYNC compatible GPUs are then able to communicate with the monitor and the monitor can vary its refresh rate dynamically to match, where possible, the frame rate of the content being outputted by the GPU. In doing so, refresh rate and frame rate mismatches are avoided, eliminating the stuttering (VSync on) or tearing and juddering (VSync off) that would usually occur. Latency is also reduced compared to running with VSync enabled, although as mentioned earlier we don’t have the means to accurately measure this difference. This monitor supports G-SYNC via DP 1.2a (DisplayPort), provided that it is connected to a compatible Nvidia GPU. Upon connecting the monitor everything should be good to go as far as G-SYNC is concerned (if not – try connecting it up again). To check everything is configured properly, open Nvidia Control Panel and navigate to ‘Display – Set Up G-SYNC’. Ensure that the checkbox for ‘Enable G-SYNC’ is checked, then select your preferred operating mode. As the image below shows, this technology works in both ‘Full Screen’ and ‘Window’ modes, provided the correct option is selected for this. If for some reason you can’t find this G-SYNC section in your Nvidia Control Panel, try plugging the monitor into a different DP output on the GPU, if possible. If this does not improve the situation, we’d advise reinstalling the GPU driver or upgrading to the latest driver. Next, you should navigate to ‘Manage 3D settings’, where you will see a few settings of interest. The first is ‘Monitor Technology’, which should be set to ‘G-SYNC’ as shown below. The second setting of interest here is VSync. You can select one of the following; ‘On’, ‘Use the 3D application setting’, ‘Off’ or ‘Fast’ (GPU dependent). If you select ‘On’, then VSync will enable once the frame rate exceeds the upper limit (ceiling) of G-SYNC operation which is 165Hz/165fps on this particular monitor. If you select ‘Off’, the frame rate is free to go as high as it can, with G-SYNC and VSync both disabled above 165fps. The monitor will stay at 165Hz and frame rate will rise above this, causing tearing and juddering. It is general good practice to select ‘On’ or ‘Off’ rather than ‘Use the 3D application setting’ as some in-game VSync implementations could potentially interfere with the smooth operation of G-SYNC. In practice it’s likely to work just fine if enforced in-game instead, however. There is also another option which appears on certain newer GPUs, such as the GTX 1070 used in our test system. This enables a technology called ‘Fast Sync’, which only applies above the refresh rate and frame rate ceiling (>165Hz/165fps). G-SYNC operates as normal below that ceiling, but a special version of VSync (‘Fast Sync’) is active above that. ‘Fast Sync’ is specifically designed to work at higher frame rates, ones which comfortably exceed the refresh rate ceiling of the monitor. The technique is supposed to combine the minimal latency of ‘VSync off’ without inducing the sort of tearing usually associated with the frame rate and refresh rate mismatches. As it’s a GPU feature rather than a monitor feature, it isn’t something we will be exploring in detail. We’d advise referring to this section of a video by Tom Petersen if you’re interested in the technology and how it works alongside G-SYNC. Regardless of which VSync setting you select, the monitor behaves in exactly the same way where the frame rate dips below the floor of operation (i.e. 30Hz/30fps, as is standard on G-SYNC monitors). The monitor will try to set the refresh rate to a multiple of the frame rate, rather than simply staying at 30Hz. So if the frame rate dipped to 18fps, the monitor might set its refresh rate to 36fps. Due to the even divisions of the frames into the refresh rate, only complete frames are drawn and hence stuttering and tearing is kept at bay. As we explore, though, low frame rates remain low frame rates regardless of G-SYNC and it isn’t a pleasant experience even if it is free from the usual tearing or stuttering. Furthermore, G-SYNC can’t correct for other sources of stuttering such as insufficient RAM, network latency or hard drive issues etc. This monitor doesn’t have a power LED that changes colour to tell you G-SYNC is in operation, but should say ‘G-SYNC’ at the bottom of the OSD menu after the resolution if this option is active in the graphics driver and ready to go. We have extensively discussed the G-SYNC experience in many of our monitor reviews in the past and are pleased to confirm that it worked exactly as intended on the AOC AG271QG. BF1 provides a good range of graphics options and scenarios which allow a huge range of frame rates to be tested. On our GTX 1070 the game rarely stayed at a frame rate that matched the refresh rate (especially with the monitor set to 165Hz, which would demand 165fps). Even if the frame rate were to drop just a bit below this, with G-SYNC disabled you get obvious stuttering (VSync on) or obvious tearing and juddering (VSync off). We say ‘obvious’, but we should clarify that sensitivity to this does vary and it is not as noticeable at high frame rates (triple digits) vs. relatively low frame rates. But these things are certainly there and we found them quite bothersome. With G-SYNC enabled these issues were eliminated, giving a much smoother and more ‘flowing’ experience. As the frame rate drops, perceived blur increases and the connected feel decreases – even with G-SYNC. We certainly preferred frame rates to be as high as possible, but certainly felt a nice level of playability at frame rates dipping to around 100fps and a bit below. Certainly more enjoyable than with G-SYNC disabled. As these sorts of frame rates there was a little bit of overshoot for some of the darker transitions, similar to what was shown in the UFO Motion test for ghosting in the previous section. This was not eye-catching and still mild overshoot, however. By increasing graphics settings or perhaps finding more graphically taxing situations in the game, there were times when the frame rate fell further. Sometimes to 80fps or lower. With this being under half of the maximum refresh rate, the level of perceived blur increased and ‘connected feel’ suffered significantly. But with G-SYNC, the experience was at least free from jarring tearing and stuttering – which, at these sorts of frame rates, becomes quite obvious normally. By increasing graphics settings further, and in particular increasing the ‘resolution scale’ setting, further reductions in frame rate were realised. As the frame rate dipped further, the level of perceived blur and lack of connected feel became quite troubling. Even so, the lack of disruptive tearing or stuttering was nice. We also managed to find some scenes, with increased resolution scale, where frame rate would dip below the 30fps (30Hz floor) minimum supported by G-SYNC on a hardware level. As intended, the refresh rate instead stuck to multiples of the frame rate here. The transition was quite seamless and it kept stuttering and tearing from refresh rate and frame rate mismatches at bay. But again, the experience was far from pleasant due to the low frame rate alone. ULMB (Ultra Low Motion Blur) is another proprietary Nvidia technology that can be enabled instead of (note – not in addition to) G-SYNC on compatible Nvidia GPUs. ULMB is a strobe backlight technique that is designed to reduce motion blur via the mechanisms described in the relevant sections of this article. Basically, the backlight pulses on and off very rapidly, at a frequency matching the refresh rate of the display. There is with a very brief ‘on phase’ where the backlight is illuminated and a relatively long ‘off phase’ where the backlight is disabled. This backlight strobing reduces the amount of time the eyes spend tracking motion on the screen and hence reduces perceived blur. ULMB can only be used at specific refresh rates; 85Hz, 100Hz or 120Hz. If you wish to use the technology, the first step is therefore to set the monitor to one of these refresh rates via Windows or the Nvidia Control Panel. You should then navigate to ‘Manage 3D settings’ in Nvidia Control Panel and select ‘ULMB’ for ‘Monitor Technology’ as shown below. You also need to ensure the monitor is in the correct operating mode – you can enable ‘ULMB’ in the ‘Extra’ section of the OSD or simply by using the right arrow of the OSD before entering the main menu. As with G-SYNC, the power light does not give a colour-based indication that this mode is active. But it should be obvious due to how different the image appears. Specifically, the display will flicker at a frequency that matches the refresh rate of the display, quite like a CRT monitor running at the same refresh rate. There is also an indication at the bottom of the OSD, after the resolution, if ULMB is active. A setting related to ULMB called ‘Pulse Width’ can be adjusted in the ‘Extra’ section of the OSD once ULMB is activated. This controls the length of the ‘On’ period of the strobe relative to the ‘Off’ period, with higher values meaning that the backlight stays on for longer – increasing brightness at the expense of motion clarity. This is set to ‘100’ by default, which offers maximum brightness potential. Most users will find motion clarity to be excellent at the default setting of ‘100’, anyway, and find this brightness level preferable to lower settings. Upon activating ULMB you can see a flickering at a frequency matching the refresh rate of the monitor – as mentioned earlier, this is most obvious at 85Hz but still noticeable to us at 100Hz or 120Hz. Depending on settings your used to, the image also looks a bit dimmer and perhaps more muted. As per the UFO Motion test pursuit photographs shown earlier, there is also a significant reduction in the level of perceived blur. The effect of this on games such as BF1 is quite profound. The clarity of objects, even when moving very rapidly on the game, remains excellent. This makes engaging tracking and engaging enemies even easier – although, admittedly, we found we were just as competent at racking up kills without ULMB. Sensitivity to perceived blur varies and some users, particularly those who are used to CRT monitors, swear by technologies such as this. But as highlighted earlier, the use of ULMB on monitors like this calls for a very strong level of overdrive use. Because the monitor’s backlight is cycling on and off at a frequency matching the refresh rate (85Hz, 100Hz or 120Hz) you actually see any trailing or overshoot as a distinct repetition of the objects in the game. Not a smooth blur, trail or smear behind and in part blending in with the object. The overshoot was certainly there, but generally didn’t stand out as much as the UFO Motion test might suggest in the complex environments and range of transitions shown off on this game. You could tell it was overshoot because it appeared a different colour (sometimes darker, sometimes brighter) compared with either the object or background. There was also a degree of conventional trailing, appearing again as a repetition of the object. This appeared a similar colour to the object itself, usually quite a bit fainter but very occasionally almost as ‘solid’ as the object itself. Whilst neither factor affected the clarity of the main objects, it is something that some users might find a bit bothersome. Some of these imperfections happen to an extent on all ULMB or strobe backlight LCD monitors we’ve tested, however. Another important consideration with ULMB is that the frame rate must exactly match the refresh rate for it to work properly. If it doesn’t, the tearing and juddering (VSync off) or stuttering (VSync on) becomes extremely noticeable and distracting and essentially ‘breaks’ the process. There is very little perceived blur to match such imperfections and things quite clearly look ‘wrong’. If you can stomach the flickering, then there’s something to be said for lowering the refresh rate (down to as low as 85Hz) so that it’s easier to match the refresh rate with the refresh rate. The motion clarity is still exceptional at 85Hz, it’s mainly the flickering that can be bothersome. Plus you don’t get as good a ‘connected feel’ due to the lower frame rate. We would like to again reiterate that you can’t activate G-SYNC and ULMB at the same time. The former is clearly designed with variable frame rate environments in mind, whereas the latter is designed to be used where the refresh rate can be consistently matched by the frame rate. And for users who are particularly sensitive to perceived blur. In our experience, most users prefer the flexibility of using G-SYNC and setting the monitor to the highest refresh rate it will go (165Hz in this case). The perceived blur is nice and low, full brightness is maintained without flicker and you get a higher framerate potential for a better ‘connected feel’ as well. As with all G-SYNC monitors, the G-SYNC board replaces the functionality of the scaler when using DisplayPort. The monitor therefore offers no scaling capability via DP. The monitor does have a dedicated scaler which can be used via HDMI, however. This allows users to connect devices such as games consoles to the monitor and run it at 1920 x 1080 (Full HD). As a PC user, you must ensure that the monitor is handling your scaling (via HDMI) rather than the graphics card if you want the best image performance. To do this, open Nvidia Control Panel and navigate to ‘Display – Adjust desktop size and position’. Ensure that ‘No Scaling’ is selected and ‘Perform scaling on:’ is set to ‘Display’ as shown below. AMD users who for whatever reason decided to go for this monitor needn’t worry about fiddling around with any scaling settings, as the monitor will automatically handle the scaling when gaming, by default. If you run the monitor at a non-native resolution such as 1920 x 1080, when connected via HDMI, an interpolation process is used to expand the resolution across the entire 2560 x 1440 resolution. The Full HD resolution appears somewhat softer compared to a native 1920 x 1080 display of similar size. This is always the case, to some degree, and we’d say that this is somewhere in the middle in terms of how well the interpolation process does at handling the Full HD resolution. In addition to a fair degree of softening there is a bit of fringing around the edges of some objects due to the sharpening filter applied during the interpolation process. Overall this gives a bit of an artificial look to the image, but the overall sharpness is certainly superior to using GPU scaling. There is no 1:1 pixel mapping feature included or any other scaling options on the monitor side. PC users can get the GPU to display 1920 x 1080 at perfect sharpness with a large black border if preferred, whether using HDMI or DP. As is always the case, if you leave the monitor at 2560 x 1440 and run 1920 x 1080 (Full HD) content using movies software or a web browser on the PC, it is the GPU or software that employs an upscaling process. The monitor simply displays 2560 x 1440 in its usual way and does not influence things. There is a bit of softening during this process, less than when running the monitor via HDMI at 1920 x 1080 and using its own interpolation though. It’s not something most users should worry about, though, as the monitor still provides a good experience when viewing Full HD movie content. The video below summarises some of the key points raised in this written review and shows the monitor in action. The video review is designed to complement the written piece and is not nearly as comprehensive. Having already reviewed the ViewSonic XG2703-GS, we had a decent idea of what to expect from the AOC AG271QG in terms of core performance. It does, after all, feature the same panel. But there’s more to a monitor than just the panel so a full review of the AOC was certainly still warranted. With minimal tweaking in the OSD, including the obligatory huge decrease in brightness and a few colour channel changes, the image was vivid and varied with the sort of consistency you’d hope for from a decent IPS-type panel. The gamma wasn’t spot on ‘2.2’ but tracked nicely at ‘2.3’ without any huge deviations – for the intended purposes of the monitor this was certainly preferable to the washed-out alternatives that many 144Hz+ models provide with much lower average gamma and further weaknesses due to colour inconsistencies. This was coupled with a light matte screen surface and generous but not completely excessive colour gamut. Games appeared much as they should with consistently rich but largely appropriately saturated shades – pleasing to the eye overall. The light matte screen surface also had quite a smooth surface, preventing the sort of obtrusive graininess that can be seen on some matte screen surfaces. The static contrast was much as expected from a decent IPS-type panel, sitting above 1000:1 even following the adjustments made to our ‘Test Settings’. Light elements stood out quite nicely against darker surroundings, although there was some ‘AHVA glow’ (‘IPS glow’) as expected which ate away at some of the detail near the corners of the screen. Unlike TN models there were no obvious perceived gamma shifts, which would sap the top of the screen of detail in dark areas whilst making the bottom appear flooded with obvious unintended detail. There was some further loss of detail due to some patches of backlight bleed on our unit. As noted in the review, this varies between individual units but models using these high refresh rate AHVA panels do suffer from these sorts of issues quite frequently. Overall responsiveness was similar to the ViewSonic XG2703-GS, meaning that the monitor made a good go of high refresh rates up to 165Hz. There was a bit of extra trailing and hence perceived blur compared to fast TN models like the Dell S2716DG, but a huge decrease in perceived blur compared to even the fastest 60Hz LCDs. Some of the more pronounced trailing involved dark shades, much as we observed on the ViewSonic. This trailing was a little more pronounced on the AOC but we didn’t find it detracted from the overall 165Hz performance really; we could certainly feel a lot of benefit as the refresh rate was increased. In addition to lower perceived blur, the monitor had an excellent ‘connected feel’ as you interacted with the game world at high frame rates. This was aided by very low levels of input lag. G-SYNC also did its thing and got rid of troublesome tearing, juddering and stuttering caused by the traditional frame rate and refresh rate mismatches. ULMB also worked as intended to massively reduce perceived blur, although overshoot and even some conventional (but fragmented, due to strobing) trailing was more obvious than on fast TN alternatives. Overall this monitor ticks a lot of boxes and offers a nice balance between image quality and gaming performance. The combination of quite nicely setup AHVA panel, good 165Hz performance and gaming extras such as Nvidia G-SYNC will certainly be enticing to some. The IPS-type panel provides a rich, colourful and largely as intended gaming experience following a few relatively minor tweaks. It also has the potential to deliver excellent colour accuracy following calibration with a colorimeter or similar device, for ‘colour critical’ work etc. As with all monitors there are weaknesses, and on this model there is the inescapable ‘AHVA glow’ and fair potential of moderate backlight bleed to contend with. The exterior design is also a bit less divisive than some gaming monitors and both price and availability (at time of writing) also relatively strong. The bottom line; a monitor with a good mix of image quality and responsiveness, for those who like a good level of responsiveness without compromising on colour quality.
Luminance uniformity table
Luminance uniformity map
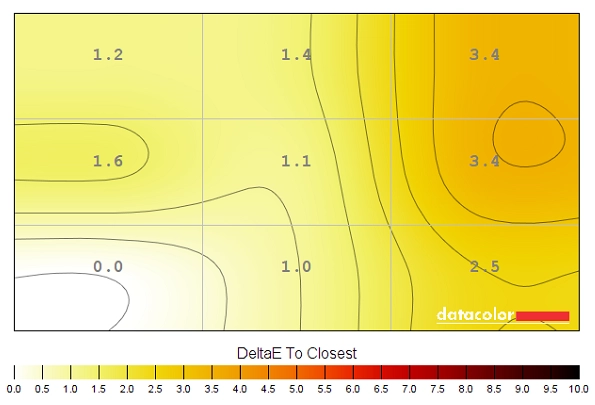
Colour temperature uniformity map
Contrast in games and movies
Lagom contrast tests
Colour reproduction
Colour gamut
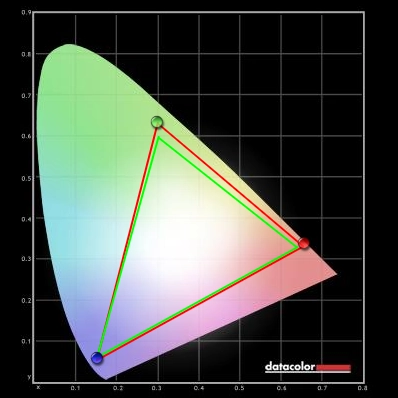
Colour gamut test settings
Colour in games and movies
Viewing angles
The video below shows this text test alongside a mixed and a dark desktop background, from a range of viewing angles. For the dark desktop background you can see the ‘AHVA glow’ mentioned previously, as it blooms out from a variety of viewing angles.
Responsiveness
Input lag
A note on overclocking
Perceived blur (pursuit photography)
Responsiveness in games and movies
G-SYNC – the technology and activating it
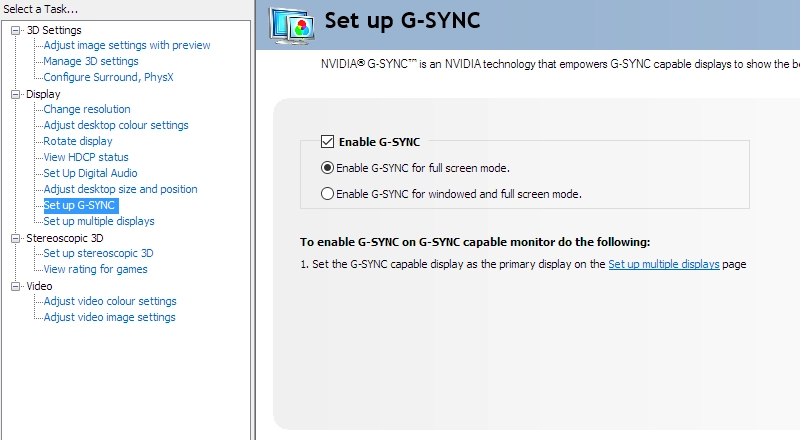
Enable G-SYNC
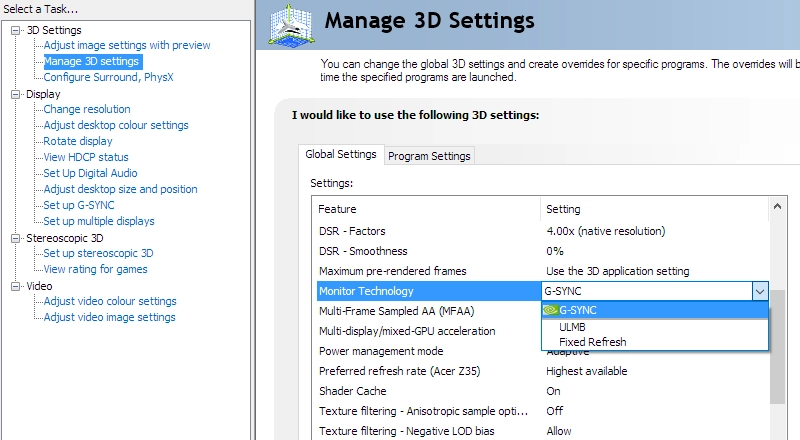
Set Monitor Technology to G-SYNC
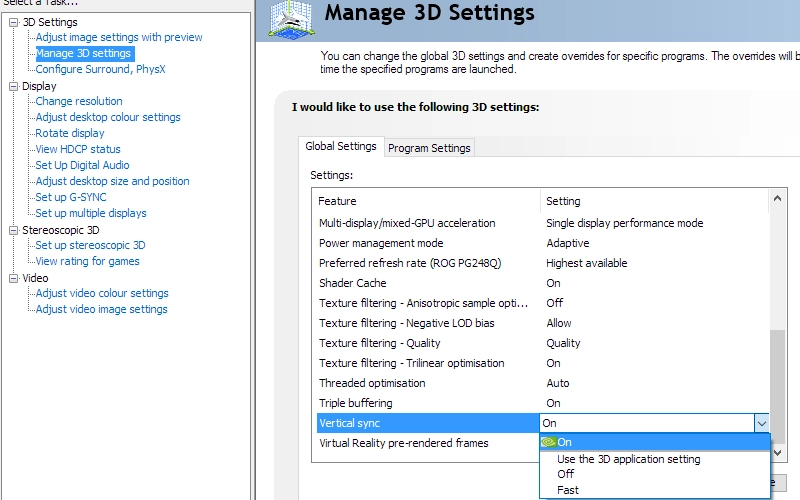
Set VSync according to preferences
G-SYNC – the experience
ULMB – the technology and activating it
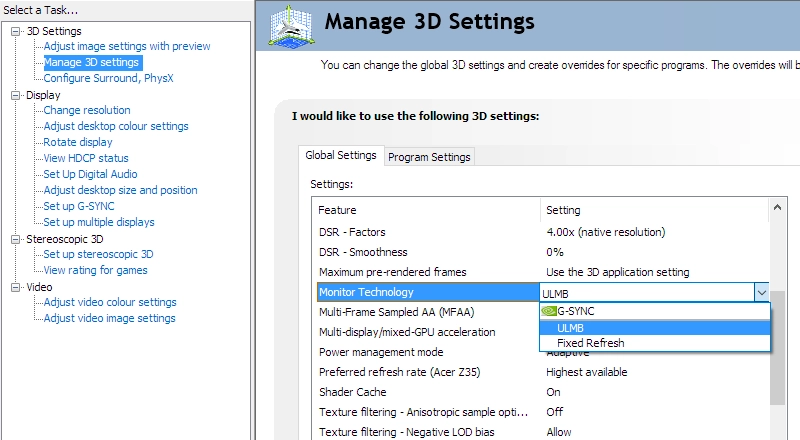
Set Monitor Technology to ULMB
ULMB – the experience
Interpolation and upscaling

Video review
Conclusion
Positives Negatives Good balance with some minor OSD tweaking, with strong colour richness and consistency aided by panel type, generous (but not excessive) colour gamut and light matte screen surface Gamma tracks at ‘2.3’ on average, which is fine for the intended uses – but given that there were 3 gamma settings it would be nice if one provided good ‘2.2’ tracking without further correction
Good static contrast and a smooth matte screen surface, giving a relatively smooth look to the image free from the graininess of some matte surfaces ‘AHVA glow’ ate away at some detail in dark scenes, near the bottom corners in particular from a normal viewing position A competitive 165Hz performance with decent pixel responsiveness and very low input lag. Bonus features such as G-SYNC and ULMB will be most welcome to Nvidia users as well A bit of additional trailing in places beyond what you’d see on faster 144Hz+ models and some minor overshoot in places. The ULMB mode work to reduce perceived blur, but for this mode there is significantly more overshoot than TN alternatives under this mode A fairly restrained design with plenty of ergonomic flexibility and some useful ‘additional’ ports like HDMI and USB 3.0 The OSD is a bit more limited than on some competing models, such as the ViewSonic XG2703-GS
![]()

