Author: Adam Simmons
Date published: September 25th 2016
Table of Contents
Introduction
Until quite recently the only high refresh rate LCD options from mainstream manufacturers used TN (Twisted Nematic) panels. We’ve now seen VA (Vertical Alignment) panels with elevated refresh rates. There have also been some IPS-type panels in the form of AHVA (Advanced Hyper-Viewing Angle – an IPS-type technology). This latter panel type is used in the ViewSonic XG2703-GS, which supports up to a 165Hz refresh rate and combines this with Nvidia G-SYNC. We will put this gaming monitors through its paces in our usual testing regime to see how it fares when it comes to core aspects of performance such as contrast, colour reproduction and responsiveness.
Specifications
This model features a 27” AU Optronics AHVA (Advanced Hyper-Viewing Angle) panel, an IPS-type panel supporting a 165Hz refresh rate. This offers true 8-bit colour per channel with a specified response time of 4ms. Some of the key ‘talking points’ have been highlighted in blue below for your reading convenience.
Key talking points of the specifications are highlighted in blue below.
Features and aesthetics
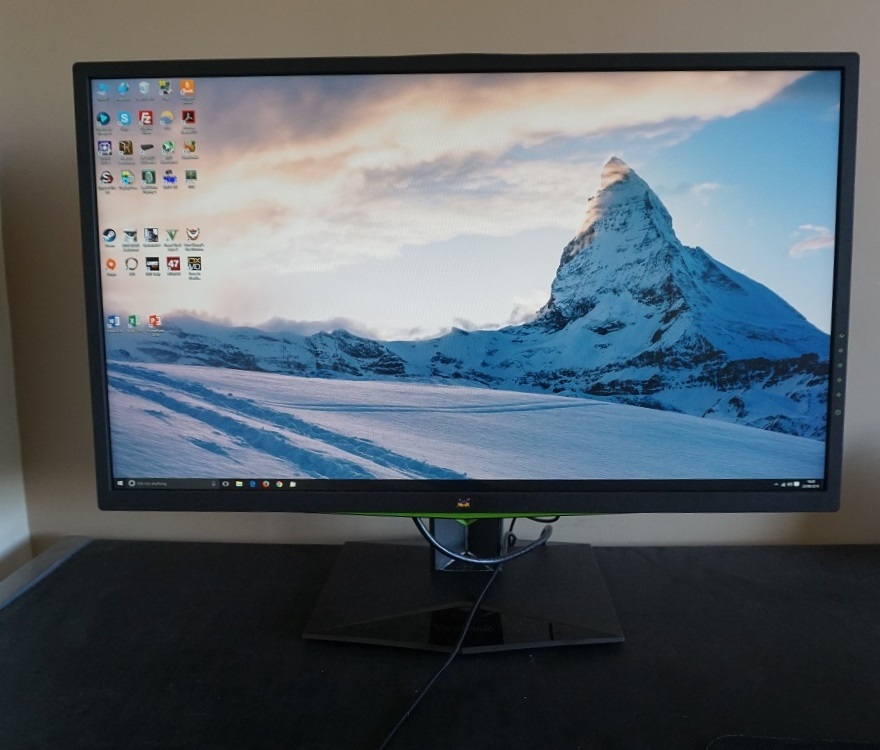
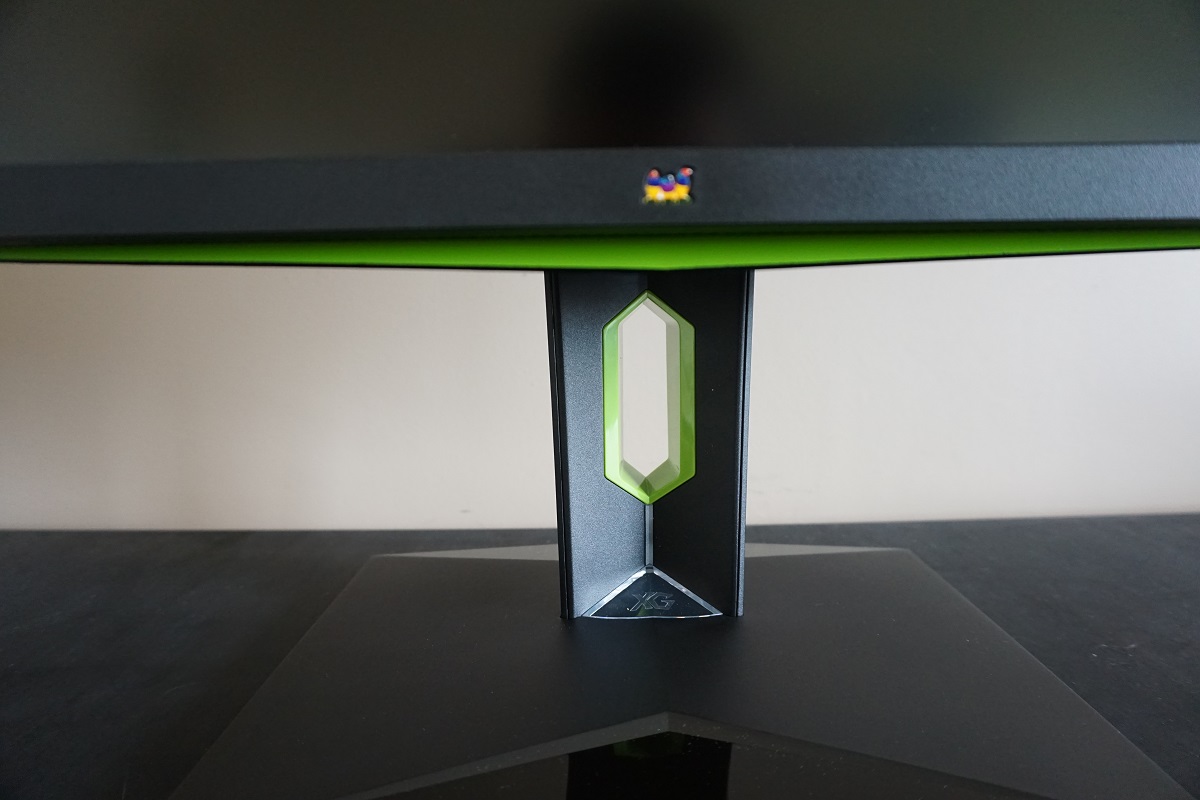
From the front the monitor has quite a homely appearance. Matte black plastics are used for the bezel and most of the stand area. The exceptions to this are a triangle of glossy black plastic towards the front of the stand base and some green matte plastic accents at the bottom and top edges (‘lips’) and inner surfaces of the stand neck. These are not as eye-catching as you might think from the photos and will only be partially visible from a normal viewing position. These accents identify this is a monitor designed for Nvidia users, with G-SYNC support. The bezels have a single-stage design without a significant panel border and are reasonably thin – ~12.5mm (0.49 inches) at the top and sides and ~17mm (0.67 inches) at the bottom. The green ‘lips’ add an extra 8mm (0.31 inches) or so at the top and bottom, if you count them. The screen surface used here is light matte anti-glare, as explored later.
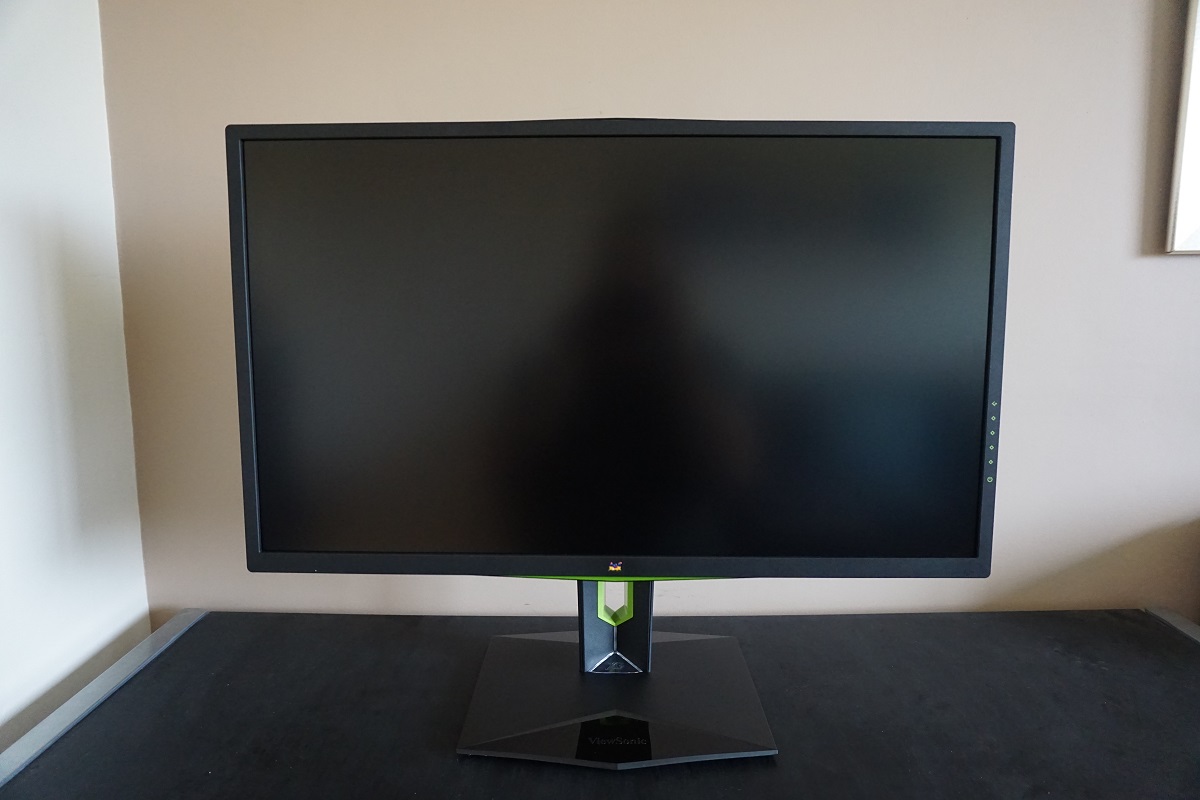
The OSD (On Screen Display) is controlled by pressable buttons at the rear of the monitor, running vertically down the right side (as viewed from the front). There are also green-painted button labels at the front. There are no touch-sensitive buttons to frustrate users, although some users would prefer a JOG button (joystick) for intuitive navigation through the menu system. There is also a large vertical slit-style power LED along with a clear plastic ‘XG’ triangle at the bottom of the stand neck which captures some of this light. The LED can be set to either red, green or blue when the monitor is switched on. Alternatively, it can be set to ‘Auto’, which will cause it to illuminate in a colour that represents the overall makeup of the image being displayed. There is also an option to switch it off if you prefer, which is just as well seeing as it is quite bright and potentially distracting when not gaming. It glows amber when the monitor enters a low power state and turns off when the monitor is ‘off’ (still technically standby). The video below runs through the OSD.
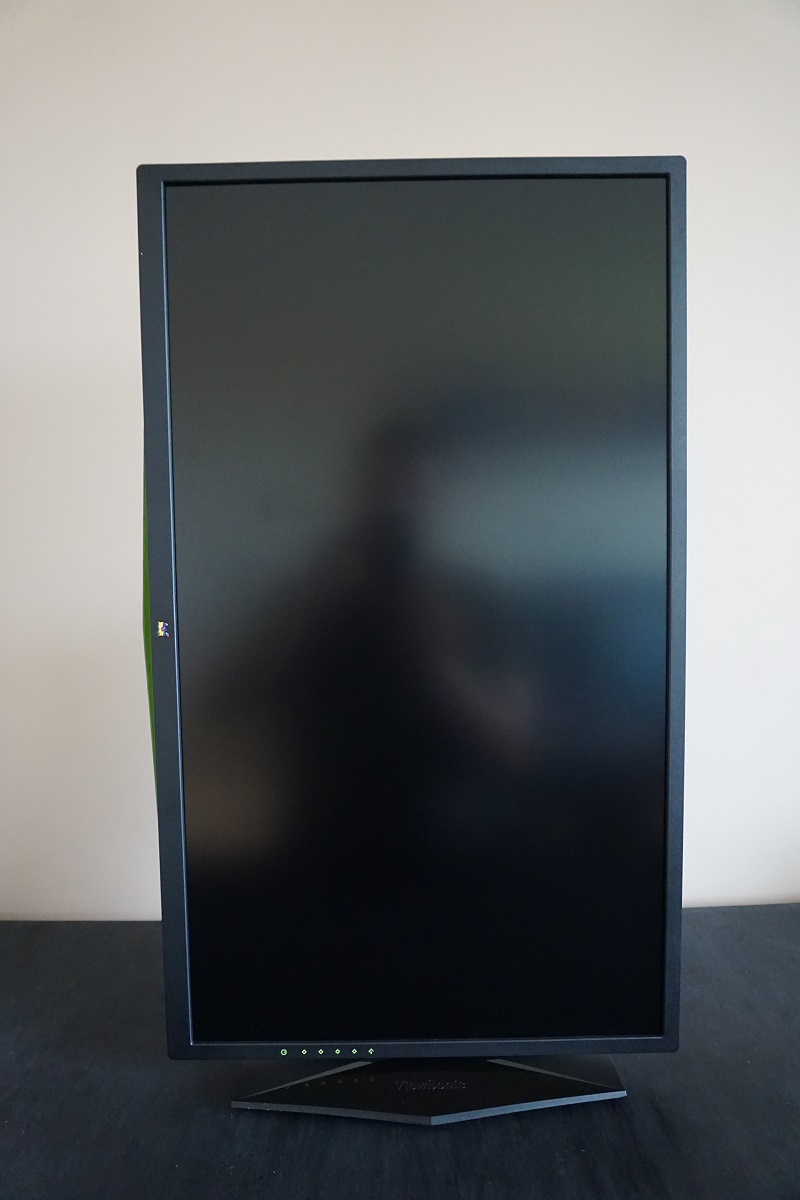
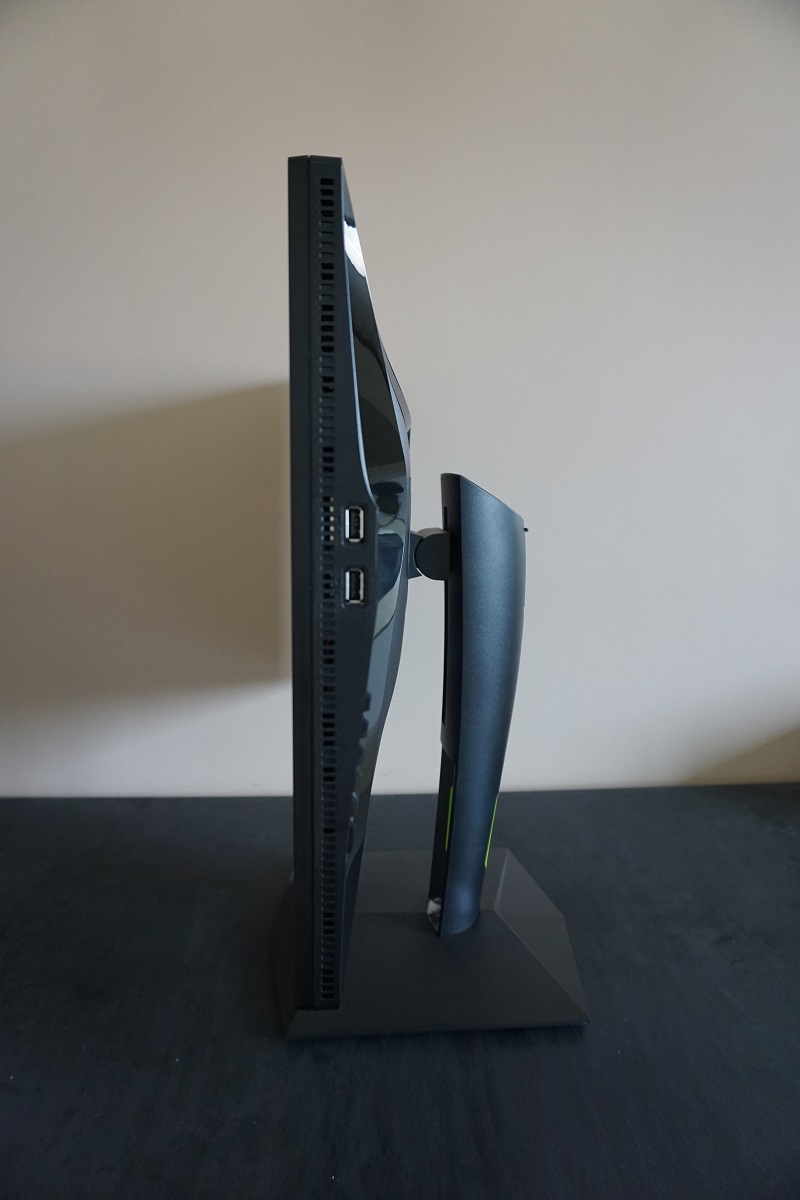
At the right side of the monitor there are 2 USB 2.0 ports and a view of the OSD control buttons below that. The screen is moderately thick compared to some but thinner than others – ~22mm (0.87 inches) at thinnest point, bulking our centrally where the stand attaches. The included stand offers good ergonomic flexibility; tilt (5° forwards, 15° backwards), height adjustment (100mm or 3.94 inches), swivel (175° left/175° right) and pivot (90° clockwise rotation into portrait). It also has a nice solid look and feel to it, keeping the screen firmly in place regardless of how you’ve adjusted it. The total depth of the monitor including stand is ~260mm (10.24 inches). At lowest height the bottom of the screen sits ~63mm (2.48 inches) above the desk surface, whilst the top of the screen sits ~442mm (17.40 inches) above the desk.
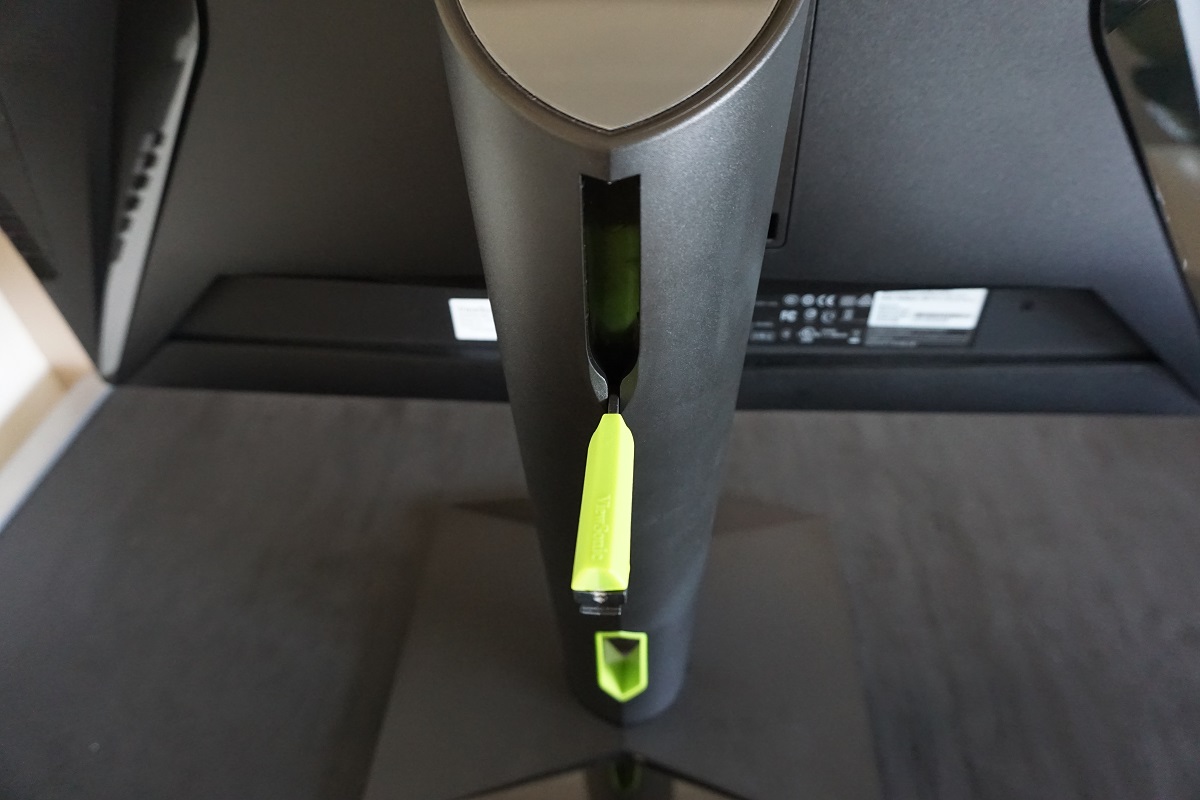
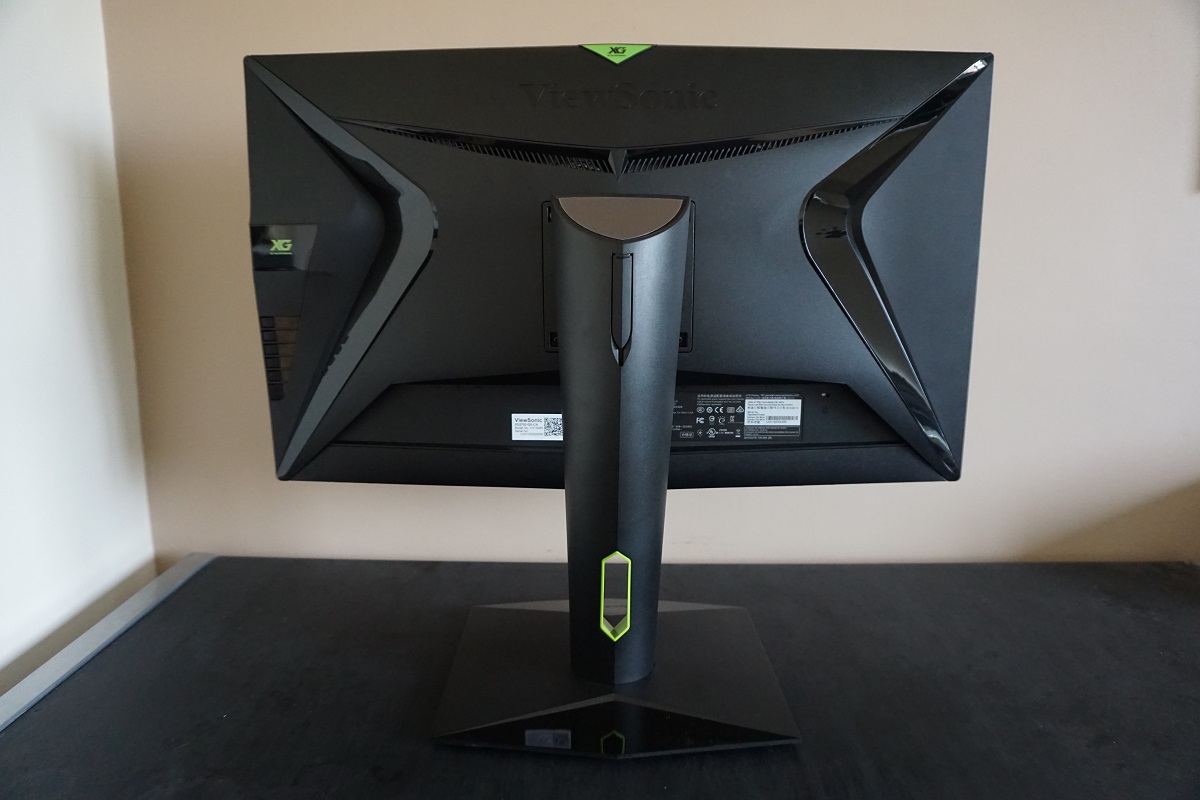
The rear of the screen continues the ‘theme’ of Nvidia green accents, with a small green ‘XG’ logo, a small triangle at the top of the monitor and the inner surface of the stand base as mentioned earlier. This is actually a cable-tidy loop. There is also a retractable headphone hook towards the top of the stand neck, which is a useful little addition. This has a grippy rubber surface and is around 177mm (7 inches) long. Matte black plastics are used for the most part, with a few glossy black plastic elements such as the inward facing ‘chevrons’. The included stand attaches by 100 x 100mm VESA and can be detached to make way for an alternative stand or mount. Towards the left side you can see the OSD control buttons, complete with raised elements that allow you to ‘feel’ the individual buttons better during operation. There are also two up-firing 2W stereo speakers for basic but fairly low quality sound output.
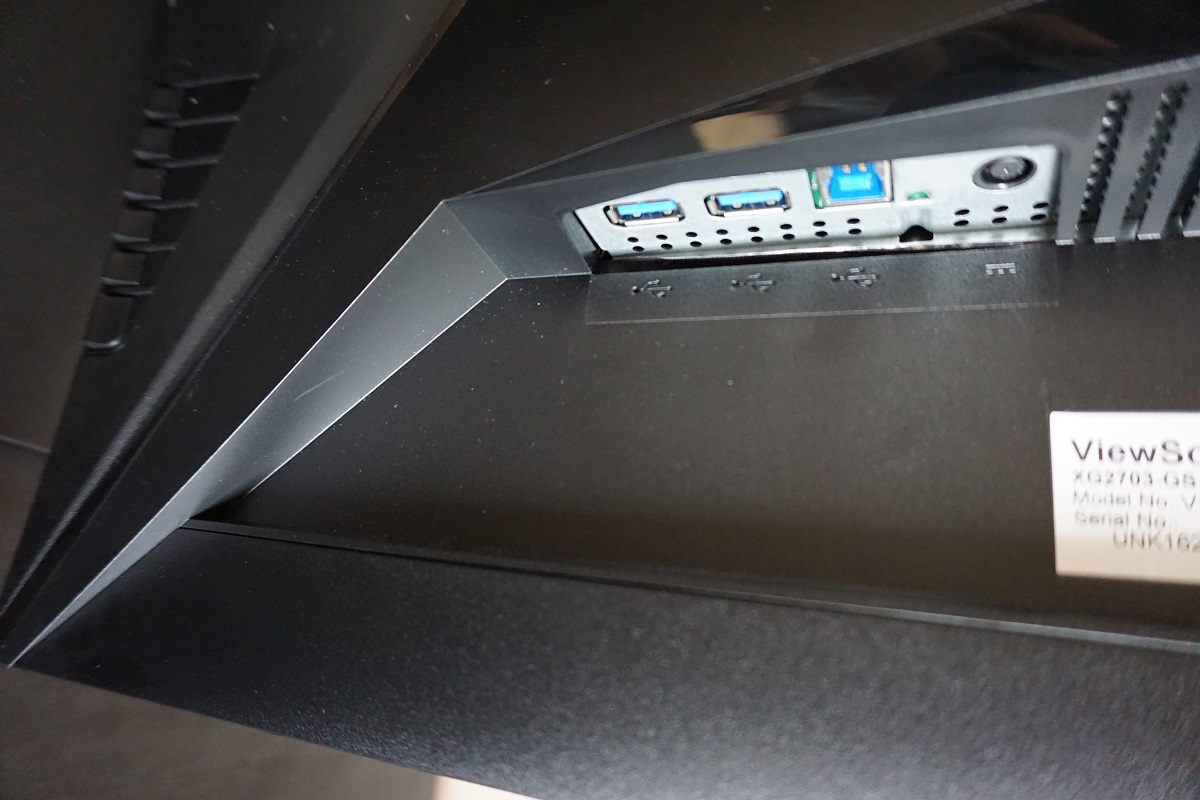
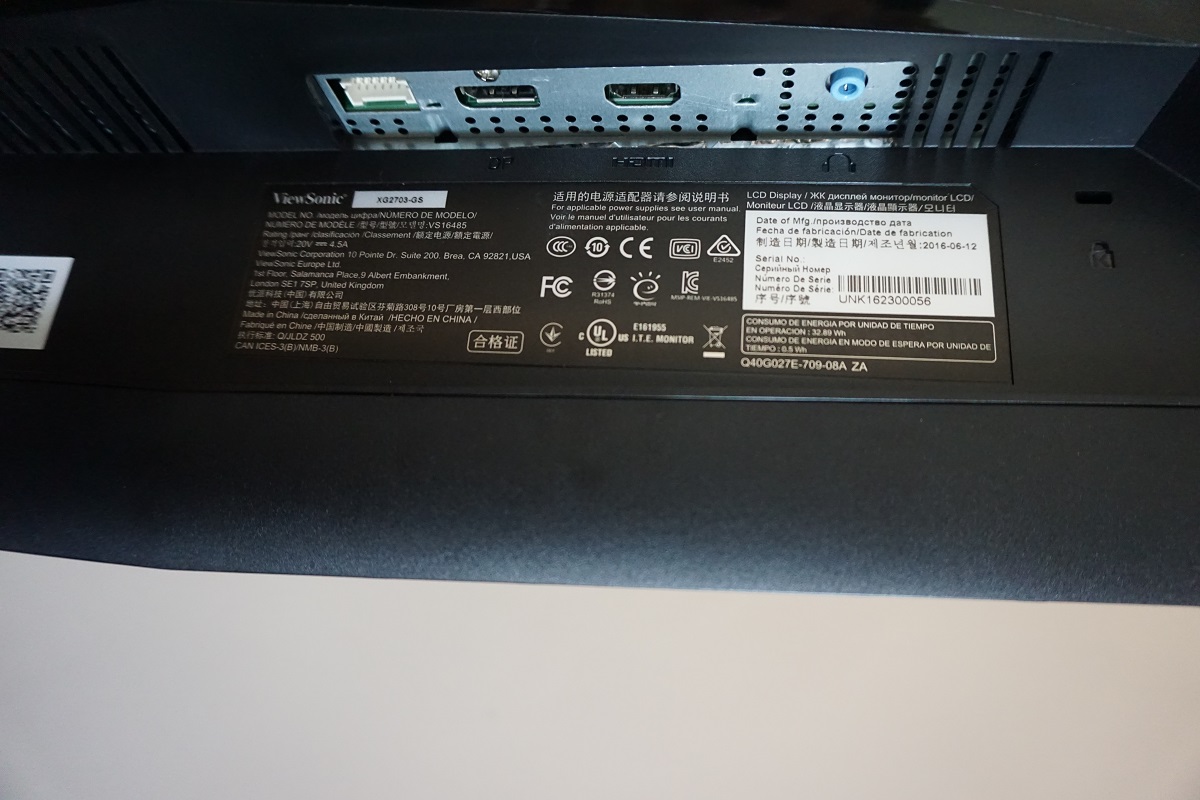
The ports are downwards-facing and include; 2 USB 3.0 ports (plus upstream), DC power input (external ‘power brick’), DP 1.2a (supports Nvidia G-SYNC), HDMI 1.4 and a 3.5mm headphone jack. The full capabilities of the monitor, including G-SYNC and up to 165Hz @ 2560 x 1440 require DP 1.2 to be used. The HDMI port is only designed to support up to 60Hz @ 2560 x 1440 or more specifically is designed to allow devices such as games consoles or Blu-ray players (Full HD output) to be connected as a secondary use for the monitor. The necessary power adaptor, a power cable, 1.5m DP cable and 1.5m USB 3.0 cable is included in the box.
Calibration
Subpixel layout and screen surface
As mentioned previously, a light matte anti-glare screen surface is used on this monitor. This has a smooth surface texture that keeps the image free from obvious graininess. The fact that it is light (low haze) also helps improve the vibrancy potential of the monitor, giving a superior performance in this respect than ‘stronger’ matte screen surfaces. It also offers good glare handling characteristics, avoiding sharp reflections as you’d see on a glossy screen.
![]()
The subpixel layout of the monitor is the usual RGB (Red, Green and Blue) stripe, shown above. This is the standard layout for both Mac and Windows systems, so there’s no need to run ClearType as a Windows user or worry about text fringing on Mac systems. You may still wish to run the ClearType wizard to fine-tune according to preferences, however.
Testing the presets
The XG2703-GS features a number of ‘Viewmode’ presets; ‘Standard’, ‘Game’, ‘Movie’ and ‘Web’. Within ‘Game’ there are a number of sub-presets; ‘Gamer1’, ‘Gamer2’, FPS1, ‘FPS2’, ‘RTS’, and ‘MOBA’. These affect the image by altering gamma, saturation levels and making various other adjustments. If you’re after an accurate and appealing image, it’s really worth simply sticking to ‘Standard’ and adjusting other settings manually if you feel it’s necessary. We will therefore be focusing on ‘Standard’ and some of the other settings available in the OSD, including one of the ‘Color Temperature’ settings and ‘Blue Light Filter’ settings. We will also be reporting our observations using ULMB (Ultra Low Motion Blur) at a range of refresh rates. We will not be commenting on ULMB with a ‘Pulse Width’ of ‘0’ this time as it is simply too dim to be practical. This is always the case – and our comments would simply reflect that fact.
The table below provides key readings (gamma and white point) taken using a Datacolor Spyder5ELITE colorimeter as well as general observations, under a range of settings. Our test system used an Nvidia GeForce GTX 1070 G-SYNC compatible GPU, connected via DisplayPort. The system used Windows 10 and the monitor was set to its ‘plug and play’ state without additional drivers or ICC profiles loaded. The monitor was left to run for over 2 hours before readings were taken. Aside from for our ‘Test Settings’ assume any setting not mentioned was left at default. The exception to this is that the refresh rate was set to 165Hz (where ‘ULMB’ was disabled) as this was used for most of our testing. Unlike on some monitors, elevated refresh rate did not negatively affect the image quality.
| Monitor Settings | Gamma (central average) | White point (kelvins) | Notes |
| Standard (Factory Defaults) | 2.2 | 7217K | The image is very bright and noticeably ‘cool’ looking (i.e. a blue channel bias). The depth and variety of shades is excellent, though, maintained consistently at all points of the screen as well. |
| Blue Light Filter = 100 | 2.1 | 4352K | This is the strongest ‘Low Blue Light’ (LBL) setting available on the monitor. It drops the intensity of the blue colour channel down massively and makes the image look noticeably warm (4352K), especially before the eyes adjust. The blue light output from the screen is cut effectively, making this setting suitable for relaxing evening viewing. This is particularly true when coupled with a lower brightness than default. Note that this option may be greyed out in the OSD if using a ‘Color Temperature’ other than ‘Native’. |
| Color Temperature = Warm | 2.2 | 4913K | An alternative ‘LBL’ setting, not quite as strong as having the ‘Blue Light Filter’ set to ‘100’ but still effective. |
| ULMB @ 120Hz | 2.2 | 7404K | The most obvious change from the factory defaults is that the screen appears significantly dimmer. The backlight strobes at 120Hz, too, inducing a mild flickering that’s like a 120Hz CRT. It certainly appears dim at first, when coming from much higher brightness levels, but your eyes do adjust to this (sensitivity and preferences for brightness varies). |
| ULMB @ 100Hz | 2.2 | 7336K | As above with slightly more obvious flickering. Perceived brightness is marginally higher due to slightly longer ‘on’ period for the strobe. |
| ULMB @ 85Hz | 2.2 | 7315K | As above, but flickering is now even more obvious and in our view quite uncomfortable. Brightness is significantly higher (can be lowered, of course) due to the longer ‘on’ period for the strobe. |
| Test Settings (see below) | 2.2 | 6488K | As factory defaults but the white point has been corrected and the blue bias alleviated. The variety and overall richness of shades is excellent, with saturation levels maintained throughout (something that can’t be said for the TN alternatives). |
Straight from the box the monitor appeared very bright and cool-tinted, but otherwise well balanced. There was clearly good depth and variety to the image, as one would hope from an IPS-type panel with good gamma handling. The gamma handling of ‘gaming monitors’ is often an issue, one which can sometimes be corrected with OSD adjustments but other times requires software-based intervention (and ICC profile, for example). This wasn’t the case with the XG2703-GS as gamma handling was excellent, averaging ‘2.2’ and sticking close to the curve. Furthermore, there were various options in the OSD to adjust according to other preferences that the user may have. The image below shows how closely gamma tracked to the desirable ‘2.2’ curve under our ‘Test Settings’. Gamma tracking was very similar straight from the box, which is pleasing. The monitor also included various settings that provided a ‘Low Blue Light’ (LBL) function. There is a ‘Blue Light Filter’ that can be adjusted between ‘0’ (off) and ‘100’ (maximum reduction) in single unit increments, giving good flexibility. There was also a ‘Warm’ setting under ‘Color Temperature’ which provided a fairly strong LBL effect. Manual adjustments of the colour channels could also provide such an effect, but are obviously a lot less convenient. We did not document other ‘Color Temperature’ settings in the table, but can confirm that ‘sRGB’ is identical to the ‘Native’ with the brightness preset to ‘20’. And ‘User Color’ is identical to ‘Native’ unless you lower the gain of R, G or B below ‘100’. And the less said about ‘Bluish’ the better – it does what it says on the tin and can be thought of as a ‘High Blue Light’ setting. Not attractive or practical. Our test settings involved significantly reducing the brightness and making some changes to colour channel to overcome the high colour temperature out of the box. There was no need to fiddle with anything else, as that was all optimal for providing accurate gamma handling and strong shade variety with a vivid but natural image. Needless to say there was no need for ICC profiles with this one – trying to use an ICC profile created by somebody else on a monitor like this is just going to be counter-productive. Note that individual units vary when it comes to colour temperature, so the changes recommended here will not necessarily be optimal in all cases. Interestingly we found setting the ‘Blue Light Filter’ to ‘20’ achieved similar results on our unit. So for simplicity, you may find just adjusting this works on your unit and you won’t necessarily have to manually adjust the individual colour channels. We’ve also included additional settings such as ‘Response Time’ setting and the refresh rate used just for reference. Anything not mentioned was left at default, including contrast which is set to ‘50’ by default. Note that if ULMB is activated, contrast might change to ‘45’ and will stay at ‘45’ even when ULMB is deactivated – be sure to change this to ‘50’ after deactivating ULMB to maximise static contrast during normal operation. Color Temperature = User Color R= 100 G= 95 B= 93 Response Time= Advanced Refresh rate= 165Hz We used a BasICColor SQUID 3 (X-Rite i1Display Pro) to measure the luminance of black and white. From these readings, static contrast ratios were calculated. This data is presented in the table below, with the same settings used that were explored in the calibration section plus various brightness adjustments. Assume any settings not mentioned here were left at default, with exceptions to this already noted in the calibration section. Black highlights indicate the highest white luminance, lowest black luminance and peak contrast ratio recorded. Blue highlights show the results under our ‘Test Settings’.

Gamma 'Test Settings'
Test Settings
Brightness= 30 (according to preferences and lighting)
Contrast and brightness
Contrast ratios
Monitor Settings White luminance (cd/m²) Black luminance (cd/m²) Contrast ratio (x:1) 100% brightness 312 0.34 1159 80% brightness (Factory Defaults) 343 0.30 1143 60% brightness 285 0.25 1140 40% brightness 219 0.19 1153 20% brightness 143 0.12 1192 0% brightness 55 0.05 1100 Blue Light Filter = 100 271 0.34 797 Color Temperature = Warm 296 0.34 871 ULMB @ 120Hz 133 0.13 1023 ULMB @ 100Hz 143 0.14 1021 ULMB @ 85Hz 181 0.18 1006 Test Settings 163 0.08 1038
The average contrast ratio with only brightness adjusted was 1148:1, which is good for an IPS-type panel (or any non-VA LCD panel for that matter). Following the adjustments made to our ‘Test Settings’ we recorded 1038:1, which is still respectable. The LBL settings, which in effect significantly reduce the blue colour channel, dropped contrast further; to 871:1 under ‘Warm’ and 797:1 under ‘Blue Light Filter = 100’. The contrast ratio remained above 1000:1 with ULMB active, regardless of refresh rate. The highest white luminance recorded was a retina-scorching 394 cd/m², whilst the lowest white luminance recorded on the table was 55 cd/m². This provides a 339 cd/m² luminance adjustment range without any loss of contrast.
There is a Dynamic Contrast setting of sorts called ‘Adaptive Contrast’, which can be activated in the ‘Standard’, ‘Gamer1’ and ‘Gamer2’ ViewMode presets. This is not like a conventional Dynamic Contrast mode as it does not allow the backlight to alter its brightness according to the level of dark and light on the screen, at least not noticeably so. Instead the backlight maintains a more or less constant brightness, at whatever you set it to with the ‘Brightness’ control, and the monitor adjusts its contrast and gamma according to the scene. It is sort of like an automatic ‘Black eQualizer’ (or more appropriately, given that it’s a ViewSonic monitor, an automatic ‘Dark Boost’ setting). It enhances visibility in dark scenes during games, whilst during bright scenes it changes its behaviour to help brighter shades maintain distinctness. It doesn’t make games look as they should (this is achieved through accurate gamma tracking, which the monitor does ordinarily) but could certainly provide a competitive edge and make sure the fine details remain visible when gaming. The effect is more subtle than most ‘gamma enhancement’ technologies, so it’s quite an interesting addition really.
PWM (Pulse Width Modulation)
This monitor does not use PWM (Pulse Width Modulation) at any brightness level. DC (Direct Current) is used to regulate backlight brightness, at all levels. The backlight is therefore flicker-free at all brightness levels, which will come as welcome news to those worried about side-effects associated with PWM usage.
Luminance uniformity
We observed a black background in a dark room and could see no obvious backlight bleed. As is usual for IPS-type panels (AHVA in this case), there is however a silverish or slightly yellow ‘glow’ that varies depending on viewing angle. This can be seen from a normal viewing position towards the bottom corners of the screen in particular and is not something that varies between individual units. It ‘blooms out’ more noticeably from a variety of viewing angles. Its effects are explored later on in the review and how it appears off-angle is explored in a video. The photograph below was taken from a few metres back and perfectly central so that this ‘AHVA glow’ was not captured, instead offering an accurate reflection of how the backlight uniformity excluding this glow appeared for dark content.
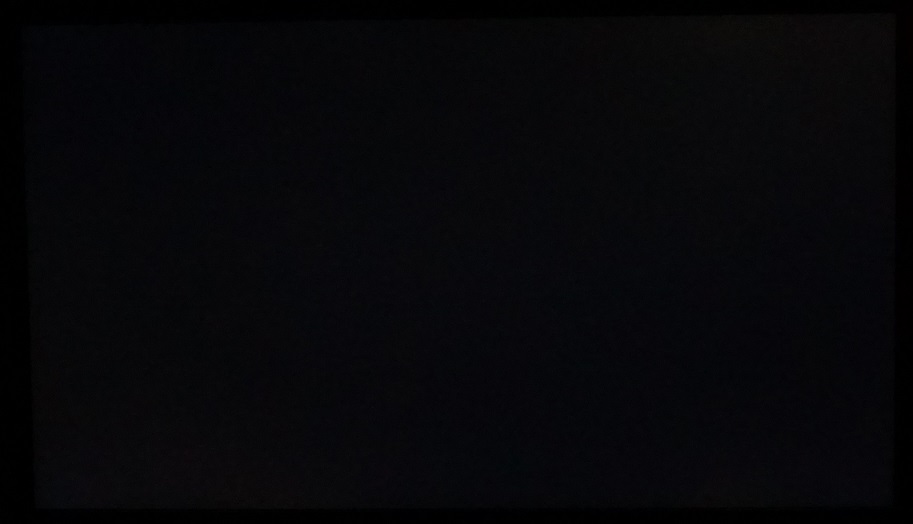
Be careful when trying to assess or compare ‘backlight bleed’ of our unit to others on the internet. Users tend to post hugely over-exposed photographs, often taken relatively close to the screen and therefore capturing ‘AHVA glow’ as well as any backlight bleed. These do not accurately represent backlight bleed or overall dark uniformity as the eye sees it. Having said that, backlight bleed does vary between individual units even if ‘AHVA glow’ does not. Our unit is clearly very strong in this regard and there is no guarantee that your unit will end up looking like this. When considering other monitors using this or a similar panel, it’s certainly something that is highly variable and there seems to be a moderate chance of having at least a little backlight bleed.
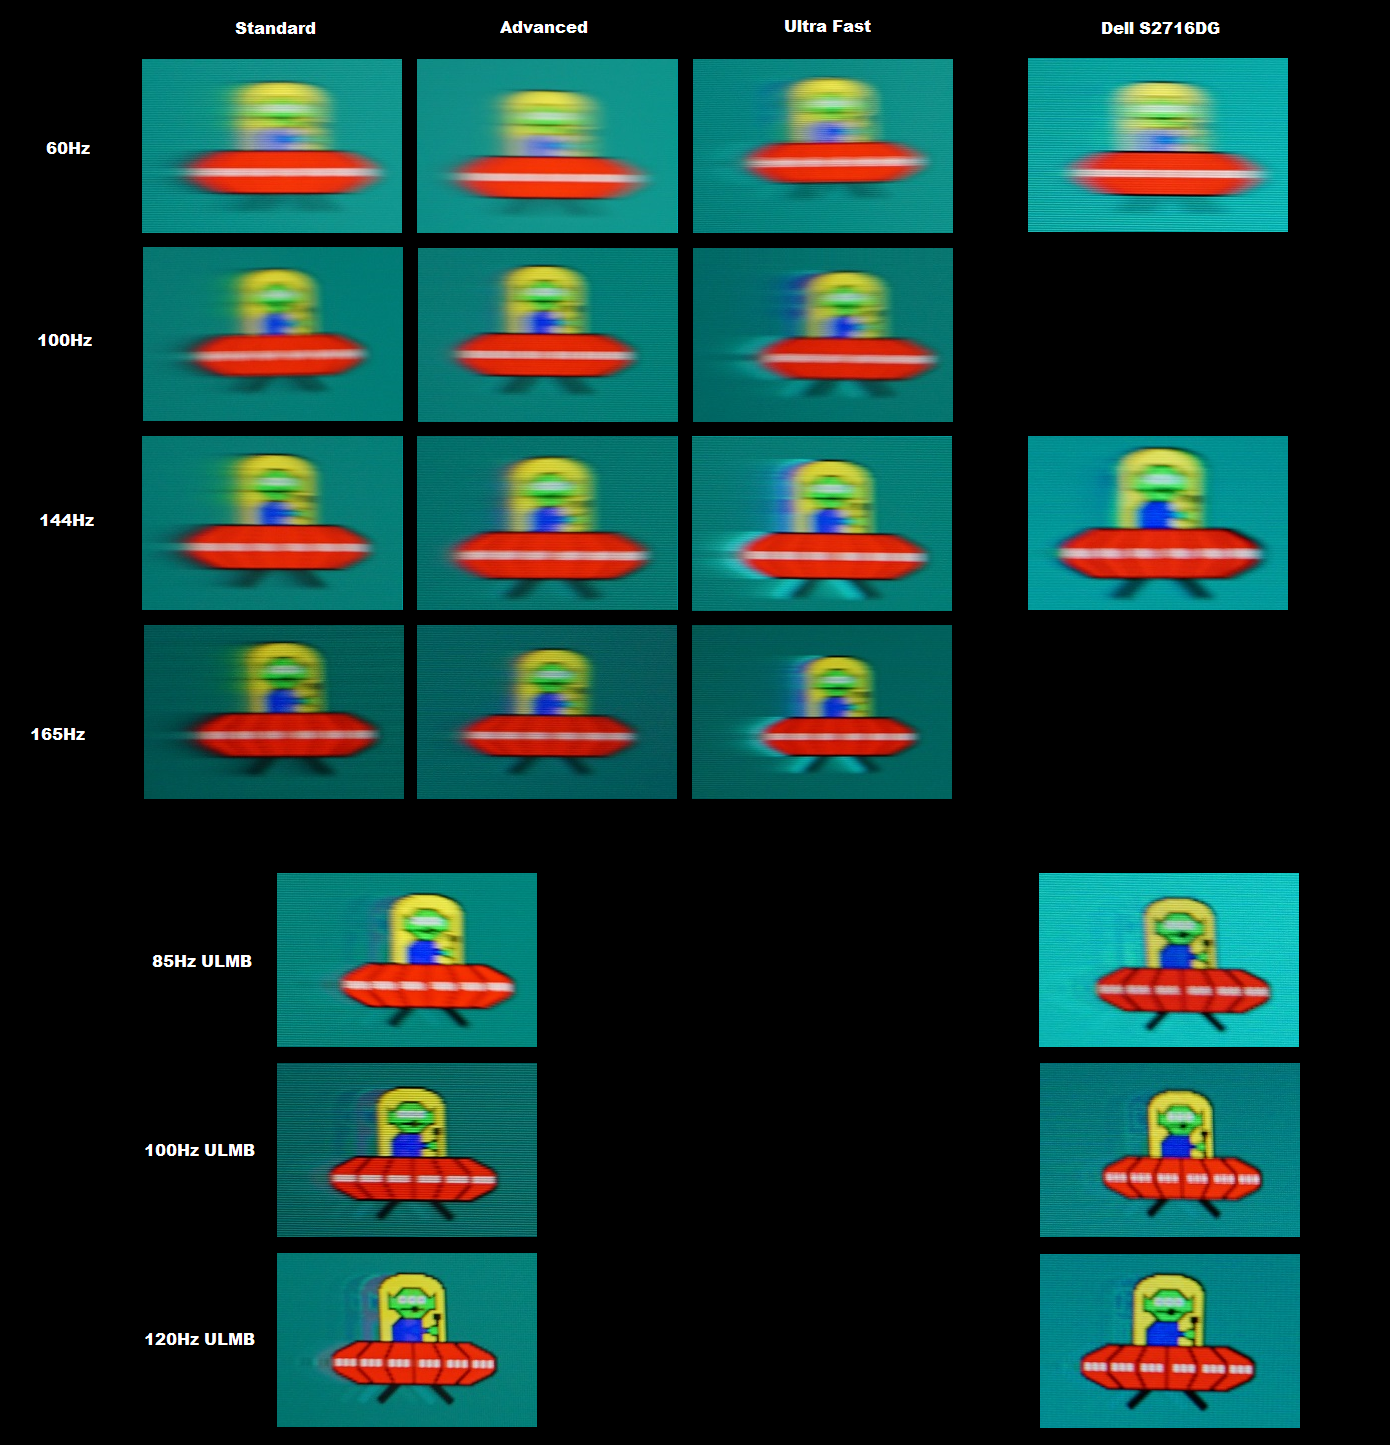
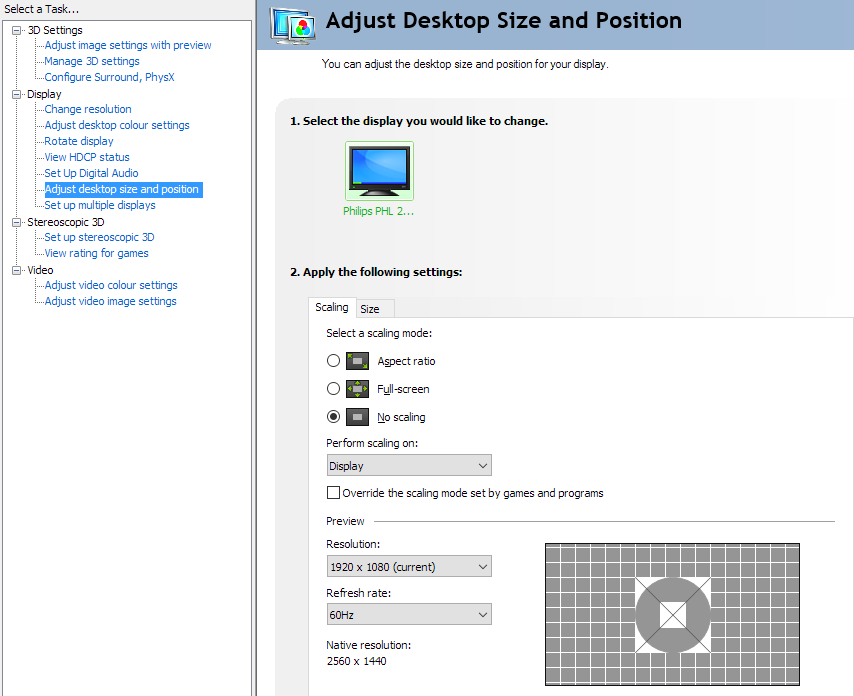
The Spyder5ELITE was used to analyse the uniformity of lighter colours, specifically white, by analysis of 9 white quadrants running from the top left to bottom right of the screen. The table below shows the luminance recorded at each quadrant alongside the percentage deviation between a given quadrant and the brightest point recorded. The luminance uniformity of the screen was reasonable overall. The brightest point recorded was ‘quadrant 5’ in the centre of the screen (158.3 cd/m²). The greatest deviation from this occurred at ‘quadrant 2’ above centre (131.1 cd/m² which is 17% dimmer than centre). Elsewhere deviation between a given quadrant and the brightest point was 7-16%. Note that individual units vary when it comes to all aspects of uniformity, and that there may be further deviation beyond the points measured. The contour map below represents these deviations graphically, with darker greys representing lower luminance and therefore greater deviation from the central point than lighter greys. We also measured the colour temperature (white point) uniformity of the same 9 quadrants. Deviations here are given DeltaE values, where higher values and deeper shades on the map represent higher deviation from 6500K (D65) than lower values and lighter shades. A DeltaE <3 is considered deviation that most users wouldn’t readily notice by eye. The results here were very good overall. There was significant deviation between the point closest to 6500K and the quadrant to the right of centre (DeltaE 3.4). No further significant deviations were detected and indeed if quadrants were all compared to the central quadrant there would be no significant deviations recorded. On Battlefield 4 (BF4) the monitor put in a competent contrast performance. Distinction between dark and light shades was good, whilst the relatively smooth screen surface did not impart obvious graininess to light shades, such as bright skies or artificial lights. The level of detail was appropriate, for the most part, but there was some detail lost towards the bottom corners of the screen in particular. This is due to the aforementioned ‘AHVA glow’, which is most noticeable near the bottom corners of the screen from a normal viewing position. This ate away at detail and gave a bit of a flooded look in dark scenes on this region of the screen. On the plus side, the perceived gamma consistency was strong so unlike TN panels you don’t get extra unintended detail in dark areas lower down the screen and a significant loss of detail further up the screen. On Dirt Rally the contrast was again good overall. The level of detail in dark scenes was good for the most part, aside from the regions affected by ‘AHVA glow’. The atmosphere was certainly not as good as on VA panels when racing in the dark. Although there was ‘glow’ there was not the vertical gamma and hence detail level inconsistencies seen on TN models. Fairly subtle details in car interiors, such as leather material texture, was just as visible further up the screen as centrally and lower down the screen (bar the aforementioned regions of ‘glow’). Bright elements such as car headlights and daylight sky appeared quite smooth without obvious graininess, thanks to the light and smooth matte screen surface. We also tested the Blu-ray of Star Wars: The Force Awakens. Contrast performance here was pleasing overall. This film features strongly contrasting scenes, with plenty of dark environments and bright contrasting elements (light sabers, explosions, flames etc.) Although the distinction between these and overall atmosphere created wasn’t as good as VA models, these brighter elements still stood out nicely. Meanwhile the level of detail in these dark areas was good, with the black bars at the top and bottom of this film (16:9 letterbox) absorbing a fair bit of the ‘AHVA glow’. The brighter elements appeared quite smooth thanks to the screen surface, too. Lagom’s contrast tests were used to analyse specific weaknesses in contrast performance which may not have been identified during other testing. The following observations were made. The ViewSonic XG2703-GS’s colour gamut (red triangle) was compared to the sRGB colour space (green triangle). The monitor offers full sRGB coverage (100%), with a little extension beyond this in the green corner of the diagram in particular. This means gives the monitor potential for accurate sRGB shade reproduction, with a little bit of extra vibrancy natively. This works nicely for general purpose use and also makes the monitor appropriate for applications where colour accuracy is important. Colour reproduction was excellent on BF4, with a vivid but natural shade representation. This helped environments within the game look very much as they should, with good earthy browns and plant-like greens that were consistent in saturation throughout the screen. The variety of closely matching shades, such as subtly different vegetation, was also excellent and helped give objects in the game their own distinct identity. Vibrant shades such as glowing orange flames, the cyan sparks of the engineer repair tool and yellow and green HUD elements on aircraft had good depth to them. Colour reproduction was also excellent on Dirt Rally. Khaki colours were represented with a suitably dusty, pastel quality. This insured that the racing environments looked natural and appropriate to their real-world locations. There was also a pleasing variety and richness of vegetation, with consistent saturation throughout the screen area. The screen was free from the pronounced saturation changes that occur vertically on TN models of this size, as observed from a normal viewing position. The car liveries benefited from this good vivid look, consistency and variety. Some impressive neon greens, highlighter yellows and oranges and deep blues, purples and reds were displayed here. The panel type, colour gamut and light matte screen surface all aided the vibrancy here. We also assessed colour reproduction on the Blu-ray of Futurama: Into the Wild Green Yonder. This is an excellent test for colour consistency, with large patches of individual shade shown on the screen. This highlights any saturation or gamma changes at various points of the screen quite nicely. In-line with our other observations, colour consistency was very strong. Colours maintained appropriate saturation levels across the screen. Neon shades looked eye-catching and bright, pastel shades looked suitably muted and deep shades suitably deep. The strong consistency helped even closely matching shades appear with their own unique identity, for example slight variation in character skin tones. Overall this monitor gave this title (and indeed the game titles) the sort of look that they crave, with vivid but accurate colour reproduction. Lagom’s tests for viewing angle tests were used to analyse colour consistency and viewing angle performance in a more specific way. The following observations were made from a normal viewing position, with eyes around 70cm from the screen. Using a sensitive camera and tool called SMTT 2.0, we compared the latency of the XG2703-GS to a range of monitors of known latency. To maximise accuracy, over 30 repeat readings were taken. Using this method, we measured 3.21ms (just over 1/2 a frame @165Hz) of input lag. This value reflects both the element of input lag you ‘see’ (pixel responsiveness) and that which you ‘feel’ (signal delay). It indicates an extremely low signal delay which shouldn’t bother even sensitive users. We don’t have the means to accurately measure input lag whilst G-SYNC is active, but it certainly felt very low indeed with G-SYNC doing its thing. As covered in the OSD video earlier, there is a section of the OSD called ‘Manual Image Adjust’ which includes an ‘OverClocking’ feature. The panel used is a native 144Hz panel, but you can get the monitor to ‘overclock’ its refresh rate to 165Hz. We noticed no negative consequences in doing so with our unit, which is why we used this refresh rate for most of our testing. Most units and systems should support this properly, but if not be mindful that the DisplayPort cable you’re using could potentially cause issues here. The DP cable length and quality can actually have an impact on this sort of capability. DP is a digital signal and there is no such thing as ‘revisions’ of a cable (DP 1.1, DP 1.2 etc.), but even so it is a somewhat sensitive signal at elevated bandwidths. This means a long cable or ‘poor quality’ cable can cause dropouts where bandwidth requirements are high (i.e. 2560 x 1440 @ 165Hz). We used both the DP cable included in the box and a ‘Cable Matters’ 6ft cable which we had to hand and had no issues with this feature. In this article we explore the key concepts related to monitor responsiveness. One of the key concepts highlighted here is perceived blur, which is contributed to not only by the pixel responsiveness of the monitor but also the movement of our own eyes as we track motion on the screen. This eye movement is actually the predominant factor on modern LCDs such as the ViewSonic, with the pixel response times having a less significant but still important effect. We also explore the concept of ‘pursuit photography’, which uses a moving camera to capture motion on a monitor in a way that reflects both the pixel responses and eye (camera) movement. It is far more indicative of what the eye sees at a given moment in time than any form of photography or video using a stationary camera. The images below are pursuit photographs taken using the UFO Motion Test for ghosting. The test is set to run at 960 pixels per second, the default and a practical speed for such photographs. The middle row of the test (medium cyan) background is used here with a range of refresh rates and all ‘Response Time’ settings (‘Standard’ ‘Advanced’ and ‘Ultra Fast’) tested. Results under ULMB are also tested, where the ‘Response Time’ setting is greyed out. The final column shows the results at 60Hz, 144Hz, 85Hz ULMB, 100Hz ULMB and 120Hz ULMB of the Dell S2716DG using its optimal (‘Normal’) response time setting. This provides an interesting comparison as the Dell is a very snappy performer in terms of pixel responses. Note that any interlace patterns observed on these photos are from the camera and not the monitor; refer to our observations on BF4. At 60Hz, there is significant blur caused by eye movement. You can see this with all ‘Response Time’ settings as the UFO appears soft and blurry. With the ‘Standard’ setting there is also a fair degree of trailing behind the object (it moves from left to right) due to slower than optimal pixel responses. This is massively reduced using the ‘Standard’ setting and replaced with obvious inverse ghosting (overshoot) using the ‘Ultra Fast’ setting. The ‘Advanced’ setting at 60Hz is actually quite similar to the S2716DG reference for the transitions analysed here, if not a little stronger due to a lack of overshoot. At 100Hz, the perceived blur is reduced significantly compared to 60Hz. You can see that the UFO body, cockpit and legs are less blurred with some of the finer details on the UFO body a little bit more visible. Using the ‘Standard’ setting there is quite a bit of trailing behind the object due to slower than optimal pixel responses. The ‘Advanced’ setting shows a hint of overshoot, but it’s quite faint and replaces the more obvious ‘powdery’ conventional trail using the slower setting. The ‘Ultra Fast’ setting is again far too aggressive in its acceleration levels, leading to very obvious overshoot with a trail that is very bold and bright in this case. More so than at 60Hz. At 144Hz the perceived blur due to eye movement is further reduced. The details on the UFO and sharpness of the legs, for example, a better defined. There is again significant trailing behind the object using the ‘Standard’ setting, a touch of light overshoot with the ‘Advanced’ setting and very obvious and extremely bright inverse ghosting using ‘Ultra Fast’. The ‘Advanced’ setting is actually remarkably similar for these transitions to the Dell S2716DG, which considering the panel type differences and potential differences in pixel responsiveness is very pleasing. The details on the UFO do appear a bit better defined on the Dell shot here, but overall the perceived blur in this example is quite similar. At 165Hz the perceived blur is further reduced, with some details on the UFO body in particular more distinct again. There is significant trailing behind the object using the ‘Standard’ setting. The ‘Advanced’ setting actually seems to have more subdued overshoot than at 144Hz – it’s still there as the trail is slightly ‘dirty’, but it’s even fainter than at 144Hz. There is a little additional trailing behind the UFO body in this example. The ‘Ultra Fast’ setting is again useless in practice as it introduces extremely eye-catching inverse ghosting. With ULMB active perceived blur is massively reduced. You can see the details on the objects are already rather distinct at 85Hz, becoming even more distinct as refresh rate is increased. The object is a clear and distinct ‘thing’ now. There is considerable overshoot behind this, however, which is fragmented due to the fact the monitor is ‘strobing’. This overshoot is stronger than on the S2716DG, especially at 100Hz and 120Hz where there is quite an obvious purple initial ‘trail’. This is because a very strong level of pixel overdrive is required to boost the pixel transition speed sufficiently, in most cases, for optimal performance under ULMB. It is quite clear from this analysis that the analysis above that the ‘Advanced’ setting is optimal, where ULMB is disabled of course and you can actually adjust this. This is echoed in general testing and usage as well, as we will come onto in the proceeding sub-section. It should be noted that not all pixel transitions occur as quickly as those shown here, with the ‘Advanced’ setting. We do highlight some slight weaknesses, so don’t take from the analysis above that the XG2703-GS is ‘just as fast’ in practice as the S2716DG. It may be for the transitions analysed above, but certainly not all. On BF4 the monitor provided an exceptional ‘flow’ to the game, where the frame rate kept up with the 165Hz refresh rate. There was an excellent ‘connected feel’ that only responsive high refresh rate monitors with low input lag can bring to the table. This made interacting with the game world (including engaging enemies) considerably easier than on models with much lower refresh rates. Perceived blur was also nice and low, especially compared to even the snappiest 60Hz LCDs. That is because the monitor is pumping out 2.75 times as much information every second, reducing the time your eye spends moving quite considerably. The difference between 144Hz and 165Hz in this respect is very slim, but it’s a nice bonus and certainly gives an edge that some users would appreciate. For the most part pixel responsiveness was good enough to make a very good go of this refresh rate, too. There was a little bit of additional trailing in places, particularly where light shades combined with significantly darker shades. This was very faint and sort of like a very fine and short mist behind some objects rather than an obvious bold trail. This trailing didn’t catch the eye and could only really be seen when you’re looking out for it. It did slightly affect the perceived blur, however. Fine details such as cracks in rocks, vegetation on the ground and other texture details were a bit less distinct during rapid movements than on fast TN alternatives like the Dell S2716DG. Even accounting for the fact the refresh rate was 165Hz on the ViewSonic vs. 144Hz for the Dell in this comparison. If the ViewSonic is run at 144Hz then the perceived blur increases just slightly again. Regardless of it not quite matching the Dell in this respect, it still looked (and felt) very much like a high refresh rate display and provided a much more enjoyable fast-paced gaming experience than 60Hz models in particular. It’s also worth mentioning that, although there was a little bit of overshoot (as already highlighted), this was really rather faint and not at all eye-catching. Sensitivity to this does vary, but it’s really not something we expect most users to notice or find bothersome. It is a lot more subdued than on the Dell S2716DG – and even then, it only bothers a minority of users on that model. There were no obvious ‘bright’ trails or particularly dark and dirty trails, just some faint trails in places that did not appear as a perfect blend of the object and background colour (hence mild overshoot). Furthermore, there were no interlace pattern artifacts (pixel inversion issues) present when gaming. As our analysis above is fairly comprehensive, we don’t have an awful lot to add from experience with other titles. But we did test Dirt Rally, as usual, and found the performance here equally pleasing where the frame rate kept pace with the 165Hz refresh rate. The car seemed to respond very rapidly to user input, providing that ‘connected feel’ that avid racing fans crave. The level of perceived blur was also nice and low, vastly improved from even the fastest 60Hz LCDs. Again, it was not quite as low as on fast high refresh rate TN models like the Dell S2716DG. There was a little bit of extra trailing in places, adding to perceived blur. This was particularly true for higher contrast transitions involving light and significantly darker shades. The sort seen at night or when driving in the snow, for example. Nonetheless, even during these scenes the overall visual fluidity was impressive and clearly far beyond what we would have traditionally expected from an IPS-type panel. There was no eye-catching overshoot, either. To round off this section, we will talk a little about our experiences on Blu-rays. As you might expect, the monitor had no issues whatsoever with this pace of action. A pace restricted largely by the ~24fps at which these films run. There was no obvious overshoot nor any issues with trailing that could be attributed to pixel responsiveness. Film fans should also be aware that such films are best shown at refresh rates that match or are multiples of the frame rate. This reduces the ‘juddering’ associated with uneven frame division into the refresh rate. So 120Hz or 144Hz would be preferable to 165Hz, for example, and did indeed show reduced juddering. For the purists out there, ViewSonic also include a 24Hz operating mode (this is selectable as a refresh rate) which works as intended and matches this sort of content nicely. G-SYNC is a variable refresh rate technology that can be used on certain compatible monitors (such as the ViewSonic XG2703-GS) in conjunction with a compatible Nvidia GPU. In our G-SYNC article, we explore this technology and give some insight into what it does on a practical level and how this aids the experience. Given that it’s covered there, we won’t be delving into too much detail and repeating ourselves here. On a basic level, though, G-SYNC compatible displays such as this have a proprietary ‘G-SYNC board’ which replaces the traditional scaler and some assistive electronics in the monitor. The monitor and GPU are able to communicate with one another so that the monitor varies its refresh rate in accordance with the frame rate being outputted by the GPU. Doing this eliminates the stuttering (VSync on) or tearing and juddering (VSync off) that comes about when the refresh rate and frame rate are not aligned. Latency is also reduced in the variable frame rate environment compared to VSync on, but as mentioned previously we don’t have the means to accurately measure this difference. This monitor supports G-SYNC via DP 1.2a (DisplayPort), provided that it is connected to a compatible Nvidia GPU. When we first connected the monitor up, everything was configured to work properly with G-SYNC. To ensure that this is the case, open Nvidia Control Panel and navigate to ‘Display – Set Up G-SYNC’. Ensure that the checkbox for ‘Enable G-SYNC’ is checked, then select your preferred operating mode. As the image below shows, this technology works in both ‘Full Screen’ and ‘Window’ modes, provided the correct option is selected for this. If for some reason you can’t find this G-SYNC section in your Nvidia Control Panel, try plugging the monitor into a different DP output on the GPU, if possible. If this does not improve the situation, we’d advise reinstalling the GPU driver or upgrading to the latest driver. Next, you should navigate to ‘Manage 3D settings’, where you will be greeted by a couple of settings of interest. The first is ‘Monitor Technology’, which should be set to ‘G-SYNC’ as shown below. The second setting of particular interest here is VSync. You can select one of the following; ‘On’, ‘Use the 3D application setting’, ‘Off’ or ‘Fast’ (GPU dependent). If ‘On’ is selected then VSync is enabled when the frame rate exceeds the upper limit (ceiling) for the refresh rate, which is up to 165Hz/165fps on this monitor. With ‘Off’ selected the frame rate is free to rise above the maximum refresh rate supported (>165fps), which introduces tearing but at the same time minimises latency. The advice Nvidia gives (or used to give, when G-SYNC was a new thing) is to select ‘On’ or ‘Off’ here rather than ‘Use the 3D application setting’. This is because some in-game VSync implementations may interfere with the smooth operation of G-SYNC. The final setting, ‘Fast’, only appears on certain newer GPUs at time of writing (including the GTX 1070 used in the test system). This enables a technology called ‘Fast Sync’, which only applies above the refresh rate and frame rate ceiling (>165Hz/165fps). So G-SYNC does its thing below that ceiling, but a special version of VSync (‘Fast Sync’) is employed above that. ‘Fast Sync’ is specifically designed to work at higher frame rates, ones which comfortably exceed the refresh rate ceiling of the monitor. The technique is supposed to combine the minimal latency of ‘VSync off’ without the same tearing that would usually come with the territory. It’s more of a GPU feature than a monitor feature and testing that is beyond the scope of this review, but this section of a video by Tom Petersen explores the technology and how it works alongside G-SYNC. Irrespective of the VSync setting used, the refresh rate of the monitor behaves in exactly the same way where the frame rate dips below the floor of operation. This term refers to the lowest frame/refresh rate supported by the monitor, which is 30Hz/30fps. Below 30Hz/30fps the monitor strives to keep its refresh rate at a multiple of the frame rate to minimise or eliminate stuttering and tearing. So if a game is running at 20fps, for example, the monitor would run at 40Hz rather than 30Hz so that every frame is displayed exactly twice and no partial frames are outputted. As we explore, though, it’s important to remember that low frame rates are always low frame rates and they do not look or feel the same as high frame rates, even with G-SYNC. The technology is also only designed to get rid of issues related to traditional refresh rate and frame rate mismatches, it can’t account for stuttering from things such as insufficient RAM, network latency or hard drive issues etc. You can see if G-SYNC is being used whilst gaming or in another application that supports it by opening the main menu (OSD) of the monitor and pressing the information icon using the button above the power button. On BF4, using our preferred settings, the frame rate was usually quite high but did show some fluctuations. It was frequently in triple digits (100fps+), but rarely hit 165fps – and if it did, wouldn’t stay there for long. Without G-SYNC enabled and with the monitor set to a high static refresh rate (for example 165Hz), there was obvious stuttering if VSync was enabled and obvious tearing or juddering with VSync disabled. With G-SYNC these issues were eliminated, providing a much smoother and better-flowing experience without jarring interruptions from tearing or stuttering. Regardless of the ‘flow’ being maintained as the frame rate dropped, in this case closer to 100fps than 165fps, the level of perceived blur did increase and level of ‘connectedness’ decrease due to the decreased frame rate. We still feel the overall gaming experience was very rewarding and the ‘responsive feel’ still very strong even at the lower end of this frame rate range, though, with G-SYNC making a palpable difference in our view. Deus Ex: Mankind Divided is a fairly demanding title, graphically, and as such the frame rate that was maintained was lower than on BF4. With settings we liked to use (rather high), the frame rate tended to sit at around 60 – 90fps a lot of the time. Whilst the ‘connected’ feel was certainly not as good as at higher frame rates and the level of perceived blur noticeably worse, the elimination of tearing and stuttering brought about by G-SYNC was greatly beneficial. These sorts of issues are even more noticeable at ‘lower’ frame rates such as this, so having them eliminated is a nice thing indeed. We actually increased the graphics settings considerably to see how things worked out at very low frame rates. G-SYNC certainly did its thing down to 30fps, whilst below the 30Hz floor of operation the compensation technology which duplicates frames evenly kicked in prevent tearing and stuttering. At such low frame rates, though, the ‘connected feel’ was completely lost and there was apparent juddering simply due to the low frame rate itself. So whilst G-SYNC was still beneficial here, it’s not a nice experience either way and certainly not where you want to be with this monitor. We are also happy to report that, unlike on some models, overshoot does not become an issue at relatively low frame rates (double digits) and the response time compensation under ‘Advanced’ remains well-balanced. We tested a broad range of titles, including Star Wars Battlefront, GTA V and Tom Clancy’s The Division. G-SYNC always did its thing and was of great benefit to our gaming enjoyment. However; it is important to note that sensitivity to tearing, juddering and stuttering does vary. For some users the technology will be a real game changer and quite revolutionary, whilst others will find it less noticeable. In general it seems users have really warmed to the technology and most of those who have experience with it really enjoy the benefits it brings. ULMB (Ultra Low Motion Blur) is another Nvidia-specific technology that can be enabled in place of G-SYNC on compatible GPUs. Specifically, ULMB is a strobe backlight technique that is designed to reduce motion blur in the way described in the relevant sections of this article. Essentially the backlight rapidly pulses on and off at a frequency matching the refresh rate of the display, with a very brief ‘on phase’ and a relatively long ‘off phase’. This reduces the amount of time the eyes spend tracking motion on the screen and hence reduces perceived blur. To clarify once again, this technology can only be used in conjunction with a compatible GPU (any that supports G-SYNC) and cannot be used at the same time as G-SYNC. ULMB can only be used at specific refresh rates as well; 85Hz, 100Hz or 120Hz. You should therefore set the monitor to one of these refresh rates via Windows or the Nvidia Control Panel. You should then navigate to ‘Manage 3D settings’ in Nvidia Control Panel and select ‘ULMB’ for ‘Monitor Technology’ as shown below. The monitor should automatically switch to the correct operating mode, but if not you will find the appropriate setting (‘ULMB’) in the ‘Display’ section of the OSD. The easy way to tell that ULMB is active is that the image will appear different, and in particular will introduce flickering at a frequency that matches the refresh rate of the display. Much like a CRT running at the same refresh rate. You can also open the main menu (OSD) of the monitor, press the information icon (button above power button) and see whether it says ‘Mode: ULMB’. You can also adjust the ‘Pulse Width’ setting in the ‘ViewMode’ section of the OSD. This is is set to ‘100’ by default. The higher you set this, the longer the ‘on phase’ and hence brighter the image. Lower Pulse Width settings reduce the ‘on phase’ and lengthen the ‘off phase’, decreasing brightness but potentially increasing motion clarity by further decreasing the time your eyes will spend moving. Most users will find motion clarity to be excellent at the default setting of ‘100’ and find this brightness level preferable to lower settings, however. When you activate ULMB, the most noticeable thing initially is the flickering, as mentioned previously. This is most pronounced and to our eyes rather unpleasant at 85Hz, but still noticeable to us at 100Hz or 120Hz. The image also appears a bit dimmer and in some ways more muted than during normal operation (this will depend in part on the settings you normally use. The motion performance of the monitor also changes significantly with ULMB active, as demonstrated earlier on in the review. The reduction in perceived blur is evident even when just moving your mouse around or dragging windows on the desktop, but more so when interacting with a game. You can’t adjust ‘Response Time’ with ULMB active, instead a strong pixel overdrive is used. We observed a range of game titles, all of which echoed the same thoughts we had when playing BF4. This is also a relatively easy title to run at a constant 120fps, which is important for optimal ULMB operation. If the frame rate departs at all from the refresh rate of the monitor, you get extremely obvious and jarring tearing and juddering (VSync off) or stuttering (VSync on). This is because there is very little perceived blur to mask such imperfections, so they stand out like a sore thumb. If you’re unable to achieve a constant 120fps, then a lower ULMB refresh rate (100Hz or 85Hz) could be more practical – if you don’t mind a bit of extra flickering. The perceived blur benefits of this mode are palpable even at 85Hz, as demonstrated using the UFO Motion Test for ghosting earlier. Our observations below for BF4 were largely tied to testing at 120Hz @120fps, however. With ULMB active and that constant 120fps achieved, the perceived blur was very low indeed. This made it very easy to track enemies and avoid obstacles whilst manoeuvring at high speed in a vehicle. Or indeed whilst running about on foot and turning your character quickly. Although perceived blur was very low, as eye movement was significantly reduced due to the backlight strobing, the performance was far from ‘clean’. There was obvious overshoot for many transitions, as the level of acceleration required to ensure the pixels were transitioning fast enough was very strong. You could see ‘dirty’ semi-transparent places in some cases and bright trails in other places. There was also a degree of conventional trailing due to slower than optimal pixel responses, particularly where very bright shades were involved. The nature of both the overshoot and conventional trailing is quite unlike during normal viewing, as it appears as a distinct repetition of the object rather than a ‘smooth’ trail behind the object. This is more obvious during rapid movement as the conventional or overshoot trail appears more distant from the original object, making it quite discrete and potentially quite eye-catching. So whilst ULMB certainly did its thing on this monitor, it didn’t do so as effectively as on TN models such as the S2716DG, and had more noticeable overshoot in the process. This is the reverse of the situation where ULMB is disabled, but there the demands and level of overdrive required for a decent performance aren’t the same. It’s a natively slower panel and as with any model it does suffer when strong level of overdrive is required, as per ULMB. As a final point, we would again like to stress that you can’t enable G-SYNC at the same time as ULMB. This means the choice of whether to use it or not will come down to individual motion clarity preferences, sensitivity to flickering and whether you are able to easily match the refresh rate with your in-game frame rate. Most users generally prefer to use G-SYNC over ULMB, but it’s nice to have a strobe backlight option for competitive gamers and/or those used to CRT monitors in particular. As with all G-SYNC monitors, the G-SYNC board replaces the functionality of the scaler when using DisplayPort. The monitor therefore offers no scaling capability via DP. The monitor does have a dedicated scaler which can be used via HDMI, however. This allows users to connect devices such as games consoles to the monitor and run it at 1920 x 1080 (Full HD). As a PC user, you must ensure that the monitor is handling your scaling (via HDMI) rather than the graphics card if you want the best image performance. To do this, open Nvidia Control Panel and navigate to ‘Display – Adjust desktop size and position’. Ensure that ‘No Scaling’ is selected and ‘Perform scaling on:’ is set to ‘Display’ as shown below. AMD users who for whatever reason decided to go for this monitor needn’t worry about fiddling around with any scaling settings, as the monitor will automatically handle the scaling when gaming, by default. When running a non-native resolution such as 1920 x 1080 via HDMI, the monitor uses an interpolation process to display this resolution and extrapolate it across the 2560 x 1440 pixels that make up the display. Considering the Full HD resolution, the resulting image is somewhat softer than a native 27” Full HD display. The softening is not as extreme as when GPU scaling is used and not as bad as some interpolation processes we’ve seen. The game world doesn’t look like it’s being observed through a smeary lens, but some of the texture detail and edges are certainly less crisp and defined than they should be. The monitor is therefore usable for Full HD HDMI devices, but is by no means ideal for this sort of use. Alternatively, you can run the monitor using its ‘1:1’ mode. This will display the image without any interpolation used but it will cover a screen area significantly smaller than 27”. The scaling modes available on the monitor are shown in the section of the OSD video shown below. When running 1920 x 1080 (Full HD) content using movie software or via a web browser on the PC and have the monitor running at its native 2560 x 1440 resolution, the GPU or software uses an upscaling process. The monitor has no say in this; it simply displays 2560 x 1440 as it usually would. There is some softening from this process, to a degree that’s quite comparable if a bit less than caused by the monitors own interpolation process when running 1920 x 1080 via HDMI. It’s not something most users should worry about – you can definitely still use WQHD displays like this for Full HD movies. The video below summarises some of the key points raised in this written review and shows the monitor in action. The video review is designed to complement the written piece and is not nearly as comprehensive. Until relatively recently, users had to choose whether they wanted the strong colour performance of an IPS-type panel or the high speed and refresh rate of a TN panel. Or perhaps wanted to go off on a bit of a tangent and opt for the strong contrast of a VA panel, with notable imperfections in both colour performance and responsiveness. The ViewSonic XG2703-GS instead opts for a high refresh rate IPS-type (or more specifically, AHVA) panel and puts it to good use. Colour reproduction was as you’d hope for from a good IPS-type model. With just a little bit of tweaking in the OSD, colours were rich, varied and very nicely balanced. The gamma performance ‘out of the box’ was very pleasing as well, with adjustable gamma settings provided if you so desire. This contrasts with models like the Dell S2716DG, where intervention with an ICC profile is required to correct central gamma. Contrast performance was again as expected for a decent IPS-type panel. The static contrast was decent, still slightly exceeding 1000:1 even following various adjustments to colour channels as per our ‘Test Settings’. The gamma consistency, aided by strong viewing angle performance, also meant that dark scenes didn’t suffer from the obvious extra detail lower down the screen and obvious lack of detail further up the screen. As usual for an IPS-type panel, though, there was a degree of ‘IPS glow’ (or more correctly, ‘AHVA glow’) which affected visibility. This ate away at some of the detail in dark scenes, particularly towards the bottom corners of the screen if observed from a normal viewing position. As with newer revisions of the S2716DG but unlike older revisions of this (and various other 27” TN WQHD models), a light matte screen surface with smooth surface texture is employed. This provided a relatively smooth image free from obvious graininess and aided the vibrancy potential of the monitor. Responsiveness was, on the whole, excellent on this model. It provided a very competent performance at a refresh rate of up to 165Hz, without any measurable or observable degradation in image quality compared to lower refresh rates such as 60Hz. Pixel responsiveness was a touch weaker than on fast TN alternatives like the aforementioned Dell, which gave a touch of extra trailing in places. This was really quite faint, though, and didn’t detract from the overall experience in our view. There was no obvious overshoot, at long as the ridiculous ‘Ultra Fast’ mode was avoided. Perceived blur remained low and was coupled with very low input lag for an excellent ‘connected feel’. On top of this, Nvidia G-SYNC was fully supported – doing its thing to get rid of tearing and stuttering from frame and refresh rate mismatches. In addition to this, ULMB is supported on compatible Nvidia GPUs. Whilst this certainly worked and massively reduced perceived blur, it did produce rather strong overshoot – stronger than we’ve seen on TN alternatives. Overall there is certainly a lot to like about this monitor. As with any screen, it’s not perfect, and it isn’t the case that it’s better in every respect than competing models from manufacturers like Dell. It’s more expensive, it isn’t quite as responsive for some pixel transitions and of course there’s that ‘AHVA glow’ that may bug some users. Although our sample tested here showed very good dark uniformity (glow aside), not all units will put a tick in this box. The warning signs from other models using this or a similar panel are certainly there and we’re sure user feedback will help create a clearer picture of where the ViewSonic stands. But in its favour, it marries attractive colour reproduction with strong responsiveness and decent contrast. In many senses it’s an excellent ‘all-rounder’ that can be used for a variety of tasks – and as useful to a photographer as it might be to an FPS gamer. That’s quite a rare combination of capabilities to have from one monitor and one that’s worth trying out – especially if you can get the screen from somewhere with a good returns policy. The bottom line; a true ‘all-rounder’ with that rare combination of colour reproduction fit for keen photographers and responsiveness fit for keen gamers.

Luminance uniformity table

Luminance uniformity map

Colour temperature uniformity map
Contrast in games and movies
Lagom contrast tests
Colour reproduction
Colour gamut

Colour gamut test settings
Colour in games and movies
Viewing angles
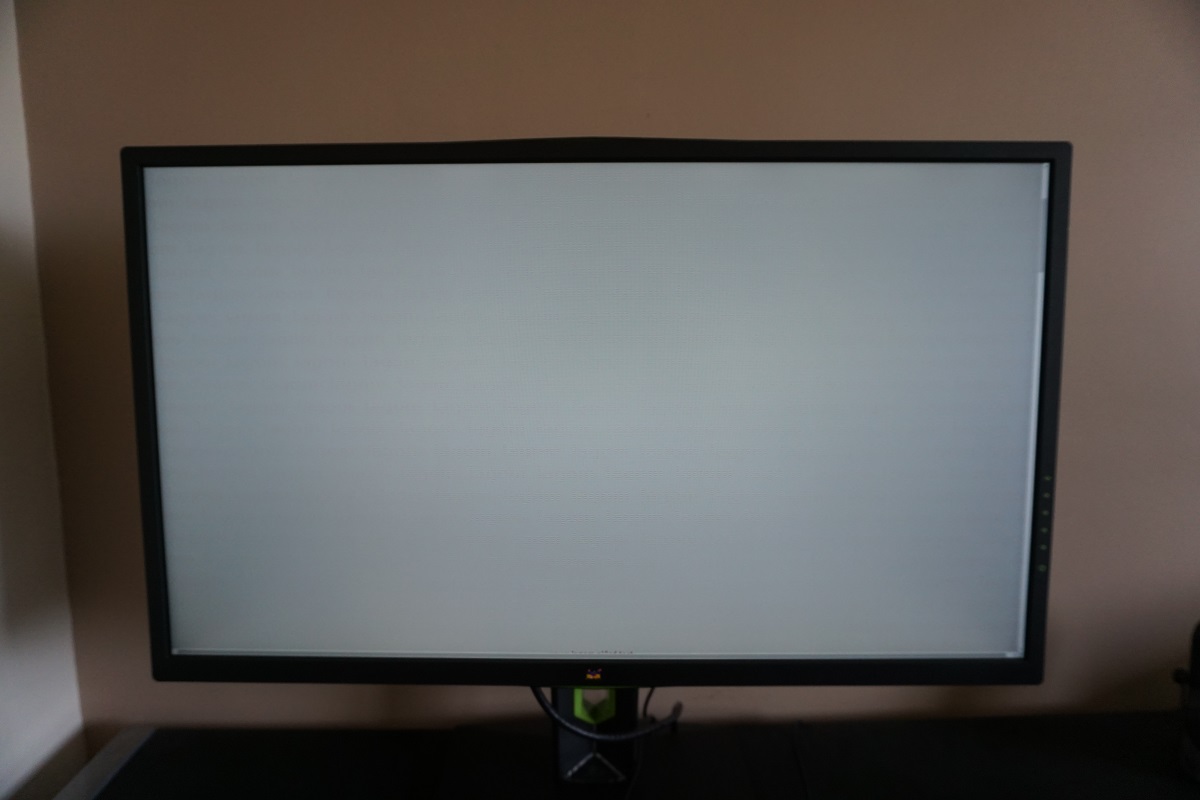
The video below shows this text test, a mixed desktop background and dark desktop background from a variety of viewing angles. Note the ‘AHVA glow’ commented on earlier, which blooms out from a variety of angles.
Responsiveness
Input lag
A note on overclocking
Perceived blur (pursuit photography)
Responsiveness in games and movies
G-SYNC – the technology and activating it
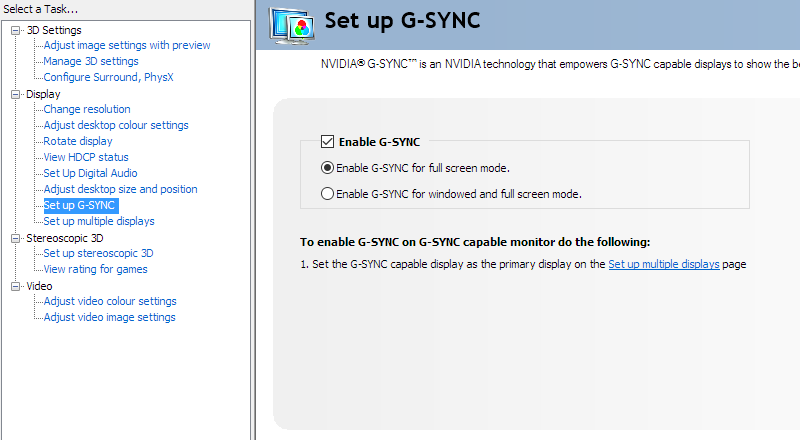
Enable G-SYNC
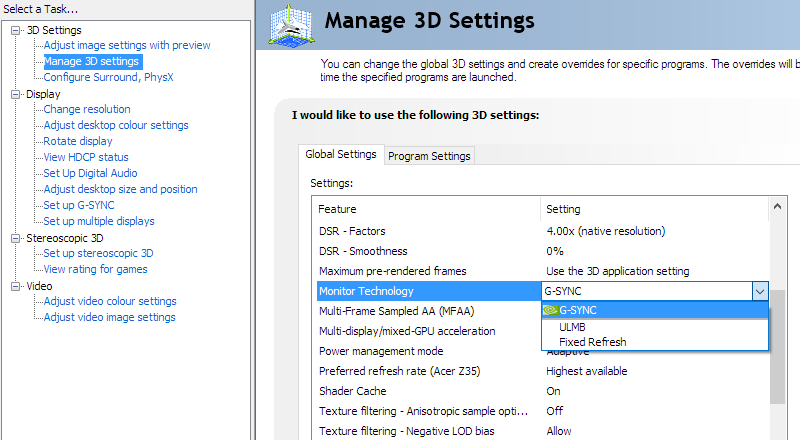
Set Monitor Technology to G-SYNC
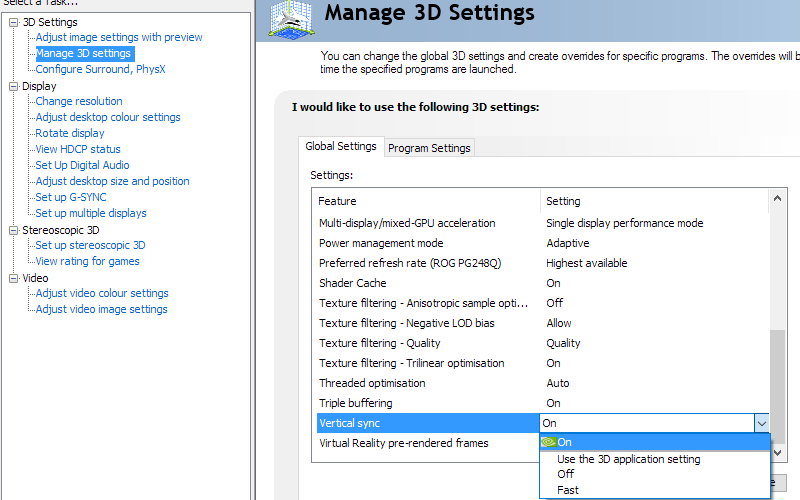
Set VSync according to preferences
G-SYNC – the experience
ULMB – the technology and activating it
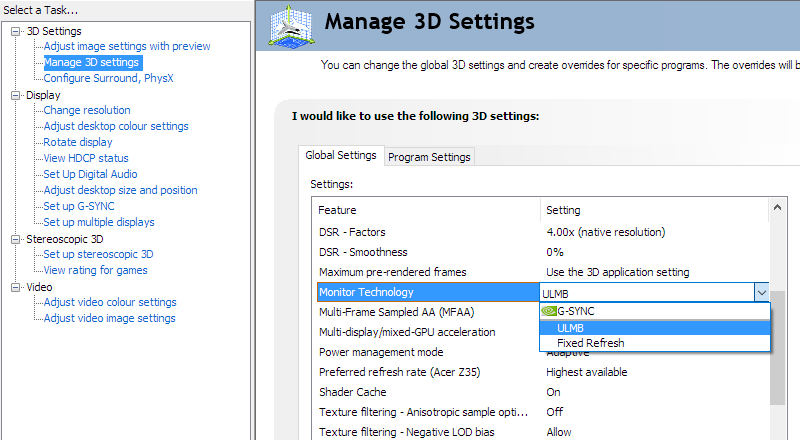
Set Monitor Technology to ULMB
ULMB – the experience
Interpolation and upscaling
Video review
Conclusion
Positives Negatives Strong ‘out of the box’ gamma performance and a consistently rich and varied look, with good balance following minor OSD tweaking – vibrancy potential aided by good but not excessive colour gamut and light matte screen surface Colour temperature too high (cool tint) out of the box on our unit, although this is not uncommon
Respectable contrast performance aided by strong gamma consistency, decent static contrast and a relatively smooth matte screen surface ‘AHVA glow’ eats away at detail, particularly near the bottom corners from a normal viewing position Strong responsiveness with well-tuned pixel overdrive gave a competent performance all the way up to 165Hz. The experience was free from troublesome overshoot or obvious trailing – plus very low input lag and support for Nvidia G-SYNC A bit of additional trailing in places beyond what you’d see on some competing TN models. The ULMB mode works, but for this mode specifically there is significantly more overshoot than TN alternatives Good ergonomic flexibility and a rather feature-rich OSD (particularly for a G-SYNC model) ‘Nvidia green’ colour splashes may not be to everyone’s taste and the height adjustment is more limited than some models (but VESA supported)
![]()


