Author: Adam Simmons
Date published: December 8th 2012
Table of Contents
Introduction
Originally designed to facilitate fluid stereoscopic 3D viewing, 120Hz monitors a favourite for most fans of fast-paced games. By displaying potentially twice as much information every second as a 60Hz display and coupling this with rapid pixel response times and low input lag the feeling of fluidity is unmatched in the LCD world. BenQ really tuned into this with their popular ‘XL’ series of 120Hz gaming monitors. Co-developed with professional players of the FPS game Counterstrike the XL2410T and XL2420T were designed with gamers in mind.
The BenQ XL2411T is the company’s latest member of the ‘XL’ series and on the surface appears something of a cross between the existing 10T and the 20T models. Aesthetically is is very similar to the former but offers some features of the latter (such as ‘Black eQualizer’ and ‘LightBoost’ for Nvidia 3D Vision 2). As we explore in the proceeding section there are also some minor changes to specification, specifically regarding the quoted grey to grey response time. What will be really interesting is how everything comes together during real-world testing, however.
Specifications
The basic specifications reveal that this monitor uses a 24” 120Hz TN panel with a WLED backlight. Our testing reveals that on both AMD and Nvidia GPUs the monitor will actually default to and happily run at 144Hz. Typical maximum luminance is given as 350 cd/m2, which is quite bright and no doubt reflects the ability of the monitor to overcome some of the dimming effects of 3D shutter glasses. The response time is quoted as 1ms grey to grey which is a little more ambitious than the usual 2ms quoted for previous XL series members using AMA (Advanced Motion Acceleration) overdrive. These key aspects of the specification have been highlighted in blue. We are particularly keen to see if some positive changes have been made on a deeper level, though, such as to the default colour setup and the aggressiveness of the AMA.
Features and aesthetics
From the front the BenQ XL2411T closely resembles the XL2410T – there are no dashes of red or a nifty ‘S-Switch’ as you’d find on the XL2420T. It has a fairly unremarkable matte black bezel, a normal matte screen surface and a ‘lip’ at the bottom with menu controls, power button and power light. The power light grows green when the monitor is on and amber to indicate a low-power state (standby). The buttons are found on the underside of the lip and are not labelled on the monitor itself but on the OSD (On Screen Display) as we explore later. This is perhaps the most obvious change at the front, aside from the lack of ‘key features’ printed above the control area, the change of model number at the top right and an extra 0.4” of screen space diagonally. The bezels are also a bit thinner this time at around 18mm at the sides and around 16mm at the top and bottom.
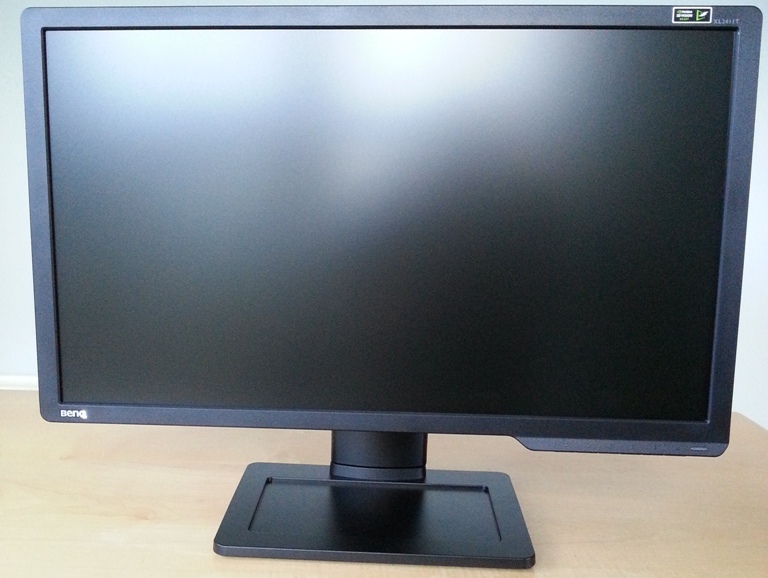
Also from the front you can see an ‘Nvidia 3D Vision Ready’ sticker – in fact Nvidia 3D Vision 2 is now supported along with light boost. The stand also features that odd recessed area in the middle and generally quite plain design. From the side the stand can be seen in all its glory. It’s quite solidly build and is fully adjustable which is good to see once again.

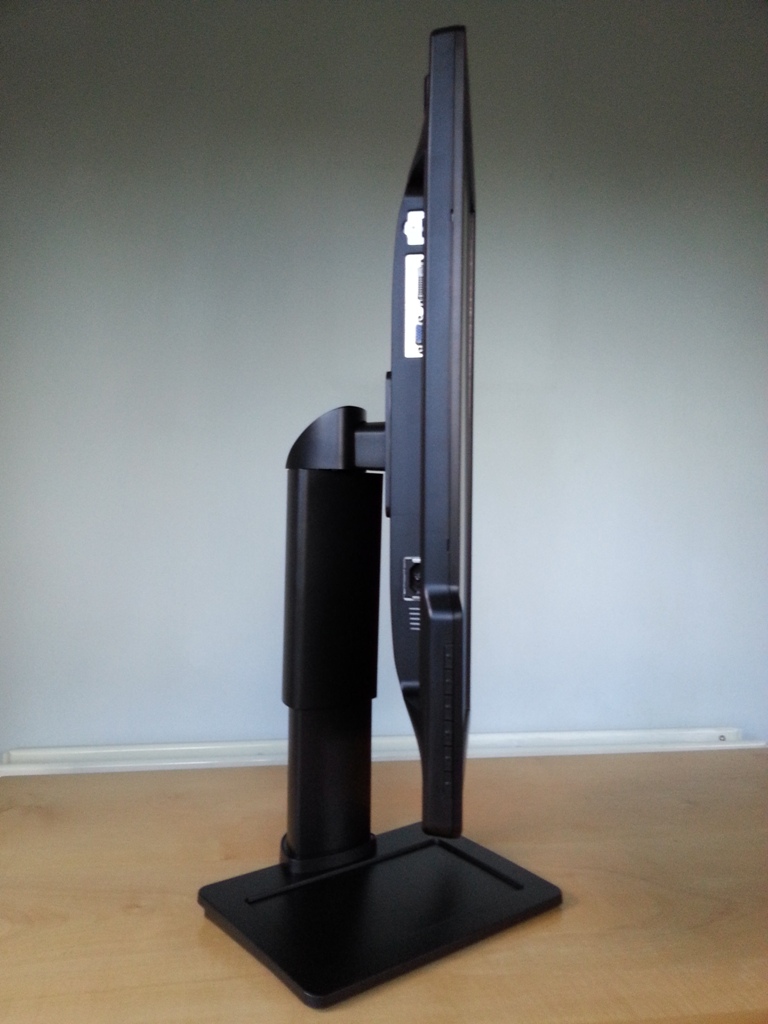
You can tilt the monitor, adjust the height by around 132mm (a little over 5 inches), swivel the screen 45 degrees left and right and rotate it clockwise into portrait mode. The adjustment actions are a little stiff, but you don’t have to worry about unwanted movement as it’s all nice and solid. Also on the right side you will notice a headphone jack and can see that the screen is reasonably slender without being super-thin. It has an LED backlight but also an internal power converter and electronics built into the screen area, adding a bit of bulk. At the rear you can see the most noticeable ‘bulk area’ in the middle where the stand attaches. This attachment is a VESA 100 x 100mm type and allows an alternative stand or mount to be used if desired.
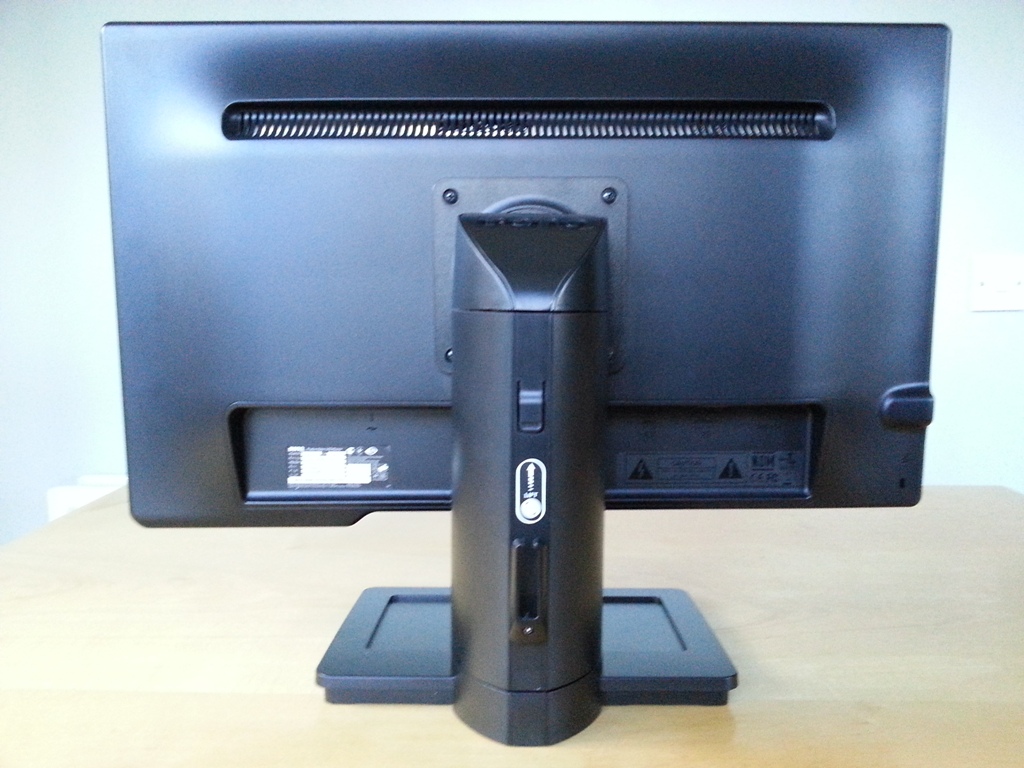
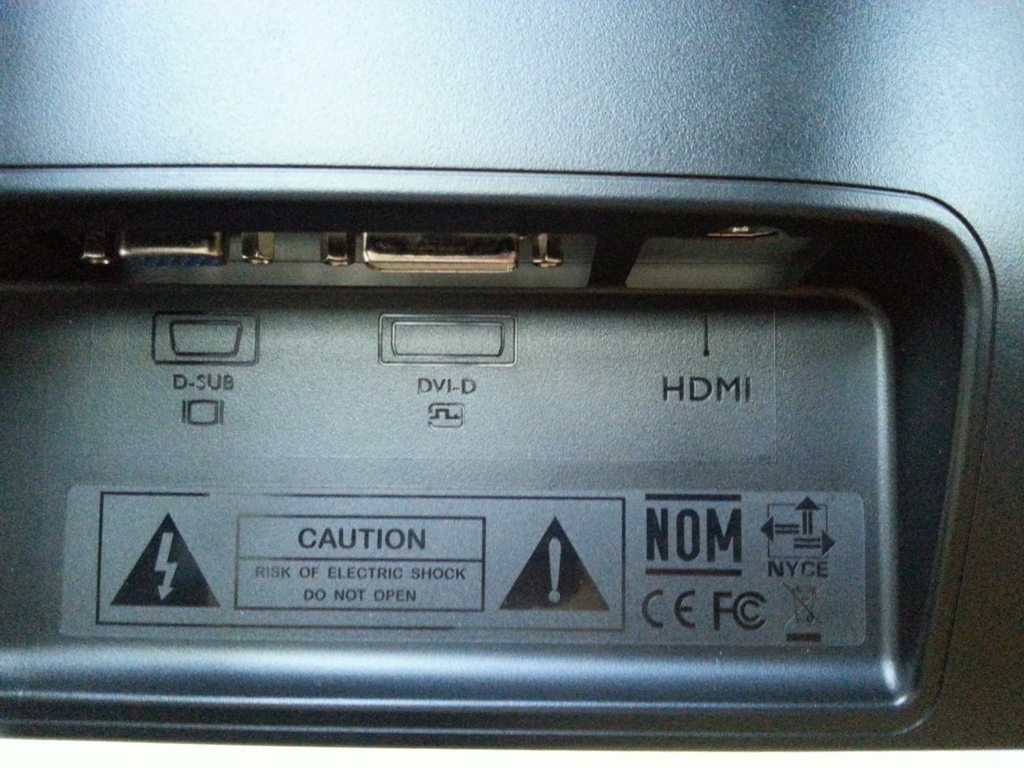
The rear of the monitor also houses a ventilation grill at the top, a Kensington lock at the bottom left and a lot of matte black plastic. There are a few ports to choose from – VGA, Dual Link DVI-D and HDMI. The HDMI port is really only there for connection to consoles as the port controller is limited to 60Hz at the monitor’s native resolution. There are no extras like audio ports, USB, DisplayPort or additional HDMI ports. There’s also a little product information label and AC power input to the left which is hidden from view in the picture below.
To round off this section we’ll take a look at the OSD, which is controlled by a set of 5 tactile buttons located beneath the ‘lip’ on the underside of the monitor. There are no labels on the monitor itself, but each button has its associated function labelled on-screen instead. Pressing any button once brings up a ‘quick menu’ consisting of 5 sections with one section assigned to each button. The first three are ‘custom keys’ which can be assigned specific functions in the main menu. The fourth is the menu and the fifth is exit.

Upon entering the main menu each key is assigned to a new function; up, down, right/select, left and exit.
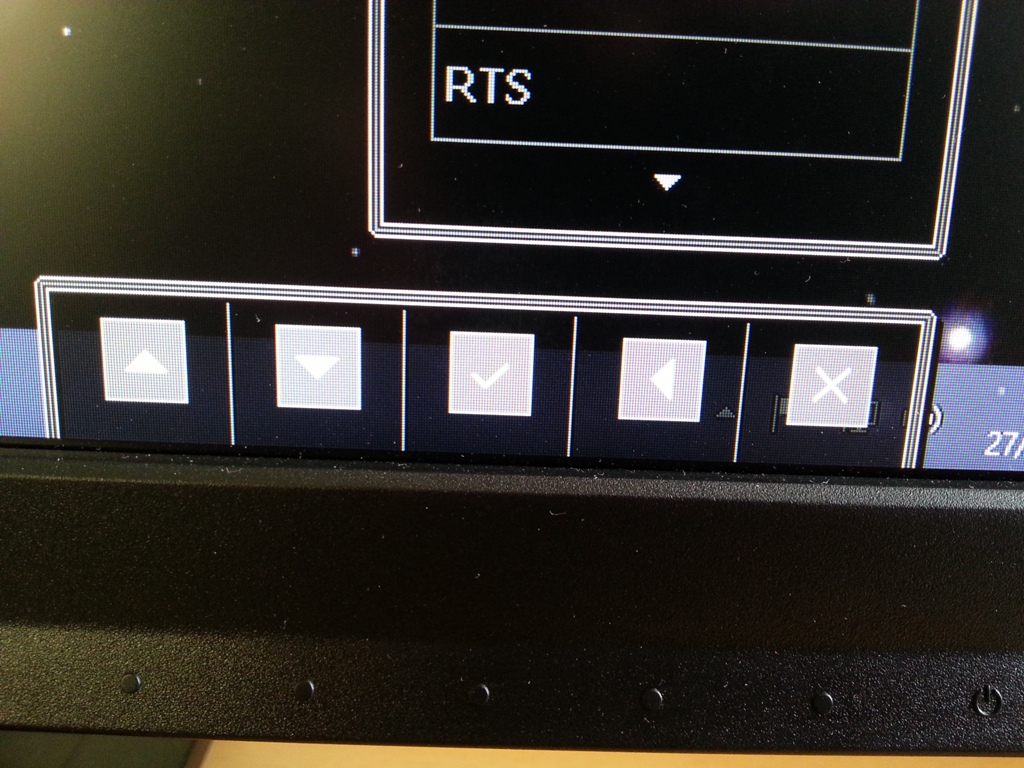
This is not quite as intuitive as on the XL2420T where the controls are lined up vertically so that ‘up’ and ‘down’ are correctly oriented and a scroll wheel is available as an alternative. It is easy enough to operate once you get used to it, though. The video below shows the functionality of the quick and main menu systems.
Our biggest criticism of the OSD is simply that cycling through the presets is very cumbersome, as you can see in the video. You can’t simply skip to your desired preset and activate it; you must go through each individually and wait for them to be applied. You must scroll all the way up the long way when you reach the bottom, too. This could be frustrating if you frequently change presets and one of the reasons the ‘S-Switch’ of the 20T was so useful. Small relief can be found from the ability to store 3 custom presets, though, which are much easier to cycle through and can of course be customised to your liking.
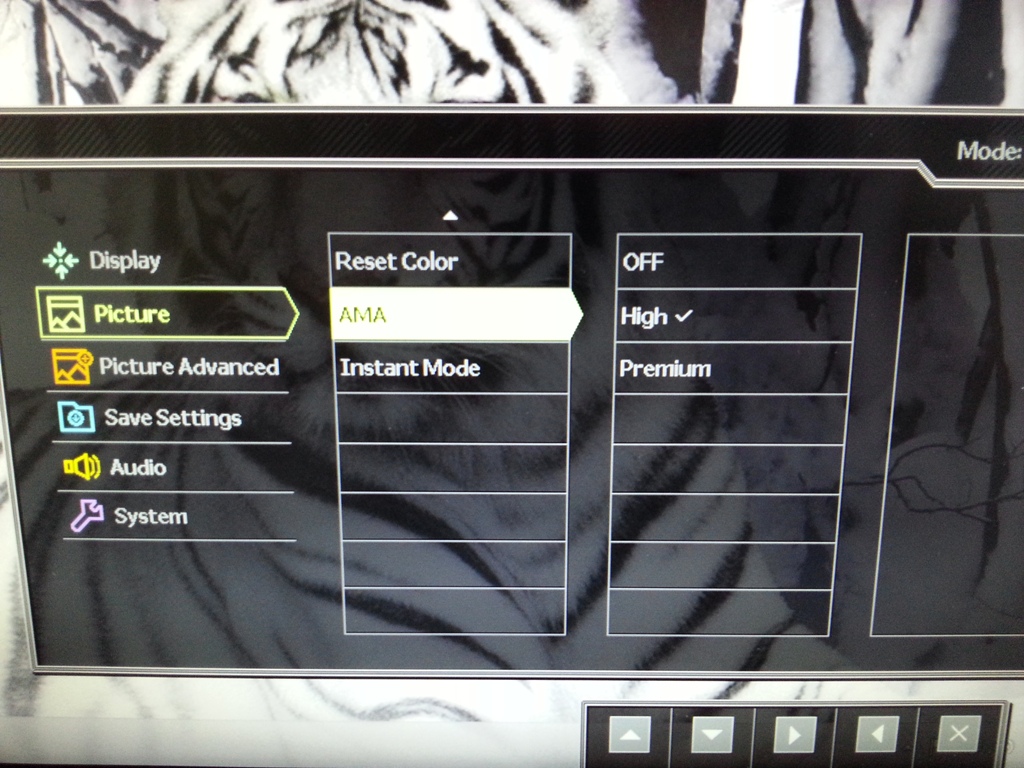
The main menu is responsive and well laid out with plenty of functions. The first section (Display) allows manual image adjustment over VGA – this is all configured automatically over digital connections. The second section (Picture) allows you to adjust various aspects of the image, including; brightness, contrast, colour temperature and gamma. There are also some additional options such as saturation and ‘Black eQualizer’ (explored later) which can only be adjusted in certain presets. If you scroll down, which we forgot to do in the video, you can also ‘Reset Color’ which applies default brightness, contrast and colour temperature. The AMA (Advanced Motion Acceleration) pixel overdrive can also be switched off, set to ‘High’ (default) or ramped up to ‘Premium’. You can also switch ‘Instant Mode’ on or off which bypasses certain processing on the monitor to minimise input lag. It’s on by default and doesn’t seem to noticeably impact the image in a negative way.
The third section (Picture Advanced) allows you to select a ‘Picture Mode’ preset and change some settings associated with it. Again, certain settings can only be adjusted in specific picture modes. Some of the features here such as ‘Smart Scaling’ and ‘Smart Focus’ have been carried over from the XL2420T, so take a quick look at the ‘Features and aesthetics’ section of that review if you’re interested in these.
The fourth section (Save Settings) allows you to save any customisations you’ve made to the image in the OSD to be saved to one of three ‘Gamer’ presets. The fifth section (Audio) simply allows you to adjust the volume or mute any audio devices connected to the monitor if you’re using HDMI (which carries an audio signal). The sixth and final section (System) gives you access to settings such as input (source) selection and allows you to customise the OSD. You can adjust how long the OSD stays open for after the last button press (Display Time), change the language and change the three ‘Custom Keys’ of the quick menu. You can also perform a factory reset if you wish to.
Calibration
It’s a nice feeling being able to turn a monitor on for the first time and for everything to just look right. Unfortunately that feeling eluded us with the BenQ XL2411T. Under default settings it looked bleached, overly bright and very washed out. In fact it was quite comparable to a weak ‘solarize’ filter being applied in photo editing software.
Fortunately BenQ give you plenty of ‘Picture Mode’ presets to play around with, some of which unlock additional settings. Using familiar desktop backgrounds, the Lagom website, a Spyder4Elite colorimeter, various game titles and a keen eye we were able to assess which settings gave the most pleasing image. We tested every conceivable combination of settings, adjusting brightness, contrast and (where available) gamma and colour temperature. The image always seemed to have something wrong with it, be it a washed-out look, crushed shade range or excessive saturation of certain colours. This became a hunt for the least problematic settings.
There was no silver bullet, but we found the following gave the most pleasing image. This was the case for both the AMD Radeon 7950 used for the review and the Nvidia 670 used to assess possible vendor-specific differences, both GPUs connected using the DVI cable supplied. It is important to remember that different individual monitors will differ, especially if BenQ provide revision changes at a later date.
Picture Mode= Standard
Brightness= 28 (according to preferences and lighting – this is still rather bright)
Contrast= 50
Gamma= Gamma 5
Color Temperature= User
Red= 100
Green= 96
Blue= 98 ‘Gamma 4’ provided a tighter fit, just below 2.2 on average, but many colours looked washed out and lacked the depth that ‘Gamma 5’ provided. The remaining gamma modes dropped the gamma further and gave a bleached look to the image. Another point to note is that the ‘Black eQualizer’ feature, explored in the proceeding section, cannot be adjusted under ‘Standard’ mode and is actually enabled to some degree. You can see an elevation in brightness for near-black shades, which can reveal unintended detail such as dark grey dithered patterns. It is difficult to see given the lack of resolution, but if you look at the response curves above (particularly Gamma 5) you will notice an artificial elevation in output brightness for dark shades. A KM CS-200 ‘Chroma Meter’ was used to measure the luminance of ‘pure white’, ‘pure black’ and the subsequent contrast ratio under a range of settings. Aside from the changes explicitly mentioned in the table default settings were used. The brightest value, lowest value and highest contrast ratio recorded are highlighted in blue and results from the test settings in black. Contrast performance on the BenQ XL2411T was good with an average contrast ratio of 1090:1 using the ‘Standard’ picture mode. A static contrast of 1022:1 was also good to see following the adjustments made for the ‘test settings’. Very respectable contrast ratios were also recorded for the ‘sRGB’ and ‘Eco’ picture modes (>1000:1) with a slight drop to under 950:1 for the FPS and RTS modes. A more significant drop to just under 800:1 occurred when using the ‘Movie’ and ‘Photo’ modes, however. On the plus side the lowest white luminance could be achieved in these modes by settings the brightness to ‘0’ (not shown in table) – 110 cd/m2 in movie mode, for example, is significantly lower than the 163 cd/m2 minimum recorded under standard mode. At the upper end the monitor was brilliantly bright at 436 cd/m2 – plenty enough for viewing using Nvidia 3D Vision glasses. This gave a luminance adjustment range of 326 cd/m2 which is good – but it would be nice to see a minimum luminance less than 110 cd/m2. There is also a dynamic contrast mode available in ‘Movie’, ‘Photo’, ‘FPS1’, ‘FPS2’, ‘RTS’ and the 3 customisable ‘Gamer’ picture modes. This can be set in ‘intensity’ between 1 and 5. This alters how rapidly the backlight responds to changes in scene brightness. It doesn’t seem to alter the end point, though, so mixed scenes often end up uncomfortably bright regardless of this setting. Also worth noting is that the BenQ XL2411T uses PWM (Pulse Width Modulation) to dim the backlight. This rapid ‘on’ and ‘off’ pulsing of the backlight at various frequencies to lower brightness is very common on modern LCD monitors. Some users are sensitive to this flickering and can find it bothersome. The effect can be recorded on a sensitive camera which shows how decreasing brightness produces an apparent ‘strobing’ effect on the screen. It isn’t present at full brightness and decreases in intensity along with decreasing brightness. It does not manifest itself in this pronounced strobing way to the human visual system but some people do detect it as flickering. The intensity of the flickering increases as brightness decreases. Given how bright and powerful the backlight on this monitor is you would generally want to use a low brightness so it follows that flickering could become troublesome for sensitive users. Additional flickering can also be observed at 144Hz when certain patterns or colours are displayed. This is isolated to the very left of the screen and appears in very specific situations. It seems to be related to the voltage control at 144Hz and is most noticeable at lower brightness (and completely invisible at full brightness). If you observe patterns 4a full screen on Lagom’s inversion test at 144Hz you can observe flickering, whereas at 120Hz you can’t. Patttern 2a reveals a weak flickering at 144Hz and a strange purple strobing effect at 120Hz. The flickering wasn’t something any of us found bothersome and only occurred in a minority of cases but we can’t speak for everyone. The general advice here is not to worry about this unless you know you are particularly sensitive to flickering. Looking at the screen in a dark room we observed no noticeable backlight bleed. Under such viewing conditions there were some small patches of dark grey clouding amongst the surrounding black, however. A mild golden glow could also be observed off-angle when displaying black in a dark room. This is fairly typical for a TN LCD and is not visible from a normal viewing position in front of the screen. This behaviour can be seen on the video in the ‘viewing angles’ section of the review. The uniformity of lighter colours was also assessed using a Spyder4Elite and our test settings. Changes in luminance were recorded across 9 equidistant ‘quadrants’. The luminance values and percentage difference between each quadrant and the brightest point of the screen are given in the table below. Uniformity was quite mediocre really. The greatest deviation from the central value (quadrant 5, the brightest point at 232 cd/m2) occurred at quadrant 1 in the top right. Here a value of 187 cd/m2 was recorded which is 20% dimmer than the centre. Quadrant 3 at the top right and quadrant 4 left of centre were also a bit problematic, giving a white luminance just below 200 cd/m2 which is a 14% deviation. Elsewhere luminance remained above 200 cd/m2 and showed 9-12% deviation which isn’t too bad. These deviations are shown graphically below with lighter shades of grey indicating higher luminance and darker shades of grey indicating lower luminance. The first title used to assess the contrast performance subjectively was Battlefield 3. There was an excellent level of detail visible in dark areas of this game. This was due in part to the artificial enhancements made by the ‘Black eQualizer’ which lighten near-black tones so they become more distinct. On one hand this was nice because minor details you would not usually expect to see pop out at you and you don’t feel anybody can hide in the darkness. On the other hand you do lose a bit of atmosphere. Some details that clearly shouldn’t be visible on a well-calibrated monitor with proper gamma tracking (no matter how good its contrast) are brought out. And it does look unnatural in places. Textures involving a mixture of blacks and dark colours, for example, gain a washed-out look at the dark (non-black) shades with the remaining blacks looking like spilt oil. The overall contrast was still good, though, with plenty of brightness for the whites and light colours to enjoy. There was a bit of a hazy look brought to such colours by the matte screen surface, however. This prevented in-game light sources from having the piercing brilliance and lifelike purity that a glossy (and to a lesser extent light matte) screen surface can provide. The BenQ XL2411T gave a pleasing contrast ratio in the Blu-ray of ‘The Girl with The Dragon Tattoo’. Subtle detail could be seen in dark and shaded areas with some distinctions (such as between a dark brown iris and a black pupil) visible in a way you’d only usually see on a VA panel. It certainly seemed the black equalizer was doing its thing, but with little negative impact. There were plenty of pure blacks and lighter shades remaining untouched. High-end brightness was plentiful, too, without any obvious bleaching or shade crushing. We also observed how the BenQ performed on the Lagom tests for contrast. This is good at highlighting any specific weaknesses that may not be as apparent during normal use. The BenQ XL2411T’s colour gamut (red triangle) was compared to the sRGB reference (green triangle) under our testing settings using the Spyder4Elite. The results are shown in the image below. The colour gamut corresponds approximately to sRGB, fitting particularly tightly for red and blue shades with just a small extension beyond. There is under-coverage of some green shades with extension beyond for other green shades. To consider the bigger picture, which colour gamut is only one part of, we performed a subjective analysis using some familiar game and movie titles. The first game title, Battlefield 3, provides a somewhat restrictive and muted colour palette by design. Still, there are certain elements within the game that crave vibrancy; roaring flames, bright ‘neon’ in-game markers and the engineer’s repair tool fixing a vehicle to name but a few. These elements were not exactly lacklustre but didn’t really jump out, either. The overall image did look much as intended with good earthy browns, neutral greys and appropriately saturated greens. There were some good rich reds on display as well, which helped make up for the slight lack of intensity on some of the oranges and yellows. On the second game title, Dirt 3, performance was good overall with varied and natural-looking vegetation and environments. Some of the lush forest greens could have done with a touch more depth but the overall balance was good. A good degree of vibrancy seen on the cars’ bodywork. Good deep reds and blues were perhaps the most impressive colours. The colours on the vehicles didn’t have the kind of smooth ‘painted on’ look you get on a glossy monitor but were lively nonetheless. Our first movie title used to test colour reproduction was the Blu-ray of Futurama: Into the Wild Green Yonder. The BenQ XL2411T displayed a pretty good range of deep and full colours as well as flashy neon ones. The colours didn’t have the kind of ‘pop’ you’d get from a glossy screen but were certainly not washed out. More muted shades were also quite well represented, although subtle variations were lost due to inconsistencies up and down the screen. This is related to the viewing angle limitations of the TN panel type used on the monitor, explored in more depth in the following section. This title is particularly good at highlighting these weaknesses with large blocks of a single shade. In the second movie title, The Girl with the Dragon Tattoo, colours were mostly well-represented with appropriate tone and saturation. Some vibrant shades, such as the orange and yellows of roaring flames and azure blues could have done with a touch more intensity but everything looked quite appropriate and natural overall. The Lagom test for viewing angles is an excellent way to further explore some of the weaknesses in colour reduction caused by viewing angle limitations. These limitations may not be of huge concern if you are just looking to use a monitor for gaming, movies and general desktop tasks. It does adversely affected colour accuracy, however, so is an important consideration for individuals interested in photo editing and suchlike. The BenQ XL2411T is undeniably a smooth and highly responsive monitor. Even moving the mouse around the desktop is a job – with a glassy smoothness and instantaneous responses to your hand movements. One of the factors contributing to this smooth and fluid experience is the input lag (or lack of it) on the 11T. With ‘Instant Mode’ enabled (the default setting) and using a similar method to our other recent monitor reviews we recorded an average input lag of <2ms (less than half a frame at 144Hz). For all intents and purposes the monitor is completely input lag free. But the ‘connected’ feeling and overall fluidity is far superior to even the fastest ‘input lag free’ 60Hz LCDs. Another factor influencing this is the 144Hz refresh rate. Compared to a 60Hz monitor, the BenQ is outputting 2.4 times as many frames of visual information – including updating the mouse cursor position – every second. Compared to a 120Hz monitor (or running this monitor in 120Hz mode) the difference is less pronounced. Technically it is displaying 1.2 times as much information; able to draw an additional 24 frames per second. In practice this does make things seem just a little faster but it really depends on the sensitivity of the user to such things. Another important factor influencing the responsiveness of a monitor is the pixel response times. Using a simple and aptly named tool called Pixel Persistence Analyser (PixPerAn) it is possible to demonstrate the influence of refresh rate on the apparent pixel responsiveness (i.e. how smooth and ‘blur free’ moving images appear) of the monitor. This tool uses a simple moving scene to make the monitor perform a set of typical grey to grey transitions similar to what you might find in a game. By using a camera at high sensitivity you can capture the pixels transitioning between states and hence assess response performance. The following images were captured on the XL2411T at 60Hz with AMA (Advanced Motion Acceleration) set to ‘Off’, ‘High’ and ‘Premium’, respectively. As with all PixPerAn images on our site the tempo was set to maximum to represent the worst-case (fastest movement) for this test. With AMA disabled results are quite typical of a TN panel with decent native responsiveness but no strong grey to grey acceleration. There is a fairly bold primary trail and a faint secondary trail. Setting AMA to ‘High’ kicks the grey to grey acceleration into gear – it is quite aggressive, replacing conventional trailing with a fairly pronounced dark overshoot (inverse ghosting) as well as a halo effect behind the car. The ‘Premium’ setting seems to increase the intensity of the overdrive, making the overshoot and halo more pronounced. At 120Hz a similar pattern was observed as shown by the images below. Although trailing in these snapshots would seem comparable to when the monitor was running at 60Hz the frame rate has been doubled and the car crosses the screen twice as quickly; the trailing is therefore more short-lived and less noticeable. RTC (Response Time Compensation) errors are once again introduced when AMA is enabled and particularly when it is set to ‘Premium’. The artifacts are a little fainter than at 60Hz at comparable settings. Bumping up the refresh rate to 144Hz gave the following results. The frame rate that the test is run at is now increased to 144fps. The car crosses the screen 2.4 times as rapidly as at 60Hz and 1.2 times as rapidly as at 120Hz. The ‘High’ settings here certainly shows a distinct improvement compared to earlier XL models with AMA enabled. The new ‘Premium’ setting seems to reflect the old ‘AMA on’ setting whereas ‘High’ is a bit better balanced. The image below shows the XL2420T at 120Hz with AMA on for the purposes of comparison. Note the bolder dark trail and more pronounced halo behind the car on the 20T compared with the the 11T set to ‘High’ in particular. When gaming the combination of negligible input lag and high refresh rate really made for a buttery smooth experience. Even if the frame rate dips to 60fps you benefit from increased fluidity and a better ‘connected feel’ compared to even the fastest 60Hz LCDs. But once the frame rate ramps up you enter a new world of smoothness. The first game title we tested, Battlefield 3, benefited greatly from this increased fluidity. The solider and any vehicles responded seemingly instantly to any input. The scene around the character did too, allowing everything to remain sharply focused even when running quickly or manoeuvring a vehicle. The image even retained good sharpness when turning quickly in nimble vehicles such as the jeep, helping you stay focused on the enemies and any obstacles in your way. Although there didn’t appear to be any ‘conventional’ trailing and the monitor seemed highly responsive on this title, there were some hints of overdrive trailing. The good news is that it was well-masked, certainly more so than on previous XL gaming monitors. It was quite faint and short-lived when it did occur and was not bold or noticeable enough to capture properly on camera. The bad news is that it is still there and some users may be quite sensitive to this. There are also two conditions which increase its visibility somewhat – increased motion speed and high-contrast transitions. Some game titles are less forgiving than Battlefield 3 this respect. To test the responsiveness during movies we ran into a bit of a hitch. Our test rig is equipped with CyberLink PowerDVD 8.0, which is a somewhat dated movie software. It has done the job for all other monitors tested but it seemed to be allergic to the BenQ when it was running at 144Hz. As the video below shows the screen is filled with what looks like white noise from an old TV set rather than the intended images. Setting the monitor to 120Hz worked fine on this movie software, however. Regardless of the refresh rate the film content itself is currently limited to a frame rate of under 30fps. Each frame is shown multiple times to fill in the refresh rate. This gives a slight edge in smoothness over running the film at 60Hz but isn’t as fluid as running high frame rate content such as games. There’s still a bit of a disconnected feeling to motion – but there was no noticeable trailing or overdrive artifacts in the two Blu-ray titles we tested. The BenQ XL2411T is not one of those monitors you can expect to turn on and happily use without a bit of tweaking. If you aren’t at all fussy then the default settings may be just about passible but they certainly don’t give an accurate or well-balanced image. Fortunately there are plenty of presets at your disposal, alongside the ability to tweak important aspects of the image such as colour channels and gamma. Whilst no combination of settings seemed perfect it was possible to get quite a pleasing image out of the monitor with a bit of fiddling. Certainly the image balance was infinitely better than the factory defaults with a decent richness to shades without an oversaturated look. One of the settings that couldn’t be tweaked using the preferred ‘Standard’ image preset was the Black eQualizer. Really this is a double edged sword. On one hand it built upon an already thoroughly decent contrast performance by bringing out an exceptional level of detail in dark and shaded areas – something that would rival any VA panel LCD. On the other hand it created an artificial look in places and changed the atmosphere, lightening some darker shades beyond their intended values. In a minority of cases details were brought out which were completely unintended and could be considered artifacts. In most instances the overall balance of a scene wasn’t upset too much – but it seems a bit restrictive to allow the Black eQualizer to be adjusted only in some presets but not others. The responsiveness of the monitor was excellent in many ways. The biggest weakness here came from the presence of ‘overdrive artifacts’ or response time compensation errors once AMA (BenQ’s grey to grey acceleration) was enabled. The good news is that rather than just switching AMA on or off you can now also select ‘Premium’ (which is the most aggressive acceleration) or ‘High’ (a more balanced but still strong acceleration). Using the intermediate setting (‘High’) the overdrive trailing was not too obtrusive really and certainly improved upon previous ‘XL’ series monitors. Everything else about the responsiveness was excellent, from the complete lack of input lag to the exceptional fluidity and ‘connected feel’ offered by the high refresh rate. Indeed there was a nice surprise here in the form of 144Hz capability. This was enabled by default and provided just a slight edge in smoothness compared to 120Hz. There was a slight degree of flicker evident in some cases at the far left of the screen when running 144Hz but it isn’t something to worry about unless you are particularly sensitive to flickering. So for gaming we found the BenQ XL2411T very nice to use. Once correctly set up the image was pretty decent as well making movies and general use fairly enjoyable. On top of this there’s a fully adjustable stand, support for 3D Vision 1 and 2 (plus LightBoost) and a competitive price tag. Overall it’s certainly a worthy choice for those who want a speedy monitor for gaming primarily but who may like to do other tasks on the side. We would not advise using any TN panel for any serious colour-critical work (this monitor included) but if that isn’t a priority for you then this should be one to consider.
Whilst not lusciously vibrant or gloriously accurate the image was relatively well-balanced using these settings. White point at the centre of the screen stood at the desirable daylight point of 6500K whilst colours had a respectable depth and variety to them. They were not garishly oversaturated or excessively washed out – although the brightness had to be a bit on the high side to provide this. The gamma curve lay at 2.4 on average, sagging some way below the 2.2 standard on the following graph.
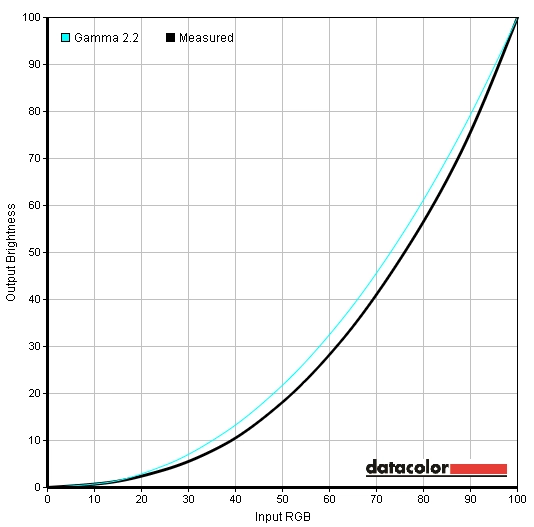
Gamma curve test settings
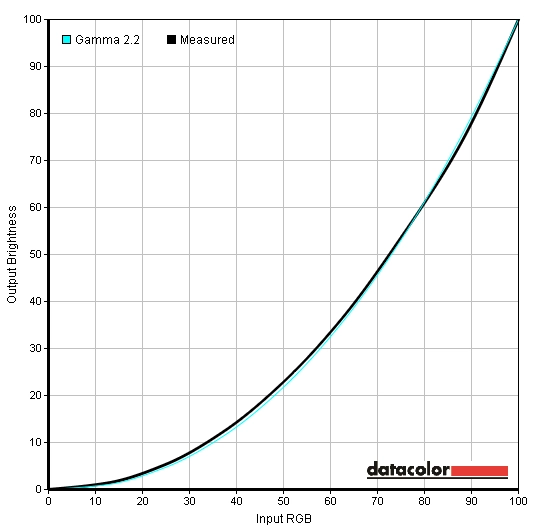
Gamma curve gamma 4
Contrast and brightness
Monitor Profile White luminance (cd/m2) Black luminance (cd/m2) Contrast ratio (x:1) ‘Standard’, 100% brightness 436 0.40 1090 ‘Standard’, 80% brightness 381 0.35 1089 ‘Standard’, 60% brightness 327 0.30 1090 ‘Standard’, 40% brightness 273 0.25 1092 ‘Standard’, 20% brightness 218 0.20 1090 ‘Standard’, 0% brightness 163 0.15 1087 Test settings, 28 brightness, 50 contrast (custom RGB and gamma) 235 0.23 1022 ‘Movie’ 296 0.38 779 ‘Photo’ 302 0.38 795 ‘sRGB’ 198 0.19 1042 ‘Eco’ 217 0.20 1085 ‘FPS1’ 358 0.38 942 ‘FPS2’ 355 0.38 934 ‘RTS’ 353 0.37 954
Update: As of July 2013 the monitors have been upgraded to the new flicker-free (PWM free) ‘Revision 2.0’. The P/N associated with this in the UK/EU is 9H.L9SLB.DBE.
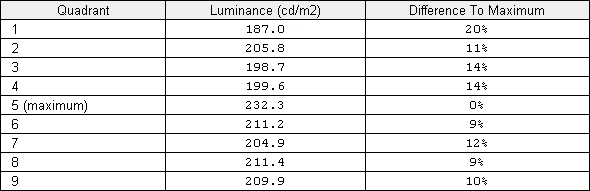
Luminance uniformity table
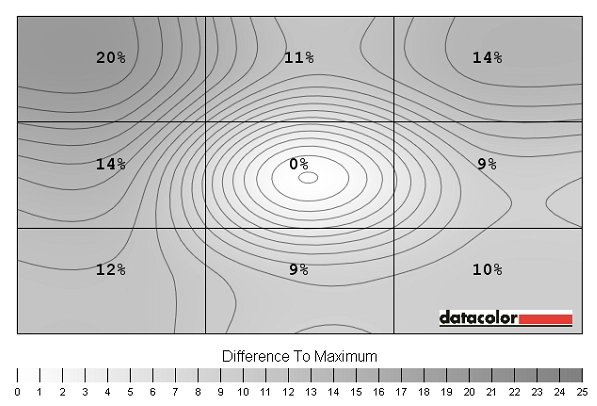
Luminance uniformity map
The images below show some of the unintended detail that can be observed as a result of the Black eQualizer. The first image shows a ‘speckled’ spatial dithering pattern that can be observed on the Lagom black levels test. The second and third image show a comparison between a ‘colour burst’ desktop wallpaper as it should appear (generally – this will depend on the monitor you’re viewing the image on) and how it is displayed on the BenQ. The fourth and fifth image show another comparison, this time of a star field background. Note extra detail is visible including some artifacts and horizontal banding that isn’t in the original image.
Speckled dithering on Lagom

Original colour burst

BenQ colour burst

Original star field

BenQ star field
Colour reproduction
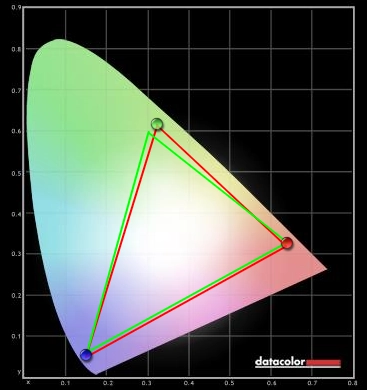
Colour gamut
Viewing angles
It is very difficult to capture subtle changes that can be observed across the screen, such as those observed above, on camera. The following video explores some of the more pronounced changes that can be observed in image composition as the viewer’s position is changed relative to the monitor. The first section of the video highlights the shifts between red and green on the Lagom text test. The second section shows some of the changes that can be observed on a mixed image – note in particular the bleaching and colour inversion that occurs vertically. The third and final section of the video shows the golden glow that can be observed off-angle as mentioned in the ‘Contrast and brightness’ section.
Response times

Ghosting 60Hz AMA off

Ghosting 60Hz AMA high

Ghosting 60Hz AMA premium

Ghosting 120Hz AMA off

Ghosting 120Hz AMA high

Ghosting 120Hz AMA premium

Ghosting 144Hz AMA off

Ghosting 144Hz AMA high

Ghosting 144Hz AMA premium

XL2420T ghosting 120Hz AMA on
I fired up Call of Duty: Black Ops 2 for some faster paced on-foot action. This is a game I had previously played multiplayer for a matter of minutes. In my first match using the XL2411T I was branded a cheater due to my uncanny fragging ability. The overdrive trailing was too faint, infrequent and short-lived to bother me. Some users may be more sensitive to this but being falsely branded a ‘cheater’ on a game you are very inexperienced with is quite an accolade.
When people consider the advantages of a 120Hz+ monitor’s motion performance they often dismiss it as something that is only of benefit to FPS games. Whilst they certainly see most benefit from increased fluidity, that doesn’t mean other game genres don’t also benefit. Dirt 3, from the car racing genre, also benefited from the rapid pixel responses and high frame rates pumped out by the BenQ. Objects in the environment moved past the car in a very smooth and natural way. The track remain sharply focused, even during tight corners. There were some dark overdrive trails visible, particularly when moving quickly past certain light objects on a dark background – these were faint and short-lived and couldn’t be accurately captured on camera. We didn’t find them distracting and had to actively look out for them to notice, but they were there nonetheless. The Gymkhana mode was also handled very well with the intended level of sharpness and no distracting trailing and a good natural smoothness.
Conclusion
Positives Negatives Good contrast performance overall with strong static contrast and plenty of brightness if you need it
Matte screen surface gives image a hazy look in places, Black eQualizer often forced upon you and the monitor is quite bright even at ‘0’ brightness
A good balance to the image after tweaking with a decent depth to many shades Colour consistency and viewing angles held back by TN panel technology, regular matte surface reduces ‘pop’ to image and default settings are poor Exceptionally low input lag, improved grey to grey acceleration and support for a 144Hz refresh rate give great fluidity
Some flickering at 144Hz and overshoot still there from aggressive pixel overdrive (AMA)
Competitive pricing and a fully adjustable stand with VESA support and side bezels that aren’t overly thick Somewhat unimaginative design (similar to XL2410T), no US availability currently and a restrictive selection of ports 