Author: Adam Simmons
Date published: July 8th 2014
Table of Contents
Introduction
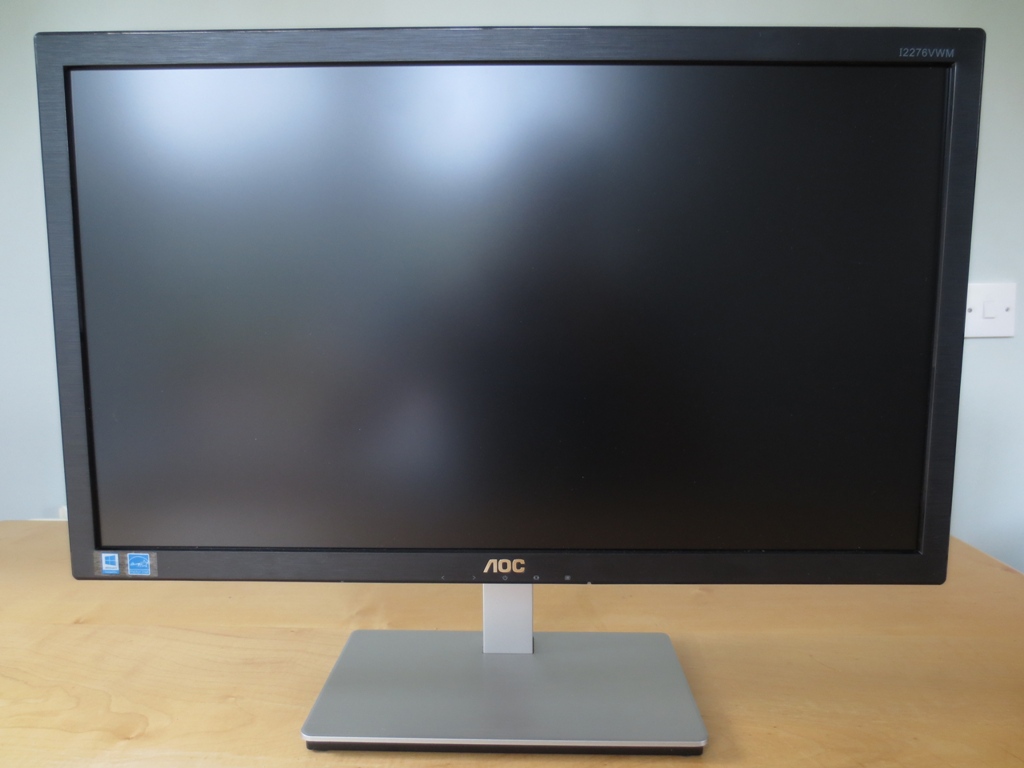
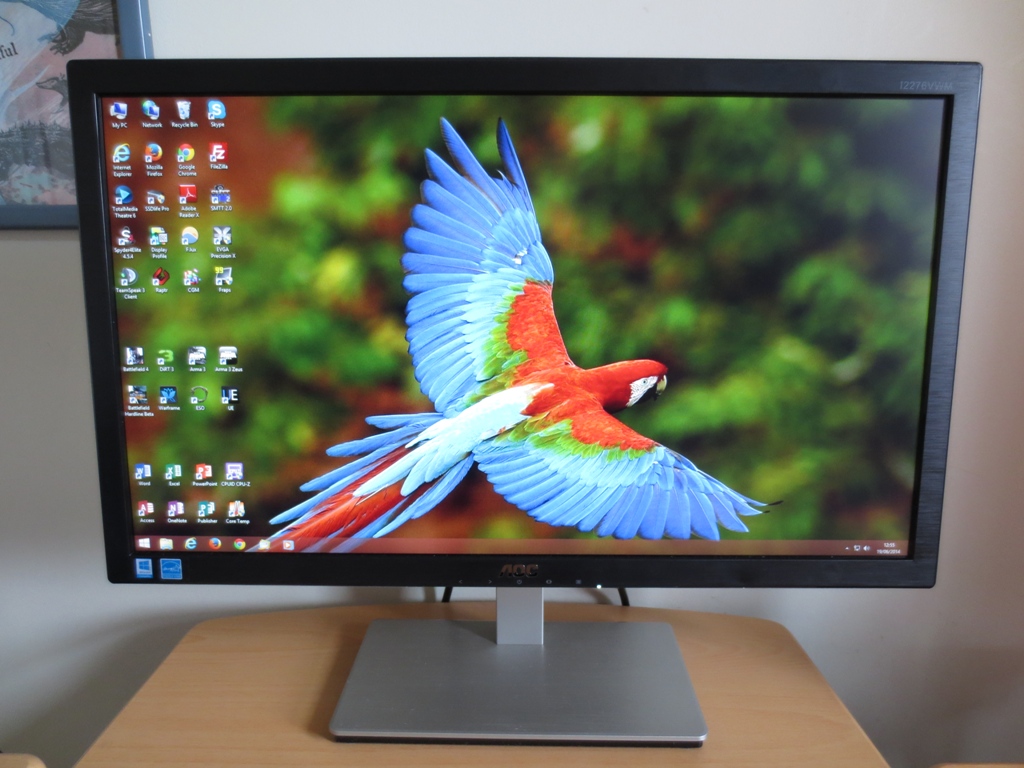
AOC have hugely expanded their line-up these past few years and have proven themselves very capable of hitting that sweet spot between price and performance. The AOC i2276Vwm uses a 21.5” ADS IPS-type panel, providing the strong viewing angles and colour consistency users have come to enjoy from the technology. There is of course more to a monitor than just the panel. In this review we put the monitor through its paces and find out how appealing the whole package is.
Specifications
This monitor uses a 21.5” IPS-type panel from Chinese manufacturer BOE with a 60Hz refresh rate and Full HD (‘1080p’) resolution. It supports 6-bits per subpixel with an additional 2-bits FRC (Frame Rate Control) dithering to make it up to 8-bits. This is common for such a monitor and not something that should concern most users. The monitor has a 5ms grey to grey response time, but as always this gives little indication of how responsive things will be in practice. The key specifications are given below with some ‘talking points’ highlighted in blue for reading convenience.
Features and aesthetics
The i2276Vwm has a fairly traditional home-office look about it from the front. The bezels feature a brushed metal effect matte plastic and are fairly thick by modern standards (18mm/0.71 inches at the sides and around 20mm/0.79 inches at the top and bottom). The screen surface is matte anti-glare with a fairly ‘strong’ (roughed up) texture. This is more similar to the surfaces seen on older IPS models than LG’s newer AH-IPS panels and affects the image clarity and vibrancy slightly more than modern IPS panels as a result. It doesn’t have quite the same ‘smeary’ look to it but certainly isn’t as ‘clean’ as the surfaces used on the latest LG IPS and Samsung PLS panels.
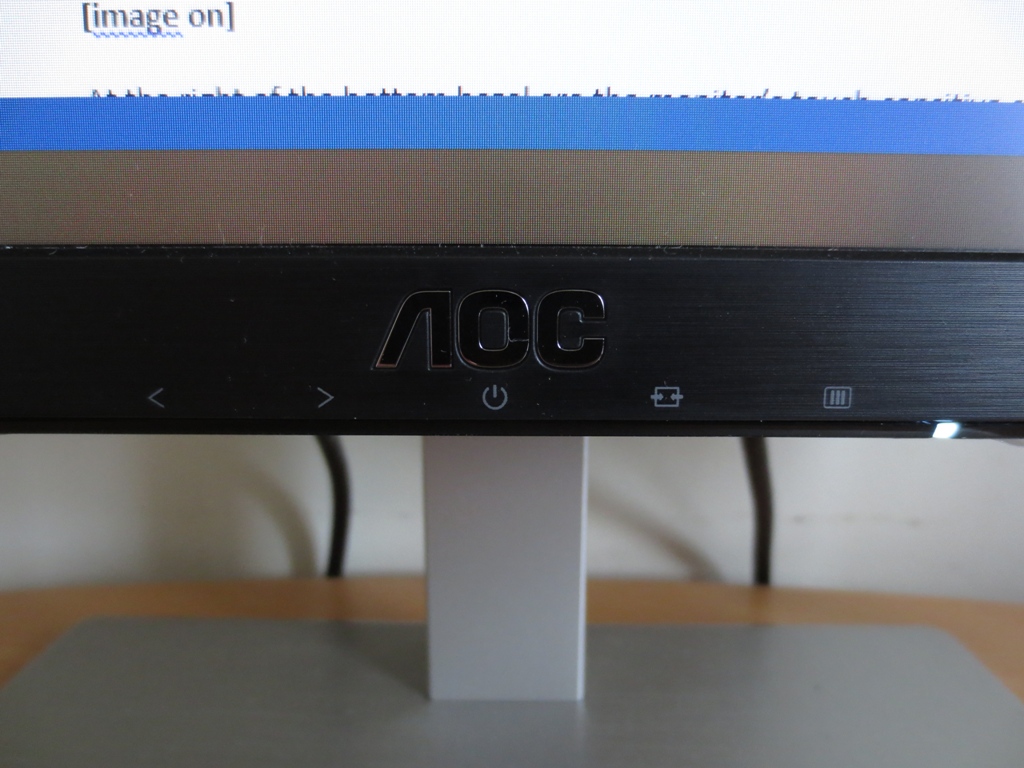
The controls are located at the central part of the bottom bezel and are as follows; ‘Clear Vision/Right’, ‘Volume/Left’, ‘Power’, ‘Source/Back’, ‘Menu/Enter’. Tactile rather than touch-sensitive buttons are used here and are fairly easy to navigate ‘by feel’. There is no illumination of the control labels nor on-screen labelling which can make using the OSD (On Screen Display) a bit tricky in a dark room if you’re not used to the layout. Another issue with the layout is that the power button is located centrally beneath the ‘O’ of the AOC logo. This is where you would naturally expect to find the ‘right’ arrow and we found we accidentally pressed it a couple of times. The power light is on its own to the right (where the power button would usually be located). A small rectangular white power LED is used which is reasonably bright but not something we found overly distracting.
The OSD itself is laid out in AOC’s typical widescreen format. It is split into sections labelled both textually and with simple graphics. Basic functions include the ability to adjust contrast, brightness and gamma mode as well as set the strength of the overdrive (grey to grey acceleration). You can also customise the colour channels. Other features include ‘Break Reminder’ which displays an on-screen message when you’ve been using the monitor for an hour. There is also an ‘Off Timer’ which allows you to select a time in hours (1-24) after which the monitor will automatically enter standby, reminding you 10 minutes beforehand with an on-screen message. As usual for AOC monitors there is no sharpness control, but we found the default sharpness optimal anyway as we usually do with this manufacturers monitors. There is a ‘Clear Vision’ sharpness enhancement setting, however. The video below gives a run-through of the OSD – there is no audio commentary on this video but rather a quick skim through of the available options.
The monitor is fairly sleek from the side, being 18mm (0.71 inches) at thinnest point with a central bulge beyond this. The stand only allows the monitor to be tilted.
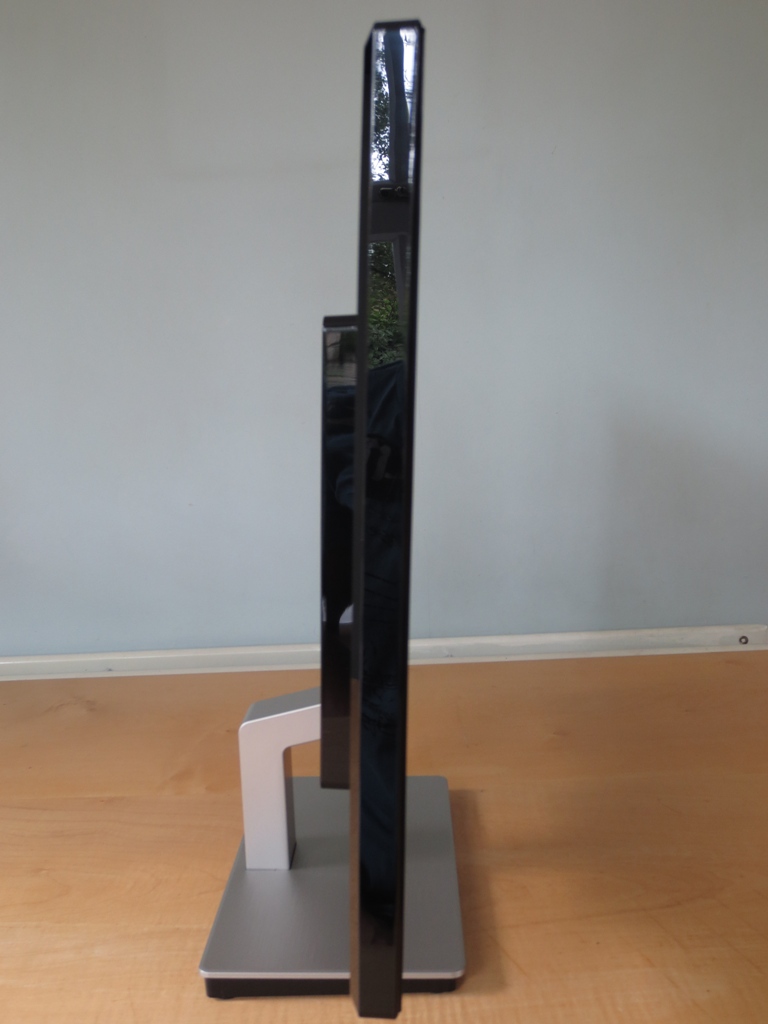
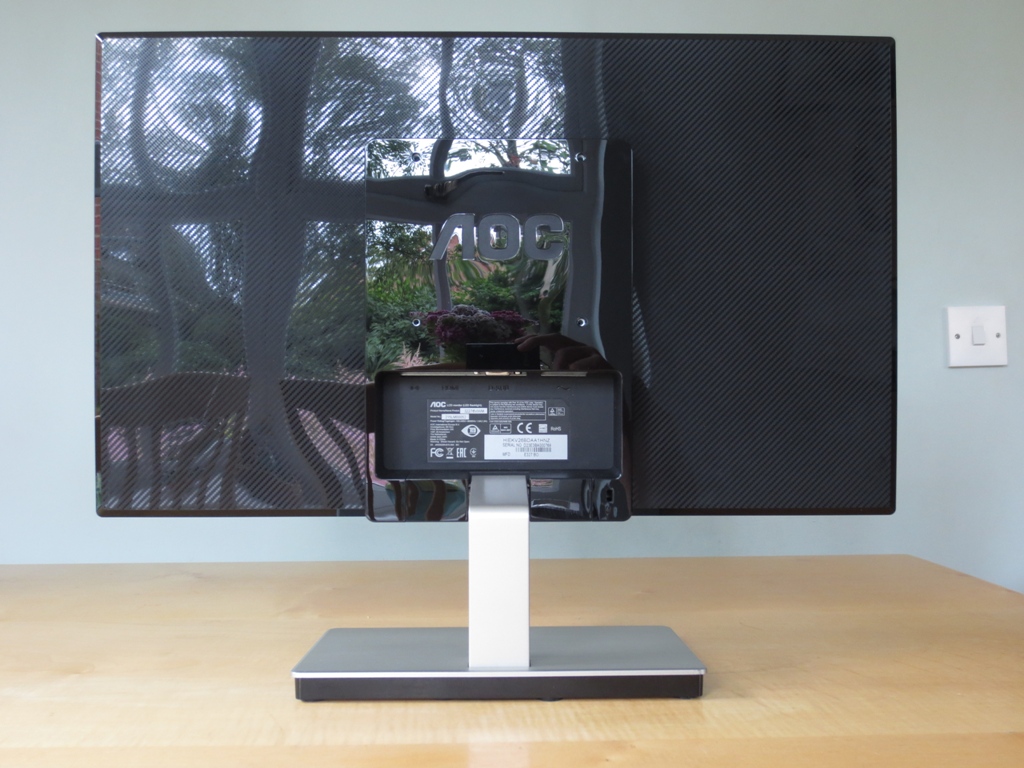
The rear of the monitor has a fairly simple design with a carbon fibre textured matte black plastic covering. There are 100 x 100mm VESA holes for alternative mounting. The ports face downwards towards the bottom; 3.5mm audio output, HDMI (with MHL), D-Sub (VGA) and an AC power input (no external ‘power brick’). The lip where the stand attaches combined with the downward facing ports does make it a bit tricky to connect cables up as there is limited space to work with. There is also a K-Slot to the bottom right of the port area.
Calibration
Correcting the colour signal
An Nvidia GTX 780 was used on our test system connected to the HDMI port of the monitor. As usual the incorrect colour signal was sent out by the GPU; ‘Limited Range RGB (16-235)’. This gives the image an obvious washed out look, adversely affecting gamma, contrast and colours. We used the toggle utility mentioned in this article to correct this, enforcing a ‘Full Range RGB (0-255)’ signal. Some tips for AMD users are also included in that article.
Testing the presets
As usual for an AOC monitor, the i2276Vwm lacks traditional presets. There are some useful options available such as a range of ‘Gamma’ and ‘Color Temp.’ settings, however. The table below shows some key readings taken using a Spyder4Elite colorimeter and a range of monitor settings, alongside some general notes on the image using those settings. All settings not mentioned in the table were left at default, with the exception of our ‘Test Settings’ were the modifications mentioned in the subsequent section were made. The table was compiled on our test system running an Nvidia GTX 780 with the correct ‘Full Range RGB (0-255)’ colour signal mentioned above. The results using a modern AMD GPU with colour signal corrected were similar.
| Monitor Profile | Gamma (central average) | White point (kelvins) | Notes |
| Gamma1 (Factory Defaults) | 2.2 | 6427K | Good balance to the image aside from the uncomfortably high brightness. The warm tint is only very slight and difficult to notice by eye – perception of this depends on lighting conditions. |
| Gamma2 | 2.0 | 6545K | A slightly cooler tint than ‘Gamma1’, not really noticeable by eye. What was noticeable is the slightly drained look that colours have due to the gamma behaviour. |
| Gamma3 | 2.3 | 6587K | As ‘Gamma1’ with extra depth to some shades, a little too much in places. |
| Color Temp. Normal | 2.2 | 7126K | Image balance is upset by a fairly strong blue tint. |
| Color Temp. User | 2.2 | 6758K | A slight blue tint again upsets balance, but not to the extent of ‘Color Temp. Normal’. |
| Test Settings (modified as below) | 2.2 | 6502K | The good balance of ‘Gamma1 (Factory Default)’ is maintained with a more comfortable brightness. Shades have a good rich look and are consistent, showing excellent variety. |
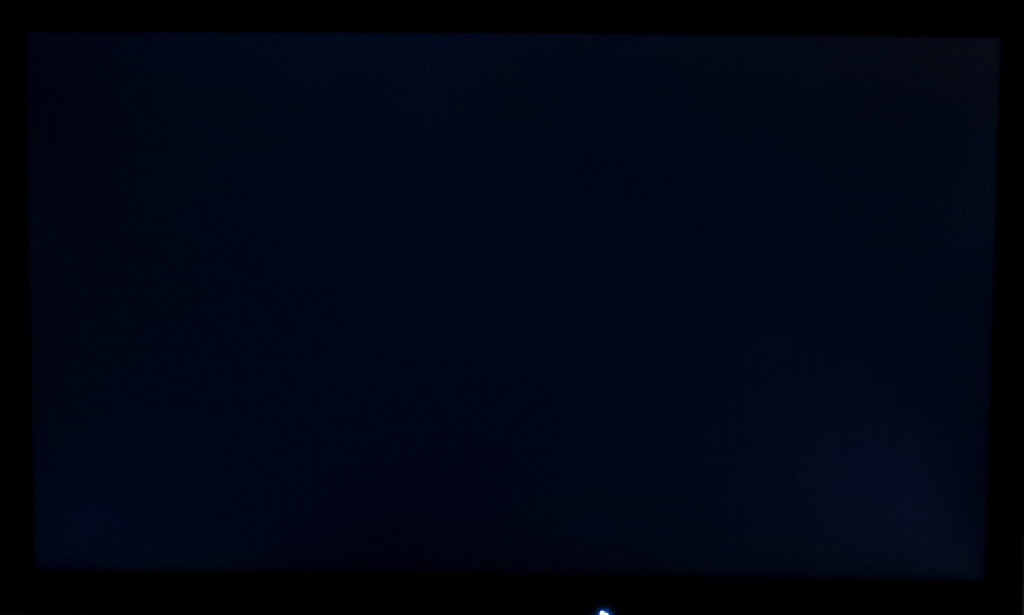
The monitor does a good job at producing a well-balanced image straight from= the box, aside from the fairly high brightness. The gamma tracking of the monitor and white point are both very close to their targets which is good. The image below shows the gamma curve of the monitor using the factory default settings. Unfortunately when you lower the brightness, the colour temperature begins climbing and the green channel begins weakening. An interesting ‘kink’ is then introduced to the gamma curve as soon as you whack the monitor into ‘Color Temp. User’ to modify the colour channels, despite the gamma still averaging 2.2. For our test settings we lowered the brightness significantly and made some modifications to the colour channels. The white point was very close to the 6500K target without any relative weakness in the green channel. The gamma tracking was not quite as tight despite still remaining quite close to the desired 2.2 curve. Visually this made little difference and isn’t something most users should worry about. The ‘Color Temp.’ setting is set to ‘Warmest’ by default, which doesn’t really make the image particularly ‘Warm’. Setting this to ‘Normal’ makes the image noticeably cool, though, introducing a blue hue that’s fairly noticeable in most light. The ‘sRGB’ setting is pretty much redundant as it is exactly the same as the default ‘Warm’ preset. We would have liked to have seen some sort of ‘Reading’ or ‘Low Blue Light’ setting. AOC could get around this whilst keeping their naming as it as by shifting the default white point settings to ‘Normal’ (which should be roughly 6500K) and making the ‘Warm’ preset actually warm – perhaps closer to 5000K. As mentioned above we lowered the brightness and made some adjustments to the colour channels to reach out test settings. Individual units are likely to differ so don’t assume that these settings will be optimal in all cases. Due to this and the fact the gamma tracking is quite close to the target (with some deviance depending on colour channels) we won’t be providing any ICC profiles for this monitor. Most users won’t be needing to use ICC profiles for this screen and those who do should be creating one themselves on their own system and tailored to their own unit. Contrast= 50 Gamma= Gamma1 R= 48 G= 50 B= 47 We used a KM CS-200 luminance meter to accurately measure white luminance, black luminance and calculate the resulting contrast ratio using a range of monitor settings. These readings and calculations are shown in the table below. Blue highlights indicate the highest white luminance, lowest black luminance and maximum contrast ratio recorded. Black highlights indicate that the readings or measurements are for our test settings. The average contrast with only brightness altered was 1003:1. This is a little lower than we’ve seen on some recent IPS-type panels but very close to the specified 1000:1. These levels were maintained across all of the settings tested without any significant changes. Using ‘Color Temp. User’ unlocked the colour channels and by default had them all set to ‘50’. This neutral value provided the highest contrast ratio measured at 1056:1. Following the adjustments made to our ‘Test Settings’ the contrast hit 1000:1 exactly which is quite good. The maximum luminance recorded was 293 cd/m² which comfortably exceeds the specified 250 cd/m². The minimum white luminance recorded was 99 cd/m², which is reasonably low but still not as low as some users would like. This gives a luminance adjustment range of 191 cd/m², which is respectable. AOC includes two separate ‘Dynamic Contrast’ settings. The first of these is ‘DCR’ or ‘Dynamic Contrast Ratio’ which is a fairly conventional Dynamic Contrast feature. This blocks off access to manual brightness, contrast and gamma mode adjustment and allows the backlight to adjust according to the levels of ‘light’ and ‘dark’ shown on-screen. This tended to output an uncomfortably bright picture during mixed images and indeed didn’t dim as much as you’d expect for mixed but predominantly dark content. The changes were quite steady – not as rapid as some implementations nor as slow to react. We actually preferred the second option which is ‘DPS’ (Dynamic Power Saving). This is intended to save energy by using your desired brightness setting as a maximum and gradually dimming the backlight for darker content to save energy. As with all current LCD monitors the backlight is dimmed as one unit so it is still a bit of a compromise, but it’s definitely nice being able to control maximum luminance levels and have the backlight dim a bit for darker content in a fairly non-distracting way. AOC doesn’t currently boast that a particular monitor model of theirs is ‘flicker-free’ but as we’ve seen with a few of their recent models this one does not use PWM (Pulse Width Modulation) to regulate its backlight brightness at any brightness. A Direct current (DC) modulation is used instead, so you can consider the backlight to be ‘flicker free’. This will be welcome use to users who are sensitive to flickering or simply want to avoid flicker-related fatigue when using the monitor. Whilst observing a black screen in a dark room using our test settings, we observed some backlight bleed. This was most prominent towards the bottom two corners and top central region of the screen as shown in the image below. As you can see the issue was not too severe on our unit. It’s also worth noting that individual units can vary in this regard. Note that the photograph above was taken a few metres back from the monitor. This ensures that only backlight bleed is captured rather than ‘IPS glow’. IPS glow is a silver-blue or gold sheen that blooms out from the monitor most noticeably as you move your head. A degree of glow can also be seen from a normal viewing position as noted elsewhere in the review. A Spyder4Elite was used to assess the uniformity of 9 equidistant pure white quadrants running across the screen from top left to bottom right. This gives an indication of any uniformity issues that may affect lighter colours such as white. The table below shows the values recorded alongside the percentage deviation between the brightness of a particular quadrant and the brightest point recorded on the screen. The uniformity of the monitor was quite variable overall. The brightest point measured was the centre of the screen, ‘quadrant 5’ (180.6 cd/m²). The maximum deviation from this was recorded at the top right of the screen (148.2 cd/m² which is 18% dimmer). The top left of the screen (‘quadrant 1’) was 17% dimmer than centre at 149.4 cd/m². Elsewhere deviation was 2-13% from the central point. It should be noted that individual units can vary when it comes to uniformity and that these results should not be too detrimental for most users. The contour map below represents these deviations graphically with darker greys representing higher deviation from the brightest point. Percentage deviations between each quadrant and the brightest point are also provided. Colour temperature uniformity was also assessed, another aspect of uniformity which is worth considering. The Spyder4Elite was used to measure variation in white point across the screen. The graphic below shows deviations in DeltaE between the same 9 quadrants previously assessed. A Delta E >3 here represents a significant deviation which some users would be able to spot quite readily. Darker colours on this map represent greater deviation from the 6500K (D65) daylight white point target than lighter colours. The point closest to 6500K was ‘quadrant 8’ below centre, with the central region (‘quadrant 5’) showing only a deviation of 0.2 DeltaE. A significant deviation was observed at ‘quadrant 3’ (top right, 3.0 DeltaE) with a fairly high deviation also observed at ‘quadrant 1’ (top left, 2.4 DeltaE). No significant deviations were recorded elsewhere. It should be noted that as with all uniformity issues mileage may vary – individual units can all differ in this respect. The contrast performance was respectable overall on Battlefield 4. Bright elements stood out quite well against darker objects. Bright elements such as the sky and artificial lights highlighted the quite apparent graininess of the screen surface. Detail levels in dark areas were quite good with some fairly minor details such as vehicle tread patterns visible. The very edges of the screen (particularly the bottom two corners) lost a bit of detail due to IPS glow. This effect was far less extensive than you’d see on a larger monitor the same viewing position. On Dirt 3 the overall distinction between ‘light’ and ‘dark’ was good. The high-end was hampered somewhat by the unforgiving matte screen surface and the low-end by a bit of IPS glow. Again this was less of an issue than it is for larger IPS-type screens, but still has an effect. The contrast performance was good overall on the Blu-ray of Skyfall. Bright elements showed good distinction from dark elements. The low-end detail was quite pleasing with minor details such as creases on dark clothing visible. IPS glow had a very limited effect on this film on the AOC with the black bars at the top and bottom of the image ‘absorbing’ most of it. The lighter colours again appeared fairly grainy due to the screen surface. We used Lagom’s contrast tests to help assess the contrast performance of the monitor, using Internet Explorer 11. Due to Mozilla’s colour management system the shades used in this test are represented differently on Firefox compared to most other web browsers, so we avoided using it. Some of the weaknesses picked up here aren’t always obvious during other testing. The following observations were made. The AOC i2276Vwm’s colour gamut follows the sRGB standard very closely. There is no significant over-coverage or under-coverage in this representation of the colour gamut which is pleasing from the perspective of colour accuracy. Colours had good depth and a pleasing variety on Battlefield 4. Everything looked much as it should really, with the exception of the screen surface sapping a bit of vibrancy in places. The consistency of colours was also very pleasing, with a distinct array of greens and browns giving a good natural look to in-game environments. The strong shade variety also gave a good natural look to the environments on Dirt 3. The array of deep green shades was particularly impressive in the Forests of Finland. The car paintjobs showed off the pleasing depth of many shades, with some particularly impressive deep reds and purples. The vibrancy was again held back a little by the moderately grainy screen surface. Colours were displayed accurately and appropriately on the Blu-ray of Skyfall. Skin tones and the natural environment showed correct saturation levels. Vibrant elements such as colourful neon lights and glowing flames had good depth, despite lacking the same ‘pop’ as you’d see on a lighter matte or glossy screen surface. On the Blu-ray of Futurama: Into the Wild Green Yonder shades lacked the smooth ‘painted on’ look you get on some screens with much lighter screen surfaces. The overall depth and variety of shades was very good, however. There was a good array of subtly different muted pastel shades, helped by the strong shade consistency. Where large areas of a single colour filled the screen, that colour appeared largely the same at all points of the screens. Neon shades didn’t quite pop off the screen as you might see on some other monitors but were far from being dull or washed out. We used Lagom’s tests for viewing angle to further analyse colour consistency on the monitor. The following observations were made. The video below shows this text test, a mixed desktop background and dark desktop background from a range of viewing angles. The viewing angle performance here is strong. The dark desktop background highlights the aforementioned ‘IPS glow’ which blooms out as viewing angle becomes more acute. We used SMTT 2.0 and a sensitive camera to compare the latency of the i2276Vwm with a range of other monitors with known latencies. This measurement includes both the signal delay of the monitor (what you may ‘feel’) and an element of pixel responsiveness (what you may ‘see’). 14ms (just under 1 frame) of input lag was recorded, indicating that the monitor has a higher signal delay than you would see on many competing modern 1920 x 1080 IPS and PLS displays. This level of input lag is on the low side in the grand scheme of things and most users shouldn’t find it problematic. Those who do would generally benefit from a model with a higher refresh rate anyway. The UFO Motion test for ghosting was used alongside a highly sensitive camera to assess the monitor’s pixel responsiveness. The test speed was set to ‘1920 Pixels Per Sec’ to ensure the UFO traveled rapidly across the screen, crossing it in 1 second. The image below compares the result of the middle row (medium cyan background) using the various ‘Overdrive’ settings available on the monitor; ‘Off’, ‘Weak’, ‘Medium’ and ‘Strong’. Using the ‘Overdrive = Off’ setting you can see a bold primary trail and slight secondary trail, fairly typical of an IPS-type panel where no overdrive impulse is supplied. Using ‘Overdrive = Weak’ slightly weakened both the primary and secondary trails. The ‘Overdrive= Medium’ setting further weakened to the secondary trail and slightly changed the appearance of the primary trail. There is a very slight light outline to the UFO which is difficult to see in the image, but is a mild overdrive artifact (overshoot). The ‘Overdrive = Strong’ setting provide a more noticeable halo artifact effect in this example. In practice the default ‘Medium’ setting was preferable to the ‘Strong’ setting as artifacts were fewer and weaker. They were still present, however. We preferred the ‘Weak’ setting which was entirely free from observable overdrive artifacts, as we explore in our subsequent testing. To give a better idea of what to expect in terms of motion performance when viewing the monitor it’s important to consider a greater range of pixel transitions. It’s also very important to take into consideration eye movement, which has a significant effect on how motion is perceived on a display. This concept is explored in this article, which is well worth a read if you’re interested in the technical side of things. This part of the review looks at the visual responsiveness of the monitor using a range of game and movie titles. On Battlefield 4 there was a moderate degree of blur that was most noticeable when cornering in a vehicle. This was mostly caused by eye movement and linked to the 60Hz refresh rate, as explored in the article linked to above. There was also some trailing on top of this from slightly slower than optimal pixel response times. This was quite minor really, adding just a very faint and short-lived trail behind some objects. Perhaps more noticeable were the bright trails that cropped up in places if the ‘Medium’ overdrive setting was used. A good example of this was the bright outline that appeared if you strafe past a silver metal post set against a medium blue sky. There were also instances of noticeable dark trails, significantly darker than either the object or background colour. These are examples of overshoot from aggressive grey to grey acceleration. They weren’t as obtrusive as we’ve seen on some monitors and some users won’t even notice them, but they aren’t there at all using the ‘Weak’ overdrive setting which we preferred. Dirt 3 told a similar story. There was a fairly predictable blur attributable to eye movement and linked to the 60Hz refresh rate of the monitor. On top of this there was a small amount of trailing in places. This was quite minor really, contributing only a small degree of additional motion blur overall. We didn’t feel this adversely affected the game play experience. When running our film titles there were no issues attributable to pixel responsiveness. The 24fps or so at which Blu-rays such as those we tested run was really the main limiting factor when it came to the visual fluidity. The pixel response times were easily fast enough to keep up with this pace of action and there was no observable overdrive artifacts using the preferred ‘Weak’ overdrive setting, either. As with any monitor the i2276Vwm has both good and bad points. As an inexpensive all-round performer there is plenty to like. The IPS-type panel provides good depth and accuracy to colours, whilst the backlight provides very close coverage of the sRGB colour space. Aside from the high brightness, the out of the box settings are really quite decent as well. Whilst contrast wasn’t technically as strong as we’ve seen on some other recent IPS-type panels (particularly 23-24” models) the monitor still hit the specified 1000:1 pretty much bang on. The usual ‘IPS glow’ phenomenon was also visible on this model, although the small screen size did mitigate the severity of this somewhat. In some respects this monitor is like taking a step back in time to some slightly older affordable IPS models. Recent screens using LG AH-IPS and Samsung AD-PLS panels have included a number of ‘enhancements’ to screen surface, responsiveness and bezel thickness compared to older E-IPS models. This monitor, in contrast, uses an IPS-type panel manufactured by the Chinese company BOE. The latter is perhaps the more pressing issue from our perspective due to its direct effect on the image, although some users won’t be as sensitive to that as others. Another area where sensitivity will differ but that the monitor doesn’t tick all the boxes is responsiveness. From the perspective of pixel responsiveness things are quite decent – AOC includes adjustable overdrive, which is useful to help overcome the fairly bold inverse ghosting that occurs using the default setting. Once you’ve done this pixel responses are a little slower than some modern AH-IPS and AD-PLS screens but is pretty good on the whole for providing a decent 60Hz performance. This monitor also has a bit more input lag than we’ve seen on other comparable models. As reviewers we are here to be critical but fair in our appraisal of a monitor. We feel that this monitors good out of the box colour performance, reasonable build quality and decent responsiveness will entice some users given its rather low price tag. We are quite happy to see that manufacturers are generally leaving behind some of the ‘thicker’, ‘stronger’ and ‘grainier’ matte screen surfaces in favour of more ‘lighter’, ‘smoother’ and more visually appearing offerings. On a personal level, the return of the stronger matte surface is something that is quite abhorrent, but not something that should or indeed will deter every user.
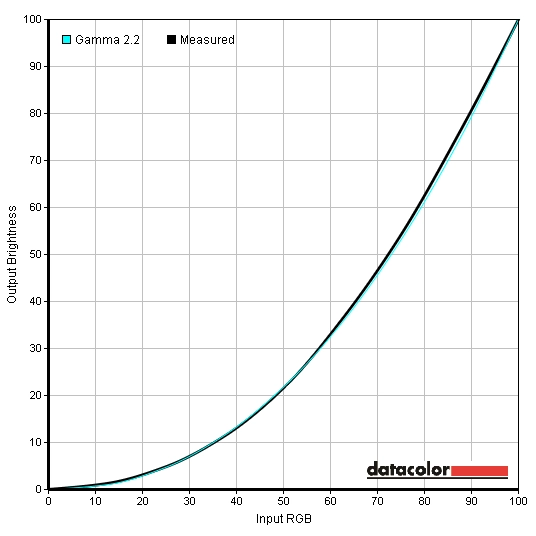
Gamma factory defaults
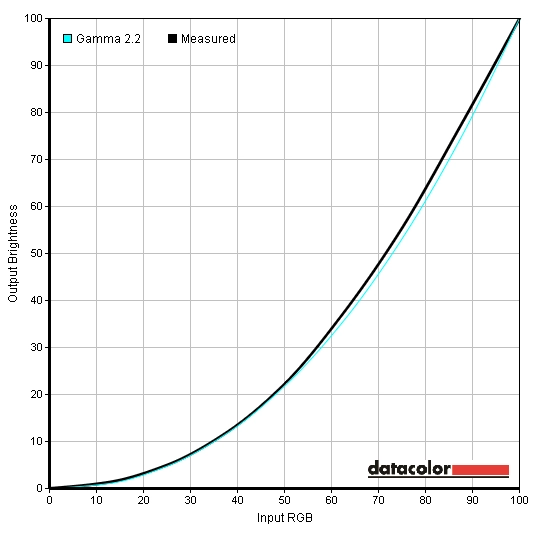
Gamma test settings
Test Settings
Brightness= 37 (according to preferences and lighting)
Contrast and brightness
Contrast ratios
Monitor Profile White luminance (cd/m²) Black luminance (cd/m²)) Contrast ratio (x:1) 100% brightness 293 0.29 1010 80% brightness 258 0.26 992 60% brightness 221 0.22 1005 40% brightness 182 0.18 1011 20% brightness 142 0.14 1014 0% brightness 99 0.10 990 Gamma = Gamma2 264 0.26 1015 Gamma = Gamma3 259 0.26 996 Color Temp. Normal 268 0.27 993 Color Temp. User 285 0.27 1056 Test Settings 293 0.29 1010
PWM (Pulse Width Modulation)
Luminance uniformity
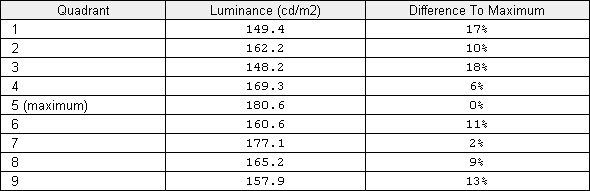
Luminance uniformity table
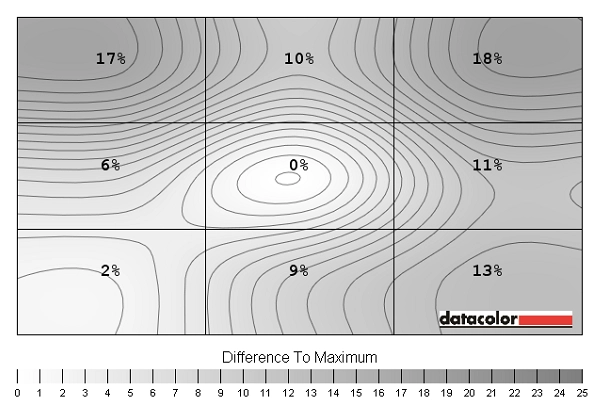
Luminance uniformity map
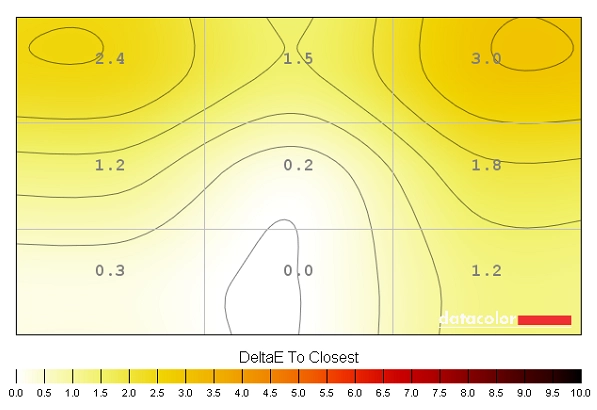
Colour temperature uniformity map
Contrast in games and movies
Lagom contrast tests
Colour reproduction
Colour gamut

Colour gamut test settings
Colour in games and movies
Viewing angles
Responsiveness
Input lag
Pixel responsiveness
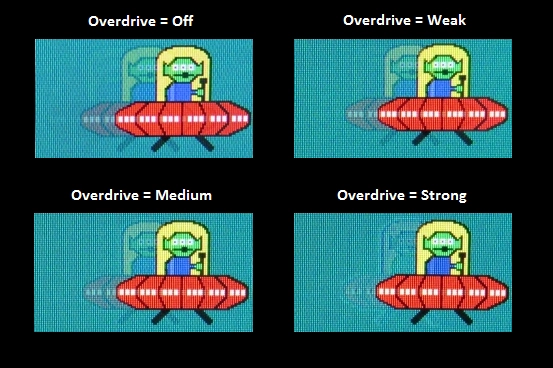
Trailing with various overdrive settings
Responsiveness in games and movies
Conclusion
Positives Negatives Solid out of the box colour setup aside from brightness which is fairly easy to rectify. Excellent sRGB coverage, particularly for such a small and cheap monitor Lack of useful ‘Warm’ preset (or ‘Reading/Low Blue Light’ setting) and frustrating OSD button layout. Screen surface affected vibrancy to a degree Contrast performance was on par with the specifications, decent overall with around 1000:1 static contrast Some uniformity issues on our panel, the usual ‘IPS glow’ and a return of the sort of grainy matte screen surface we were happy to see the back of Decent pixel responsiveness following adjustment to ‘Overdrive’ setting Some slightly slower pixel transitions and more input lag than comparable AH-IPS and AD-PLS models A simple design, but VESA mounting supported and a suitably low price tag Thick bezels and lack of ergonomic adjustability may deter some users
![]()

