Author: Adam Simmons
Date published: April 30th 2015
Table of Contents
Introduction
BenQ’s XL series is revered the world over for providing an exceptionally fluid and responsive gaming experience. Marketed as being built ‘for gamers, by gamers’ models such as the XL2420Z are favourites amongst competitive gamers. Even users who would consider themselves non-competitive gamers, but who like a bit of multiplayer action, enjoy the connected feeling that these monitors offer. But for some people the 1920 x 1080 (Full HD) resolution isn’t quite enough. For these individuals the 27” BenQ XL2730Z (ZOWIE XL2730), reviewed herein, may just heed their call. The resolution has been bumped up to 2560 x 1440 (WQHD) whilst a number of new features have been added. The most exciting of these is undoubtedly the use of Adaptive-Sync and therefore support for AMD FreeSync.
Specifications
The monitor uses a TN panel from AU Optronics which produces colours using 8-bits per subpixel without dithering. The resolution is 2560 x 1440 (WQHD) and the refresh rate is 144Hz (variable with Adaptive-Sync). The monitor boasts a 1ms grey to grey response time which is undoubtedly achieved on a select few transitions using the ‘AMA Premium’ setting (which isn’t exactly going to be ‘artifact free’). Whichever way you cut it, this is designed to be a fast monitor specifically tailored to gaming.
For your reading convenience the key ‘talking points’ of the specification have been highlighted in blue below.
*The spec. sheet does not make it clear whether an FRC stage (dithering) is used on this monitor, but BenQ have told us that it should be using a true 8-bit panel. We observed what appeared to be a small amount of dithering in places as mentioned in our analysis using Lagom, but this was nowhere near what 6-bit + FRC TN panels would usually display.
Features and aesthetics
From the front the monitor adopts a fairly smart and stylish look. The matte black plastic bezels are around 17mm (0.67 inches) thick at all edges. The stand neck has a red cable tidy ring which is either fully visible, partially visible or hidden from the front depending on the stand height and seating position. The screen surface is regular (medium) matte anti-glare as explored later.


Towards the bottom of the right bezel there are pressable buttons to control the OSD (On Screen Display) menu system and power state of the monitor. There is also an illuminated power symbol on the power button which indicates the power state. A constant white glow indicates the monitor is on, which can be intensified or disabled in the OSD according to preferences. When the monitor is in standby this glows dark amber. There is also a remote control called an ‘S-Switch Arc’ that provides intuitive navigation through the OSD and quick activation of 3 user-configured ‘Gamer’ presets. The remote sits in a recess to the far right of the stand base, with grippy rubber feet at the bottom of the remote keeping it in place. The remote attaches to the monitor by Mini USB cable and can be placed in a more convenient location. The cable allows you to place the remote up to 710mm (28 inches) or so in front of the screen.
The following video takes a look at the functionality of both control systems as well as the menu itself.
From the side the monitor is reasonably slender, without compromising on build quality or adjustability. It is around 25.40mm (1 inch) thick at thinnest point but protrudes out considerably further to around 80mm (3.15 inches) excluding the stand. There are some very nice features at the left side of the screen. From top to bottom in the image below, these are; a retractable headphone holder (‘hook’), 2 USB 3.0 downstream ports, a 3.5mm headphone jack and a 3.5mm microphone jack. The second image (below) shows the headphone holder in action. It is an incredibly simple but useful addition. Although it is also nice to see a headphone jack and microphone jack here, we tested the headphone jack and found the sound quality inferior to when it was connected directly to the sound card. So we didn’t use this.


From the side you can also see the very robust fully adjustable stand. This really is very solidly built and includes an aluminium alloy coating on the stand neck, providing a really high quality (and weighty) look and feel. Ergonomic flexibility includes; tilt adjustment (5° forwards and 20° backwards), height adjustment (140mm or 5.51 inches), swivel (45° left and 45° right) and pivot (rotation 90° clockwise into portrait, as shown below). At its lowest height the bottom of the screen is ~47mm (1.85 inches) above the desk surface. In this position the top of the monitor is ~419mm (16.50 inches) above the desk surface with an additional ~35mm (1.38 inches) above this for the carrying handle.

There are some useful indicators to help you adjust the monitor or indeed multiple monitors of this type according to preferences, as shown in the following images. The first image shows the swivel adjustment markings. You rotate the outer ring so that the inward-facing red triangle corresponds to your desired swivel position. You then swivel the monitor to this position, so the other red triangle lines up. If nothing else this makes it easier to see when the screen is facing directly forwards. The second image shows a tilt indicator, which is quite straightforward. The third image shows the height adjustment scale with the number of cm above minimum height that the screen is raised. Note the small red blob on the ‘screen-stand junction’ is the marker point for this. The big red pointer is slid by the user to mark a preferred height.


The rear of the XL2730Z (ZOWIE XL2730) shows off the broad aluminium surface of the stand neck. There is a carry handle at the top of this and a dark red glossy plastic cable tidy ring towards the bottom. The screen itself uses glossy black plastic centrally and matte black plastic elsewhere. Towards the bottom right there is a Kensington lock socket. The stand attaches by 100mm VESA and can be removed using a quick-release button beneath the attachment point. That leaves 100x100mm VESA holes for you to use.

The ports face downwards, or in other words are down-firing. These are shown in the picture below, with the exception of the AC power input (internal power converter) which is much further to the left; 3.5mm mic jack, Mini USB (for S-Switch), Dual-Link DVI-D, HDMI 1.4, HDMI 2.0, DP ‘1.2a+’ (with Adaptive-Sync), VGA (D-Sub) and USB 3.0 upstream.

The ports face downwards, or in other words are down-firing. These are shown in the picture below, with the exception of the AC power input (internal power converter) which is much further to the left; 3.5mm mic jack, Mini USB (for S-Switch), Dual-Link DVI-D, HDMI 1.4, HDMI 2.0, DP ‘1.2a+’ (with Adaptive-Sync), VGA (D-Sub) and USB 3.0 upstream.
Calibration
Subpixel layout and screen surface
The monitor uses a medium matte screen surface, which means it has a moderately roughened outer polarising layer. As explored in this article, this causes the light emitted from the monitor to be diffused somewhat which affects both the clarity and potential vibrancy of the image. This contrasts with IPS-type models that share the 2560 x 1440 resolution as they now use light matte screen surfaces, which some users would refer to as ‘semi glossy’. The XL2730Z has a slightly grainier look to the image by comparison, although fortunately it doesn’t give you the same smeared or ‘sand-papered’ look that some stronger/heavier matte surfaces can give, such as those used on older IPS panels.
![]()
The panel uses an RGB (Red, Green and Blue) stripe subpixel layout, shown above, which is the most common layout. This is the sort of subpixel layout that modern operating systems such as Microsoft Windows and MacOS are designed to handle correctly by default. MacOS users therefore shouldn’t experience fringed text and neither should Windows users, unless they have previously configured ClearType for a monitor with a different subpixel layout. You should feel free to run through the ClearType wizard to further optimise text according to taste regardless of this.
Testing the presets
The XL2730Z includes a range of different ‘Picture Mode’ presets; ‘FPS1’, ‘FPS2’, ‘RTS’, ‘Gamer 1’, ‘Gamer 2’, ‘Gamer 3’, ‘Movie’ and ‘Standard’. Rather than looking at each setting individually, we will pick a few setting combinations which we feel are of most interest or most appealing. We will also be discussing some of the additional modes and settings after the table. As explored in the OSD video the ‘Gamer’ presets (1-3) simply allow you to save and easily recall your favourite setting combinations. Unlike on most previous ‘XL’ series monitors, the full gamut of customisation options is available in each of these presets. This is a very nice thing to see, especially the ability to disable the black equaliser if you prefer an accurate image representation and lack of ‘unintended detail’ over artificially elevated visibility.
Our test system used a Club3D Radeon R9 290 royalAce FreeSync-compatible GPU connected via DP 1.2a+. Windows 8.1 was used with the monitor in its ‘Plug and Play’ state – no additional drivers or image profiles were loaded as the monitor has everything it needs to function normally built into its firmware. The readings in the table below were taken using a Spyder4Elite colorimeter, with accompanying observations made ‘by eye’ using a range of applications. Unless otherwise stated assume default settings were used at a refresh rate of 144Hz. We also connected the monitor up to an Nvidia GeForce GTX 970 via DP 1.2 and HDMI 2.0 and observed similar image quality (including the ability to run 144Hz at the native resolution for both connections). Obviously there was no support for AMD FreeSync when using the Nvidia GPU. As noted in the previous section, DP 1.2 and HDMI 2.0 are the only connections to support 144Hz at the native resolution of this monitor, with other connections limited to 60Hz natively.
| Monitor Settings | Gamma (central average) | White point (kelvins) | Notes |
| FPS1 (Factory Defaults) | 1.2 | 6346K | Extremely bright with an inaccurate and flooded look. High levels of oversaturation in places as well as considerable under-saturation in others. Not at all appealing, with the well-balanced white point of little consolation. |
| Standard | 1.8 | 6333K | Much better balance, although extremely bright and fairly washed out in places. |
| Standard (Gamma = Gamma 4) | 2.0 | 6373K | As above but extra depth, things starting to look a bit more as they should. |
| Standard (Gamma = Gamma 5) | 2.2 | 6340K | Extremely bright still. Depth much more appropriate overall, although due to the viewing angle restrictions of the panel technology some shades look a bit too deep towards the bottom of the screen and undersaturated near the bottom. |
| Standard (Low Blue Light = 10) | 1.8 | 5777K | This has the ‘Low Blue Light’ (LBL) setting at maximum, but only provides a modest reduction in the blue channel. The image certainly looks warmer but this isn’t as effective as LBL settings should be at their maximum value. |
| Standard (Color = User Define – R100, G90, B78) | 1.8 | 4663K | A much more effective ‘Low Blue Light’ setting involves some simple adjustments to colour channels. These are just a suggestion but are there to prove a point. You’re better off making your own adjustments, like this, and saving to one of the ‘Gamer’ presets for easy access later instead of relying on the weak factory LBL setting. |
| Standard (Color = User Define) | 1.8 | 5967K | Exceptionally bright with the colour channels at their full native ‘100’. This setting is almost as effective as the maximum LBL setting in ‘Standard’ at cutting out blue light. But that will probably be the least of your worries if you keep the brightness this high. |
| Standard (Blur Reduction = On, 144Hz) | 1.8 | 6098K | The screen becomes significantly dimmer but actually maintains quite a sensible and usable brightness. The image is a little warmer with a slightly stronger green channel, but this is not obvious by eye. By its very nature, this mode involves flickering of the backlight at 144Hz, like a high refresh rate CRT. Which some users won’t mind but others might. |
| Standard (Blur Reduction = On, 120Hz) | 1.8 | 6074K | As above but slightly more noticeable flickering and marginally brighter. |
| Test Settings (as below) | 2.2 | 6475K | The brightness is much more comfortable and things have a good rich look overall. The viewing angle restrictions mentioned above still apply, of course, but the image is vivid on the whole and not washed out in the way we’ve seen on most other ‘XL Series’ monitors. Increasing the refresh rate to 144Hz (or lowering it, if you fancy) has little effect on the overall balance and certainly doesn’t affect the gamma in the same way it did on some other 144Hz models, which is good. |
In the table above you can see that there are a range of presets and other settings available on the BenQ – and indeed there were many that weren’t mentioned. As usual the monitor comes set to ‘FPS1’ in the factory, providing an image that makes your eyes bleed and gives you an overwhelming urge to turn the screen off again. There is nothing remotely accurate or in our view pleasing about the horrendous colours displayed. The same can be said for the ‘FPS2’ preset and ‘RTS’ presets, which are much the same as on previous XL Series monitors. Feel free to refer to our previous reviews for information on how much of an eyesore they are.
There are a number of other settings that are quite ‘interesting’ on this monitor. There is a setting called ‘Black eQualizer 2.0’, which can be set in intensity between 0-20 in single unit increments. We couldn’t compare this to ‘Black eQualizer 1.0’ as we didn’t have an older XL Series model to hand, but this essentially functions in a similar way. It modifies the gamma curve to make certain shades lighter than they should be. At a low setting it works on the darkest shades (other than black), increasing visibility in dark areas by lightening the near-black shades. As you increase the setting it works its ‘magic’ on increasingly light shades. In competitive gaming this can be useful to give the player an edge at spotting enemies in dark areas, for example, but it also gives an artificial and sometimes patchy look to the image, spoils atmosphere and reveals unintended detail. We love that you can actually disable this feature entirely in the ‘Standard’ preset now and in fact have access to all of the features in every preset.
Another interesting feature is ‘Color Vibrance’, which increases or decreases the saturation of a broad range of shades. Again this is set between 0-20 in single unit increments. It doesn’t affect the colour gamut, so it can’t actually empower the monitor to display shades that are more saturated than its backlight will allow. What it does do, though, is to ‘stretch’ shades out closer to the edges of its colour gamut so that they appear more saturated than they should. This is very similar to the ‘Digital Vibrance’ control that can be accessed in the Nvidia Control Panel, but can of course be used by AMD users as well and is easy to alter ‘on the fly’ whilst running a game full screen. It is set to ‘10’ by default and if you increase this this extra saturation becomes readily apparent. Things quickly begin looking quite artificial and because naturally saturated shades towards the edge of the gamut can’t become more saturated, the variety of shades is negatively impacted. Some users may like this setting on certain game titles and it is there if you want to use it, but be aware of its limitations and use it sparingly. You can also decrease this which starts giving a washed out look all the way down to presenting everything in monochrome – which is quite funky and could be useful in some scenarios.
There is also a ‘Low Blue Light’ (LBL) setting which can be set between 0-10 in single unit increments. As explored in the table, this isn’t actually very effective even when set to its maximum value. You are much better off making manual adjustments to the blue colour channels, and if you want quick access to your custom LBL setting, saving it as one of the ‘Gamer’ modes. We certainly found the ability to store different settings as ‘Gamer1’, ‘Gamer2’ and ‘Gamer3’ and quickly recall them with the S-Switch very useful indeed. You might have one lot for normal use, one for the ‘Blur Reduction’ (BR) mode where you will likely want to use a higher brightness and perhaps some LBL settings. Having mentioned ‘Blur Reduction’, which is something we explore later on, we should at least note the basic effect it has on the image. The idea is that it strobes (‘flickers’) the backlight on and off at a frequency matching the refresh rate of the display. You can activate this function with the monitor set to a refresh rate of 60Hz, 100Hz, 120Hz or 144Hz. We documented the slight flickering and obvious dimming (but still useable brightness) yielded at 120Hz and 144Hz in the table. At 60Hz it actually strobes the monitor at 120Hz, which is good because CRT-like flicker at 60Hz is quite uncomfortable. Unfortunately there is obvious crosstalk, with apparent ghosting both preceding and proceeding the object – it just doesn’t look right at all. At 100Hz the BR mode again strobes at 120Hz, giving a ridiculous amount of stuttering that renders the mode completely unusable. We will therefore only be focusing on this setting at 120Hz and 144Hz later on in the review.
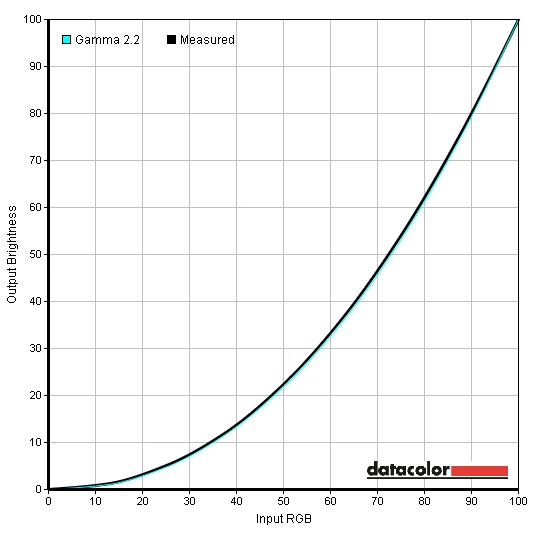
Often with these ‘XL Series’ models we find that the image can be improved somewhat by tweaking on the OSD, but really you’re always left wanting more. Yes there are limitations related to the panel type and screen surface which are explored above and throughout the review, but even with these limitations in mind there is clearly more potential left to be untapped. This monitor was a refreshing change. On our unit we simply lowered the brightness, set it to ‘Standard’ and whacked it into ‘Gamma 5’. The white point was already quite decent without any obvious tints one way or the other and indeed in this mode the gamma tracking in the centre of the screen was excellent, as shown below. Having gamma tracking this well (in the centre of the screen) and being able to entirely turn off the ‘Black eQualizer’ in ‘Standard’ mode is something we as reviewers hugely respect. We are very happy that BenQ have made this decision and we’re sure users will see the benefits. For our test settings, which are explored below, we also made a couple of tweaks to colour channels to bring the white point even closer to the ‘6500K’ target. With the ability to gain this sort of setup with just OSD tweaks and given inter-unit variation (at least with regards to colour temperature) we will not be providing any ICC profiles for this model. As explored in that article they aren’t really designed for gaming anyway, whereas this monitor certainly is. For our ‘Test Settings’ we opted for the ‘Standard’ setting with some tweaks to the gamma setting and colour channels. As mentioned previously this yielded a well-balanced image with good richness – not the usual eyesore we’ve seen on many similar models. Please remember that individual units can differ and these settings should only be used as a guide. Feel free to make your own adjustments, this model certainly gives you a lot of flexibility to do so. Any setting not mentioned here was left at default. We’ve also included the ‘AMA’ setting we preferred when testing the monitor. Brightness= 36 (according to preferences and lighting) Gamma= Gamma 5 Color Temperature= User Mode R= 91 G= 95 B= 100 Refresh Rate= 144Hz* AMA= High** **When connected to a FreeSync capable GPU (via DP) with a compatible driver installed, changing the AMA setting didn’t do anything. This occurs regardless of whether FreeSync is enabled in Catalyst Control Centre. We explore this later on and also note that it is fixed on newer revisions of the monitor. As we found the ‘Low Blue Light’ (LBL) feature of the monitor quite disappointing, we will also make a suggestion for the kinds of settings you could use to yield a more effective blue light reduction yourself. As above, the monitor was set to 144Hz. Any monitor setting not mentioned here was left at default. We used these for our own viewing pleasure later in the evening but not for any of our testing. Picture Mode= Standard Brightness= 36 (according to preferences and lighting) Gamma= Gamma 5 Color Temperature= User Mode R= 91 G= 90 B= 78 We used a KM CS-200 luminance meter to measure the brightness of white and black using a range of monitor settings. From these values a static contrast ratio was calculated. The table below shows these results and calculations with the highest white luminance, lowest black luminance and peak contrast ratio highlighted in black. The results where our test settings were employed are highlighted in blue. With the exception of our test settings, any settings not specifically noted in the table were left at default.
Gamma test settings
Test Settings
Picture Mode= Standard
A suggestion for relaxing evening viewing
Contrast and brightness
Contrast ratios
Monitor Settings White luminance (cd/m²) Black luminance (cd/m²) Contrast ratio (x:1) 100% brightness 292 0.31 942 80% brightness 245 0.26 942 60% brightness 197 0.21 938 40% brightness 146 0.16 913 20% brightness 95 0.10 950 0% brightness 41 0.04 1025 FPS1 (Factory Defaults) 283 0.36 786 Standard (Gamma = Gamma 4) 350 0.36 972 Standard (Gamma = Gamma 5) 348 0.36 967 Standard (Low Blue Light = 10) 342 0.36 950 Standard (Color = User Define – R100, G90, B78) 149 0.18 828 Standard (Color = User Define) 366 0.35 1046 Standard (Blur Reduction = On, 144Hz) 137 0.15 913 Standard (Blur Reduction = On, 120Hz) 140 0.15 933 Test Settings 163 0.18 906
The average contrast ratio in ‘Standard’ mode with only brightness adjusted was a fairly respectable 952:1. The contrast dropped only very slightly to 906:1 following the adjustments made to our test setting, which is reasonably good. Activating ‘Blur Reduction’ or changing the ‘Gamma’ setting had no significant negative impact on contrast. The factory defaults, aside from being an eyesore, dropped the contrast ratio to 786:1. That was an even more significant drop off in contrast than observed with our custom ‘Low Blue Light’ setting where 828:1 was recorded. The maximum brightness of the screen in our testing was 366 cd/m, with colour channels all at ‘100’. The minimum white luminance we recorded in this table was 41 cd/m², giving a pleasing luminance adjustment range of 325 cd/m² with quite a low minimum.
There is also a ‘Dynamic Contrast’ function which can be activated independently of any other settings (apart from ‘Brightness’ or ‘Contrast’). This allows the backlight of the monitor to adjust its intensity according to the level of light and dark on the screen at any given time. The backlight is controlled as a single ‘Backlight Unit’ (BLU) and therefore can’t account for mixtures of light and dark on the screen. You can set the ‘Dynamic Contrast’ between ‘0’ (off) and ‘5’ (full effect), but even at a setting of ‘1’ we found the image far too bright unless very dark content was being displayed. We’re not fans of this sort of setting at all, which we make no secret of in all of our reviews, but it is there if you want to abuse your eyes with it.
PWM (Pulse Width Modulation)
As advertised this monitor is considered ‘flicker-free’, as it does not use PWM (Pulse Width Modulation) to regulate its backlight brightness. DC (Direct Current) modulation is used instead, at all brightness levels. That will come as welcome news to those who are sensitive to flickering or other PWM-related effects or are looking to help minimise visual fatigue. The exception to this ‘flicker-free’ state of the backlight occurs if ‘Blur Reduction’ is enabled, is this causes the backlight to strobe (flicker) in time with the refresh rate. The nature of this flickering is not the same as PWM, but some users may find it uncomfortable nonetheless.
Luminance uniformity
Whilst observing a black screen in a dark room, we could see a very small amount of backlight bleed and a touch of clouding at the left of the screen. You can see from the image below, which was taken from 70cm to represent a typical viewing distance, that the screen is rather uniform when displaying black. Individual units can vary in this regard, but it was good to see our sample perform like this.

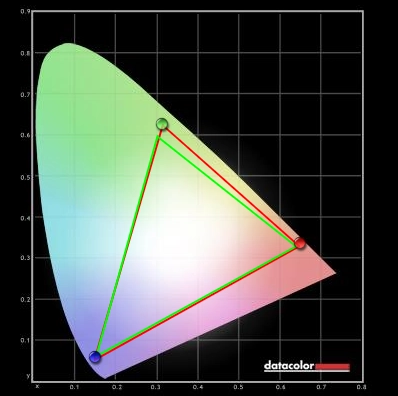
From a normal viewing distance (anything over about 30cm in fact) there is no ‘glow’ evident either, which is quite different to what you’d see on your typical IPS model. There is a silvery grey and golden sheen which appears if you view the monitor from an angle, shown in the viewing angles video later on.
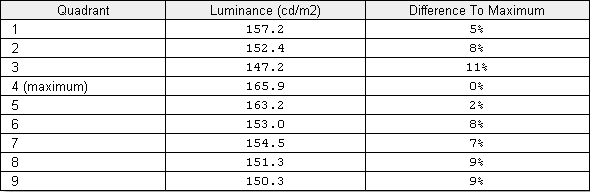
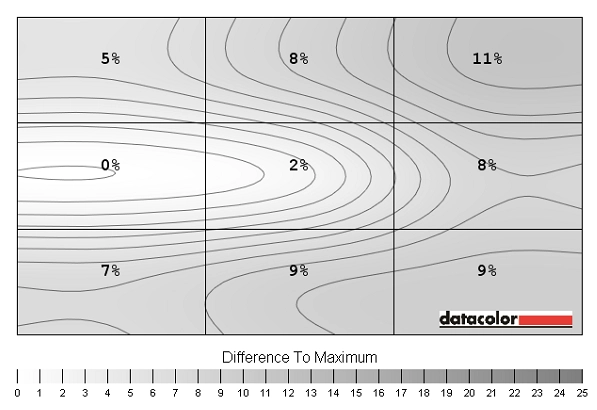
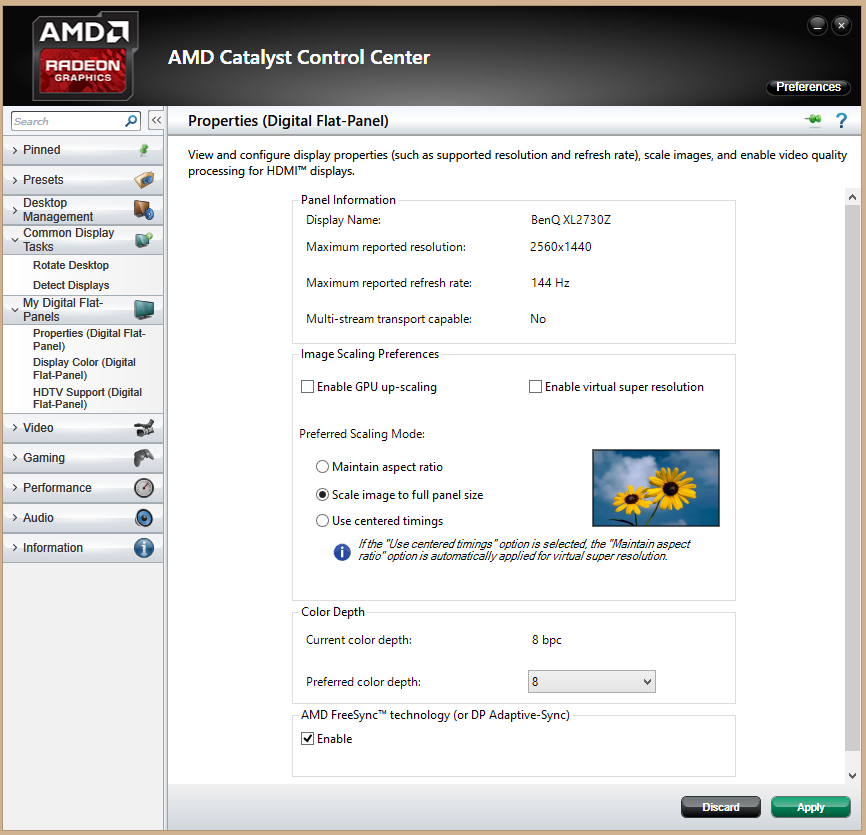
To assess the uniformity of lighter colours, a Spyder4Elite was used. This measured the luminance of 9 equidistant white quadrants running from the top left to the bottom right of the screen. The following table shows the percentage deviation between each quadrant and the brightest point recorded as well as the luminance at each quadrant. The luminance uniformity of the monitor was very good overall. The brightest point on the screen was ‘quadrant 4’ just left of centre (165.9 cd/m²). The maximum deviation from this occurred at ‘quadrant 3’ at the top right of the screen (147.2 cd/m² which is 11% dimmer than the brightest point). Elsewhere the screen was 2-9% dimmer than the brightest recorded point, with the central region a mere 2% dimmer (163.2 cd/m²). It is worth remembering that individual units can differ when it comes to all aspects of uniformity. Being a TN panel, the viewing angle also affects perceived brightness at different points of the screen. That doesn’t change the fact that having strong backlight uniformity as we see here is an advantage, however. For those who prefer a graphical representation, the contour map below represents the deviation with darker greys representing lower luminance (greater deviation) than lighter greys. We will not be providing any analysis of colour temperature uniformity on this screen using a colorimeter. Analysing colour temperature variation on a monitor with TN panel using a colorimeter is of limited use. This faces perfectly perpendicular to the screen at zero distance, whereas your eyes subtend different sections of the screen at different angles. This gives perceived shifts which simply aren’t reflected by the colorimeter’s readings and can largely nullify much of the variation that the colorimeter may pick up. The contrast performance was quite strong on Battlefield 4 (BF4). Unlike on many earlier ‘XL’ models and many gaming monitors more broadly, there were no ‘artificial gamma enhancements’. There was no ‘IPS glow’ to get in the way, either. Both of these factors meant that dark areas had an appropriate level of detail overall and created a good atmosphere without a flooded look. Shades did lose some saturation further down the screen, again due to TN viewing angle restrictions. Bright shades stood out nicely in their dark surroundings, although they also showcased a fair degree of graininess due to the screen surface. As with BF4, Grand Theft Auto 5 (GTA V) had an appropriate atmosphere overall in dark scenes. There was the same ‘fading’ of near black shades that occurs on even the best TN panels However; there was no unwanted gamma enhancement going on, nor any patchy ‘oil slick’ looks due to unintended detail in dark areas. Visibility in such areas was still good, though, with a pleasing but appropriate level of detail. Again this was maintained peripherally as well due to the lack of any sort of IPS-specific glow. Bright elements contrasted well, for example car headlights and street lights shining at night. Such elements and other lighter colours such as the sky and light building textures did look somewhat grainy due to the screen surface, but fortunately not to the extent that they would on some older models. Dirt 3 provided a similar contrast experience. Brighter shades lacked the smoothness that they’d have on lighter screen surfaces but stood out well amongst darker surroundings. The level of detail in dark areas was good. Leather textures on car dashboards, the underside of wheel arches and tire tread patterns remained visible even in the bottom corners of the screen. This is a region of the screen that the typical ‘glow’ of an IPS panel would affect and cause a loss of such details. On the Blu-ray movie Skyfall the contrast performance was pleasing. There was no noticeable loss of detail nor any artificially enhance ‘flooded’ look. As a result, things looked quite atmospheric and appropriate. Bright elements such as lights shining through darkness did stand out quite well, although such bright elements lacked the ‘pop’ and smoothness seen on some screen surfaces. The black depth was obviously not as good as on VA panel types, either, but it was still respectable enough to provide decent atmosphere and good distinction between light and dark. We used some Lagom tests to further analyse contrast performance and highlight some weaknesses that may not be obvious during other testing. The following observations were made. The BenQ XL2730Z (ZOWIE XL2730)’s colour gamut (red triangle) is compared with the reference sRGB space (green triangle) in the image below. As you can see, it offers very good coverage of the sRGB colour space with virtually no under-coverage in this 2D representation. You can also see a little extension beyond sRGB in some regions, such as green on orange on this diagram. This allows the monitor to provide a little extra vibrancy for some shades without going to the extremes of a wide gamut model. On BF4 the monitor produced a good palette of rich-looking colours. Natural environments had a good range of fairly deep and lush-looking greens, minty greens and earthy browns. Some of this richness was lost further down the screen, making rich brown earth look more of a clay-like colour and leaving some deeper greens looking a bit lacklustre compared to further up the screen. There were some nice vibrant oranges, reds and blues in amongst flames and fires – which are of course an important part of this game. The screen surface did hold back the ‘pop’ a bit, however. The generally rich colours also worked nicely on GTA V. The bustling and vibrant city of Los Santos looked just that – quite vibrant overall. There was again a loss of saturation further down the screen. This was evident when observing a colourful vehicle and driving along normally in third person view, where it is displayed near the bottom of the screen. If you get out and observe that same vehicle, or shift the camera so it is displayed further up the screen you can see this comparatively less saturated look. The colours of vehicles certainly looked inviting overall, though, and were not in danger of looking ‘washed out’. There were some strong bright greens, reds and yellows shown on various car paintjobs and indeed other objects throughout the city. There were also some fairly lush deep greens of vegetation, particularly towards the top and centre of the screen. The colour reproduction also worked well on Dirt 3. Environments looked rich and natural on the whole, with a decent variety of earthy browns and pastel greens. There were some fair lush greens as well, although the loss of saturation towards the bottom of the screen affected both the vibrancy of these shades as well as the variety of closely matching shades. There were some good strong vibrant colours visible on car liveries, despite such elements lacking the same ‘pop’ that they’d have on a screen with a lighter screen surface. Highlighter greens, bright yellows and some light blues stood out particularly well. On the Blu-ray of Skyfall, the colour representation was largely as it should be. Environments throughout the film and the skin tones of various characters showed appropriate saturation overall. The black bars of the film at the top and bottom, which is presented in 2.40:1 (16:9 letterbox), mean that the images is kept free from the more extreme saturation shifts. The screen surface certainly restrained the ‘pop’ of some of the more vibrant colours in the film, such as the neon lights of Shanghai, but they were still presented with respectable depth and a fairly vivid look. We also tested the Blu-ray of Futurama: Into the Wild Green Yonder to assess colour performance. Overall colours on this title were rich with good depth and a vivid look, where appropriate. There were some really good deep purples, neon greens and bright pinks (amongst others). The weaknesses in consistency related to the panel technology were also readily apparent, however. This title features large areas of individual shades, which have an apparent saturation gradient (appearing deeper and somewhat oversaturated towards the top of the screen, quite correct centrally and under-saturated towards the bottom. This effect meant that subtle different shades lost their ‘identity’, although the monitor did still present some of the pastel shades on the film in an appropriate way for the most part. To analyse colour consistency and the influence of viewing angle oin a more specific way we used Lagom’s tests for viewing angle. We made the following observations from a viewing distance of 70cm, although for most ‘normal’ viewing distances (50-100cm) observations will be similar. The video below shows the results of the Lagom text test, a light desktop background and dark desktop background as viewed from a variety of viewing angles. You can see that the shifts in brightness and colour are quite pronounced, more so vertically. You can also see a little bit of ‘glow’ on the dark desktop background from some angles, as described previously. We calculated input lag using a utility called SMTT 2.0. This is used alongside a sensitive camera to compare the latency of the XL2730Z (ZOWIE XL2730) with a range of monitors where the latency is known. Using this method we calculated 3.3ms (<0.5 frames at 144Hz) of input lag. The pixel response time (element you ‘see’) and signal delay (element you ‘feel’) both affect this value. This indicates an exceptionally low signal delay for the monitor, contributing to a very fluid and connected feel when gaming with it. ‘Blur Reduction’ did not have a significant influence on the values recorded here. We do not have the means to accurately analyse input lag with ‘FreeSync’ enabled, but as we explore the connected feel in this mode in a variable refresh rate environment is excellent. Furthermore, both AMD and BenQ have confirmed that FreeSync does not impact the signal delay of the monitor and therefore does not have a negative effect on the monitor’s input lag. In this article we explore the concept of perceived blur and how it is influenced not only by the pixel responsiveness of the monitor but also the movement of our own eyes. We then go on to introduce the concept of ‘pursuit photography’, which can capture both of these aspects. This contrasts with the usual static photography that we’ve used in reviews up until now that will only show the influence of pixel responsiveness. Using the pursuit photography method described in the article, just prior to the conclusion, we captured the images below. The middle row (medium cyan background) for the UFO Motion Test for ghosting was used with the test running at 960 pixels per second with the UFO moving across the screen from left to right. The ‘reference screen’ shown in the final column is a Samsung S27A750D set to full brightness and to a response time mode that provides optimal pixel responsiveness for each refresh rate, as noted in the article. The remaining images are all taken from the XL2730Z (ZOWIE XL2730), set to a range of different AMA (Advanced Motion Acceleration) response time settings and with ‘Blur Reduction’ enabled for the last two rows of the image. The ‘Blur Reduction’ mode is a strobe backlight feature designed to significantly reduce eye movement and hence reduce perceived blur. This is actually ‘Blur Reduction 2.0’ which provides two adjustment options that weren’t available through the OSD of the original ‘Z’ series models. There is ‘Intensity’ which adjusts the ‘on’ period of the strobe so that the image is brighter at the expense of motion clarity (longer ‘on’ period) or dimmer with further improved motion clarity (shorter ‘on’ period). There is also an ‘Area’ setting which changes where on the screen strobe crosstalk will appear. We were happy to use the factory defaults for our testing. At 60Hz, shown in the top row, you can see a relatively high level of blur. This is largely accounted by eye movement, as illustrated by the reference screen where this is the only real influence. If you compare the reference with ‘AMA = Off’ you can see a moderate degree of additional ‘blur’, which is actually trailing caused by slower than optimal pixel response times. With ‘AMA = High’ the pixel responses are sped up so that this is largely eliminated and things look more like the reference. There is a faint hint of overshoot (inverse ghosting) with a slight shadow behind the UFO. With ‘AMA = Premium’ very heavy acceleration is used, introducing obvious overshoot which is visible here as an inky trail behind the UFO cockpit and a halo (bright) trail behind the UFO body. At 120Hz, shown in the second row, there is a significant reduction in perceived blur. The reference screen shows this very nicely, with no noticeable trailing and very little overshoot – again, perceived blur from eye movement is the key factor here. With ‘AMA = Off’ you can see that the UFO itself is sharper and the details within it (such as the alien) appear less elongated. There is some trailing behind it, though, which is due to slower than optimal pixel responses. With ‘AMA = High’ the conventional trailing is as good as eliminated and things look closer to the reference. There is a bit of a ‘vapour trail’ behind the object which is a bit of overshoot. With ‘AMA = Premium’ there is obvious overshoot, with a bold inverted trail accompanying the UFO. At 144Hz, shown in the third row, things are really very similar to at 120Hz. There is no 144Hz reference here as the reference screen is limited to a 120Hz refresh rate. You only gain an extra 24fps and therefore the potential improvement in perceived blur is extremely limited, especially when comparing 60Hz to 120Hz. When using the monitor outside of this test we actually found the slight increase in ‘connectedness’ (i.e. how things ‘felt’) to be a small but noticeable improvement, whereas by way of motion blur things were very similar as shown here. The fourth and fifth rows show the results with the monitor set to strobe at 120Hz and 144Hz, respectively. If you look at the reference image, with the S27A750D set to its ‘Frame Sequential’ mode and strobing at its maximum 120Hz refresh rate, you can see that the main object (UFO) is extremely clear. You can see a level of clarity and detail on its features that is far beyond what can be seen previously where the backlight does not strobe. There is a fairly faint trail behind this as a result of slightly slower than optimal pixel transitions. On the BenQ you can see that the main image maintains this exceptional clarity and detail level. With ‘AMA = Off’ there is some conventional trailing due to slower than optimal pixel transitions, with a moderate primary and even faint secondary trail. ‘AMA = High’ replaces these trails with some inverse ghosting, which is intensified using the ‘AMA = Premium’ setting. Note that adjusting the ‘Intensity’ or ‘Area’ settings did little to improve this inverse ghosting. In practice, as we explore later, the inverse ghosting with ‘AMA = High’ and Blur Reduction enabled was not at all obvious, whereas the potential clarity of objects during motion was. Again 120Hz and 144Hz provided similar performance really, with what you ‘feel’ rather than what you ‘see’ perhaps being the main change. Albeit still a minor one. It does appear from these images that ‘120Hz Strobe’ is clearer than ‘144Hz Strobe’, but that is simply because the photographs themselves are better (clearer). We would like to end this section with a bit of an aside, by talking a little bit about ‘interlace-pattern artifacts’. We do not intend to go into any technical detail about these, but they are related to imperfections in the voltage control of the monitor during pixel transitions. They are very common on high refresh rate monitors in particular and do indeed occur on this one. They manifest as a faint vertical interlaced (interleaved) pattern during motion on the monitor. They can be seen in the image below, which shows a pistol recoiling upwards on Battlefield Hardline. Notice the vertical green lines on the ‘enhanced iron sights’ of the weapon. Please click to enlarge the image, otherwise the lines blend in. You can also see them in the image below when it is enlarged. This shows a neon sign on Battlefield Hardline with the mouse moved from the bottom to top of the sign at a moderate pace. Obviously you don’t see this distinct ghost image with interlacing trailing behind the main object, but you can see the interlacing effect demonstrated here if you have a keen eye. Please note that these artifacts don’t occur during transitions between all shades, they are generally found where fairly bright shades are involved. More importantly, they are not something that most users would actually notice. We were almost reluctant to bring these up as we don’t think most users should worry about them at all, but for the sake of completeness we thought they should be mentioned. On BF4 the experience was very fluid where the frame rate matched the 144Hz refresh rate of the monitor. You felt really connected to the game, with the monitor seeming to respond instantaneously to your inputs. The pixel responses were clearly very snappy indeed, able to make full use of the refresh rate without any conventional trailing. The level of motion blur was very low, as you’d hope for from the refresh rate. This made it that bit easier to keep track of enemies when moving rapidly on foot or in a vehicle compared to LCDs with lower refresh rates. There was a downside to these very rapid pixel transitions, though, and that is that very ‘aggressive’ pixel overdrive is used. There was some overshoot in places, but this was generally rather light and not too obtrusive in our opinion. There was a fairly faint and short transparent (‘snail slime’) trail next to some objects, for example vehicles and buildings as you moved past them with light blue sky in the background. This didn’t generally catch the eye and was something we had to look out for. If the object was lighter, for example a white painted wall with deep blue sky in the background, the trail became a somewhat more noticeable dark grey. Not everyone will notice this inverse ghosting, but it is something that some users are sensitive to and may be bothered by. We didn’t find it as bold as on previous XL Series monitors we’ve tested, which is good. As the frame rate dropped below this or rose above it, tearing ensued. To sensitive eyes such as ours, this was quite obvious – even if the distinct tear lines aren’t visible, it has the effect of objects appearing to ‘judder’ rather than move smoothly. With VSync enabled there was obvious stuttering if the frame rate fell even slightly below the refresh rate, which really hampered the ‘connected feel’ of the game. The level of motion blur also increased in proportion to a decrease in frame rate, as you would expect. With ‘Blur Reduction’ (BR) the stuttering was very pronounced indeed where the frame rate departed from the refresh rate. That is because there isn’t the same degree of motion blur to mask this juddering, so it appears rather distinct. Where the frame rate matched the refresh rate (be it 120Hz or 144Hz – we tested both) the clarity of motion was superb with BR on. The game world appeared exceptionally sharp and focused even if you moved your character rapidly, making moving in quick vehicles far less dizzying and making it surprisingly easy to keep track of enemies. The ‘connected feeling’ was definitely there as well, with 144Hz providing just a little bit of an edge here. As we explored previously, there are some fairly faint ‘staggered trails’ which can be observed during fast motion. These appeared as very faint repetitions behind certain objects as you moved quickly past them and couldn’t really be observed as staggered overshoot trails due to how faint they appeared. These were much fainter that we’ve observed on Nvidia’s similar ULMB (Ultra Low Motion Blur) strobe backlight solution and was something we actually had to actively seek out to notice. In many ways this was even less obtrusive than the overshoot that you get with Blur Reduction disabled and AMA enabled, so not even something that sensitive users should worry about really. We also tested Dirt 3, which again benefited from the high refresh rate of the monitor. Where the frame rate and refresh rate matched (144fps at 144Hz) things were very fluid. We didn’t really gain much benefit in terms of ‘connectedness’ with the keyboard we used to control the vehicle, but the motion blur was pleasantly low. Other cars and environments racing past had a respectable degree of sharpness, allowing you to admire the scenery a bit more. Or perhaps concentrate on the road that bit better. There were no troublesome issues with overshoot either. It was certainly there here and there, but fainter and less obtrusive than on previous XL Series models. The BR mode also did its thing on this game, but again required the frame rate to be laser-locked to the refresh rate to avoid extremely unpleasant stuttering and suchlike. The benefit of this was questionable in the regular game modes, where 144Hz already provided a nice fluid experience really. On the Gymkhana mode, though, the rapid spins could be performed without the course blurring much at all. This really helped us to focus on the obstacles, although we were still rubbish at Gymkhana regardless of that. We didn’t notice any obtrusive issues with trailing or object repetitions, either. They were there if you looked quite carefully, but were faint and unobtrusive really. Finally we took a look at our Blu-ray movie test titles to assess the motion performance of the monitor on those. The pixel responsiveness did not hamper the experience in any way, with no additional trailing or inverse ghosting that we noticed. If you did happen to notice any inverse ghosting with ‘AMA’ set to ‘High’, you could always set this to ‘Off’ for movie watching. The ‘Off’ setting did not introduce any trailing in movies as the pixel responsiveness was good enough for this pace of action. The frame rate at which current Blu-rays currently run is limited to around 24fps and that limits the overall fluidity and pace of action. There was less ‘juddering’ as the refresh rate of the monitor (144Hz) divides evenly into 24fps, but the overall smoothness is still limited by the low source refresh rate. We didn’t find the ‘Blur Reduction’ feature added anything positive to the experience, either. We have already explored Nvidia’s G-SYNC variable refresh rate technology, reviewing a range of monitors which use this. As with Nvidia G-SYNC, AMD’s FreeSync technology aims to smooth out the gaming experience in variable refresh rate environments by reducing stuttering, juddering and tearing. Synchronising the refresh rate of the monitor with the frame rate outputted by the GPU is an important part of delivering the smoothest gaming experience in the variable frame rate environments that are common in games. Note that network latency, ‘CPU spikes’ and other such issues can also affect smoothness, but these are not affected by variable refresh rate tech. We have explored the technical reasons for this in the G-SYNC article previously linked to and also in the ‘Variable refresh rate’ section of this article, so please refer to those article if you’re interested in such details. G-SYNC requires the use of a proprietary ‘G-SYNC board’ integrated into the monitor, which replaces the traditional scaling hardware and assistive electronics of the monitor. This allows Nvidia to tightly control both the colour and responsiveness tuning of the monitor, but blocks off the other ports and many of the manufacturer-specific OSD features of the monitor. FreeSync on the other hand relies on the ‘Adaptive-Sync’ protocol, which is an optional DisplayPort 1.2a extension supported by VESA. On monitors that specifically support this (not all DP 1.2a ports do) you essentially retain all of the manufacturer-specific ‘goodies’ on the OSD as well as the full range of ports, although you must use the ‘DP 1.2a+’ port to use the Adaptive-Sync protocol and therefore make use of FreeSync. This way of doing things generally ends up cheaper to the consumer. This is especially true when considering G-SYNC models that support ports other than DisplayPort – as they contain the traditional assistive electronics and scaler in addition to the G-SYNC board. To enable FreeSync you need both a compatible monitor, such as the BenQ XL2730Z (ZOWIE XL2730) reviewed herein, and a compatible AMD graphics card. We are using the Club3D Radeon R9 290 royalAce to run FreeSync on this model other models are compatible and most if not all future GPUs by AMD should also be fully compatible. When you first connect the monitor up and get onto Windows you’re actually presented with a notification from Catalyst Control Centre (CCC) that you’ve got a FreeSync-capable display and should enable the technology. To do this you simply open CCC and navigate to ‘My Digital Flat-Panels – Properties (Digital Flat-Panel)’, ensure the checkbox at the bottom of the page is ticked and then press ‘Apply’. This page and checkbox is shown in the image below. There are a few important things to note which are specific to FreeSync and this monitor: 1) You may find that the checkbox isn’t there on the relevant page. If you’re running ‘Blur Reduction’, note that this disables FreeSync – you can’t use these technologies together, they can only be used separately. If you aren’t running this then try turning this feature ‘On’ and then ‘Off’ in the OSD, as that should ‘re-communicate’ the fact that you’re using a compatible display to the graphics card. 2) At least on the revision of the monitor we tested, AMA is always set to ‘off’ regardless of the setting that you select in the OSD. We explore the consequences of this in the subsequent section. Newer revisions of the monitor (‘V002’) allow the user to enable and control AMA whilst using FreeSync. 3) The operating range for FreeSync is 40-144Hz on this monitor. Outside of this range the monitor will respect your choice of ‘VSync on’ or ‘VSync off’ and behave accordingly. That means that if you have ‘VSync on’ you get stuttering if the frame rate falls below 40fps a latency penalty if it tries to rise above 144fps. With ‘Vsync off’ you get tearing/juddering below or above the limits. This is a bit different to G-SYNC which at time of writing forces VSync on in both scenarios, but can still minimise stuttering below the floor of operation by setting the refresh rate to double the frame rate. If for example the game was running at 35fps, the G-SYNC monitor would set the monitor’s refresh rate to 70Hz so that the frames divides evenly into the refresh cycle of the monitor. This is now an added feature of the new ‘Radeon Software Crimson’ suite called ‘Low Frame Rate Compensation’. Regardless of this, low frame rates are still low frame rates as we explored on our G-SYNC reviews and will explore for FreeSync below. Warframe is a title which generally sits at rather high frame rates, in the triple digits but rarely consistently matching the 144Hz maximum refresh rate of the monitor. As explored previously, there is considerable stuttering or tearing (and juddering) in this sort of variable refresh rate environment. Some users seem to have this notion that the sort of issues that FreeSync sets out to solve are not noticeable at high refresh rates and frame rates. That is categorically not true. Whilst these issues are certainly less significant, they are definitely there and to users who are even moderately sensitive to them they can really affect the gaming experience. With FreeSync enabled this title was very smooth, fluid and playable in these triple-digit frame rates – free from disruptive stuttering and tearing. There were some instances where frame rate dropped rather abruptly to around 50-70fps, when the action suddenly intensified massively. This sharp drop was still a shock to the system and the game lost the fluidity and connectedness that was enjoyed at higher frame rates, in addition to motion blur increasing. We also found the pixel responsive of the monitor to be surprisingly good on this title, overall, even though AMA was forcefully disabled. There was a little extra trailing in places due to some slower than optimal pixel transitions, particularly where bright objects (such as lights or illuminated ‘powerups’ etc.) sat surrounded by darker colours. This was never severe, though, and you could definitely still observe the benefits of hugely reduced motion blur at higher refresh rates. The technology was also tested on GTA V, which is quite a graphically demanding title on which we like to crank up the detail settings a fair bit. With the settings we like to use the frame rate generally sits at around 50-70fps. Without FreeSync this provides significant stuttering or tearing, which sensitive eyes such as ours really dislike. Whilst the game certainly didn’t have the same low levels of motion blur and overall connectedness that you would expect from higher frame rates and refresh rates, the overall smoothness was very enjoyable. It actually made the game a lot more playable, especially when driving at high speeds. Having the experience interrupted by tearing, juddering or stuttering is not only something we found annoying on this title, it was something we feel really affected the playability. So it was great to see the back of it such interruptions. We did of course also test our staple title, BF4. This title is well known for its fluctuating frame rates and is indeed a popular title used by both Nvidia and AMD when promoting their variable refresh rate technologies. As with Warframe this generally ran with frame rates in the triple digits, but rarely stayed at 144fps for long with the settings we enjoy using. In this relatively high but variable frame rate environment, FreeSync completely eliminated the tearing and juddering that you get with VSync off and the stuttering (and indeed latency penalty) you get with VSync on. The connectedness to the game world and overall fluidity was excellent and we definitely found the game more playable without these aforementioned interruptions. There was some very occasional stuttering, but this was generally related to network latency and not anything to do with the monitor or GPU specifically. There were some instances where frame rate dropped far lower and this again interrupted the fluidity and increased motion blur, still coming as a bit of a system shock despite the lack of stuttering or tearing. These drops were few and far between, however. We should also mention that, as with Warframe, the level of motion blur was largely linked to eye movement and the refresh rate itself rather than being too heavily influenced by pixel responsiveness. There was again a bit of trailing beyond what you’d see with AMA set to ‘High’, particularly where darker shades such as the gunmetal greys of vehicles or dark tree bark was cast against lighter shades such as blue sky or lighter patches of earth. This was fairly constrained really and didn’t really spoil our overall appreciation of the advantages brought about by the higher refresh rates and frame rates. There was again no overshoot, either, which is a bonus that some users might appreciate more than others. To complete our game testing we tested Dirt 3. This was more a test for the effects of having AMA forcefully set to ‘Off’ when using FreeSync rather than a test for the technology itself. That is simply because this title ran quite comfortably at 144fps (144Hz) most of the time with the settings we were happy to use. There were occasional dips a little below that, so it was nice not to suffer from stuttering as a result of this. With VSync disabled it would frequently climb above this, too, and it is nice not to have any tearing. In the way of pixel responsiveness the monitor again managed to make good use of the refresh rate (up to 144Hz), despite AMA being disabled. There was some additional trailing in places, for example when passing lightly coloured road signs with darker vegetation or another backdrop in the background. These sorts slower than optimal transitions were quite common when racing at night. Again we didn’t feel that some users would mind or indeed notice this extra trailing, and indeed there was no inverse ghosting which some users dislike even more. This monitor has a native resolution of 2560 x 1440 at which it will run with optimal clarity. If you connect a source (be it a PC GPU, games console or other device) that runs at a lower resolution, then the monitor will be able to use its integrated scaling functionality to display this. There are two key ways in which the monitor handles this, both of which are found in the ‘Display – Display Mode’ section of the OSD; ‘Full’ and ‘1:1’. The ‘Full’ option is used by default, and will force the monitor to use interpolation to display an image using all of its pixels. The ‘1:1’ option allows the monitor to use 1:1 pixel mapping, therefore displaying only the required number of pixels with the remaining pixels remaining unlit as a black border around the image. Both options can be seen in the relevant section of the OSD video, shown below for your convenience. If you set the resolution to one that is lower than the native 2560 x 1440 (WQHD), such as 1920 x 1080 (Full HD), things appear soft if you use the ‘Full’ option. There is no wasted screen space, but you lose a moderate degree of sharpness compared to running that resolution on a native Full HD display of a similar size and with a similar screen surface. You can see this softening on the desktop quite readily and also when gaming. The edges of textures appear somewhat blurred as if a sort of anti-aliasing filter is applied. Textures lack the sharpness that they should have and the game environment generally looks quite soft. If you do want to use this monitor at resolutions that are lower than native then you will have to think carefully about whether you want this softening or whether you would like a large black border surrounding the image (1:1). With the latter option the image essentially appears as it would on a ~20” 1920 x 1080 monitor. If you watch lower resolution content over the PC but keep the screen resolution set to 2560 x 1440, then upscaling is used. You might be watching a Blu-ray or Netflix movie with movie software or a web browser, for example. This upscaling is handled by the GPU or software itself and essentially makes the image look quite similar to on an otherwise similar screen with Full HD resolution. There is very slight softening, but this is not at all significant and much weaker than when the aforementioned interpolation process is used. BenQ’s XL Series gaming monitors usually provide strong responsiveness at the expense of image quality. Regardless of the tweaking you do in the OSD, you’re left with dodgy gamma and an unbalanced image – oversaturated in some places, washed out in others. The XL2730Z (ZOWIE XL2730) was quite a refreshing change in that respect. Out of the box it was certainly an eyesore, as usual, but after a bit of tweaking quickly become well balanced. Whilst the usual TN viewing angle related inconsistencies applied, such as weakening saturation most notably towards the bottom of the screen, the overall image was rich and varied. This was complimented nicely by the 2560 x 1440 (WQHD) resolution, which is another first for the series. The screen surface didn’t provide the clarity or smoothness that you’d see on recent IPS-type models with the same resolution, though. We found setting up the monitor and indeed quickly switching between different sets of settings a breeze with the ‘S-Switch Arc’. Whilst its new design didn’t really enhance its functionality too much, we do feel it looks nicer. And the same can be said about the monitor more broadly – it is very solidly built and aesthetically speaking we found it quite appealing. There are a lot of extra features, such as ‘Black eQualizer’ and ‘Color Vibrance’, but if you’re interested in an accurate representation of images, games and other content then it’s best to leave these alone. We certainly appreciate that the user has the flexibility to change such features through the OSD regardless of the preset mode they’re using. You can actually completely disable the ‘Black eQualizer’ and obtain accurate gamma tracking in the centre of the screen without resorting to ICC profiles or other such imperfect modifications – a real plus compared to older models in the series. As a result of this dark scenes had an atmospheric look rather than appearing flooded with strange patches of grey here and there. The overall contrast performance was quite decent, nothing spectacular but enough to provide a decent experience without any annoying issues. Except perhaps the grain of the screen surface, which we found less than ideal. When it came to responsiveness the monitor put in a very strong performance overall. Under its normal operation it made good use of its 144Hz refresh rate, with strong grey to grey acceleration making sure those pixels were transitioning fast enough. The downside to this rapid acceleration came in the form of overshoot (inverse ghosting), although this was somewhat reduced compared to on previous XL Series models. FreeSync worked very nicely to cut out tearing, juddering and stuttering in the variable frame rate environments that are so common in games. We really enjoyed gaming with this feature, even though it cut out ‘AMA’ completely. The overall fluidity at moderately high frame rates was still very good regardless of this and some users would like the overshoot-free experience as well. If you’re prepared to forgo FreeSync you could opt for the ‘Blur Reduction’ mode instead, which again did exactly what it should. On the upside, you get a huge reduction in motion blur which can work out really nicely for some games or situations. On the downside, you need to have your framerate laser-locked to the refresh rate of the monitor – and that’s 120Hz or 144Hz as the only two useable refresh rates with this technology. A lot is also said about the ‘flicker free’ status of the monitor, too, which does not apply with this strobe backlight technology enabled. All in all this monitor provided a very enjoyable gaming experience. It did not compromise on image quality in quite the way we’ve come to expect from such models and also provided very strong responsiveness with a range of useful features. Overall we feel this monitor has a lot to offer for the current asking price.
Luminance uniformity table
Luminance uniformity map
Contrast in games and movies
Lagom contrast tests
Colour reproduction
Colour gamut
Colour gamut test settings
Colour in games and movies
Viewing angles
Responsiveness
Input lag
Perceived blur (pursuit photography)


Responsiveness in games and movies
FreeSync – the technology and activating it
FreeSync – the experience
Interpolation and upscaling
Conclusion
![]()
Positives Negatives Good colour performance overall with a bit of tweaking, with a fairly rich and inviting look which easily surpasses the expectations set by other XL Series monitors. The 2560 x 1440 resolution is also a welcome addition
Terrible out of the box image quality, as expected. The screen surface and TN viewing angle restrictions held back the vibrancy potential a bit and prevented the image having the same ‘pop’ as lighter screen surfaces or consistent richness of some other panel types A good contrast performance overall, respectable static contrast without any ‘IPS glow’ and dodgy gamma enhancements spoiling the atmospheric look The screen surface provided a bit of a grainy look to lighter shades – the lighter surface common on IPS-type WQHD models would be preferable An exceptionally responsive monitor with no real input lag to speak of and strong pixel responsiveness. FreeSync and ‘Blur Reduction’ both worked as intended (although not simultaneously), providing a nice smooth experience in different ways
AMA control is disabled when FreeSync is enabled (now fixed). ‘Blur Reduction’ is useless at 60Hz and 100Hz due to implementation and there is a bit of overshoot even when using optimal settings there An aesthetically appealing product (in our view) with some really nice features like a retractable headphone hook, ‘S-Switch Arc’, USB 3.0 and a range of other ports The ‘Low Blue Light’ mode was quite ineffectual in practice (now improved), although it was easy to create your own superior alternative
![]()

