Author: Adam Simmons
Last updated: July 22nd 2023
What’s the issue with a wide colour gamut?
The colour gamut reflects the range of colours that a monitor can output and defines its limits of saturation. Monitors with wide colour gamuts are becoming increasingly common, with a range of backlight technologies now available to facilitate this at relatively low cost. The rise of HDR (High Dynamic Range) has accelerated this, with good coverage of the DCI-P3 colour space the near-term goal. Most content we consume under SDR (Standard Dynamic Range), on the other hand, is designed around the sRGB colour space. This includes games as well as most image and movie content, where the creators have the sRGB colour space in mind. It’s still the common standard for displays under SDR; wide gamuts are not universally supported and sRGB remains the lowest common denominator.
If you view this content designed for the sRGB colour space on a screen with a wider gamut than sRGB. And you aren’t controlling the gamut using one of the methods described below. Then things appear more vibrant and saturated than they should. This is different to a digital saturation boost, such as Nvidia’s Digital Vibrance Control or a saturation slider in the monitor’s OSD. Things aren’t simply pulled closer to the edge of the gamut without that gamut being expanded, which crushes shade variety. Good spacing is still maintained between shades on the gamut and strong variety remains. Some users like this varied but more vibrant and saturated look, others do not. And if the gamut is a lot wider than sRGB things are taken to the extreme in that respect. We describe these effects in our reviews of such monitors, for example the Acer XB323U GP, which is afforded a very wide gamut by its Quantum Dot backlight solution. In games and other content designed for sRGB, untamed wide gamuts like this can produce a range of issue. Overly tanned or sometimes sunburnt-looking skin tones, reddish brown earth appearing far too red, yellowish green vegetation appearing overly yellow and somewhat garish, artificially vibrant sky blues to give just a few examples. The colour gamut below shows the native gamut of the Acer XB323U GP (red triangle) compared to DCI-P3 (blue triangle) and sRGB (green triangle). As an Amazon Associate I earn from qualifying purchases made using the below link. Where possible, you’ll be redirected to your nearest store. Further information on supporting our work. ICC profiles provide gamut mapping corrections for ‘colour-aware’ (‘colour-managed’ or ‘ICC aware’) applications such as web browsers and photo editing applications. Unfortunately, this does not include games or the Windows desktop itself for a basic software-based profiling. And unless you’ve created the profile on your own screen using your own colorimeter or alternative calibration device, it will suffer when it comes to accuracy. Some monitors provide an sRGB emulation mode, which clamps the colour gamut universally (regardless of being ‘colour-aware’ or not) so it more closely tracks sRGB*. Ideally with little extension beyond and as little under-coverage as possible. Such a setting is fairly widespread but not always found on wide gamut displays and is the only sRGB gamut clamp option for devices such as the Xbox Series X, PS5 and other games consoles. Even if such a setting is present, it’s unfortunately fairly common for sRGB emulation modes to lock off brightness, which means the setting can be inappropriate for many if it doesn’t fit their own sensitivities and preferences. If not, it’s extremely common for them to lock off access to other settings such as colour controls and gamma settings. The sRGB emulation setting of the Acer used in this example allows brightness to be adjusted, but the colour channels and gamma settings are inaccessible. Adjusting gamma and colour balance is ideally done through the monitor OSD as doing so using the graphics driver can negatively impact the image in various ways, including the contrast and shade variety. Reduction in the latter can induce banding, with crushing together of closely matching shades. Even if using a colorimeter or similar device, it’s best to adjust as much as possible through the monitor’s OSD. Also note that no setting in the graphics driver controls backlight brightness – just digital brightness controls which are very different indeed and can’t reduce brightness without a hit in contrast. The image below shows the Acer XB323U GP’s colour gamut (red triangle) compared to sRGB (green triangle), using its sRGB emulation mode. *Caution: if you’re running with sRGB emulation applied and running a ‘colour-aware’ application with ICC profile created outside of this sRGB emulated state, things will be significantly undersaturated as you’re ‘double correcting’. This applies if you’re using the GPU driver methods described below, too.
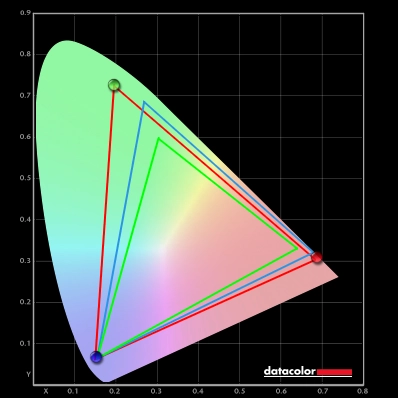
Colour gamut XB323U GP (native)

What can we do to control the gamut on the monitor?
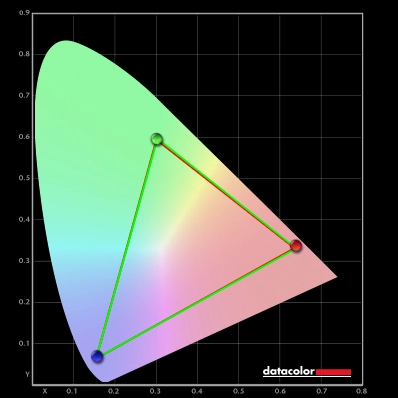
Colour gamut XB323U GP ('sRGB' mode)
What can we do to control the gamut in the graphics driver?
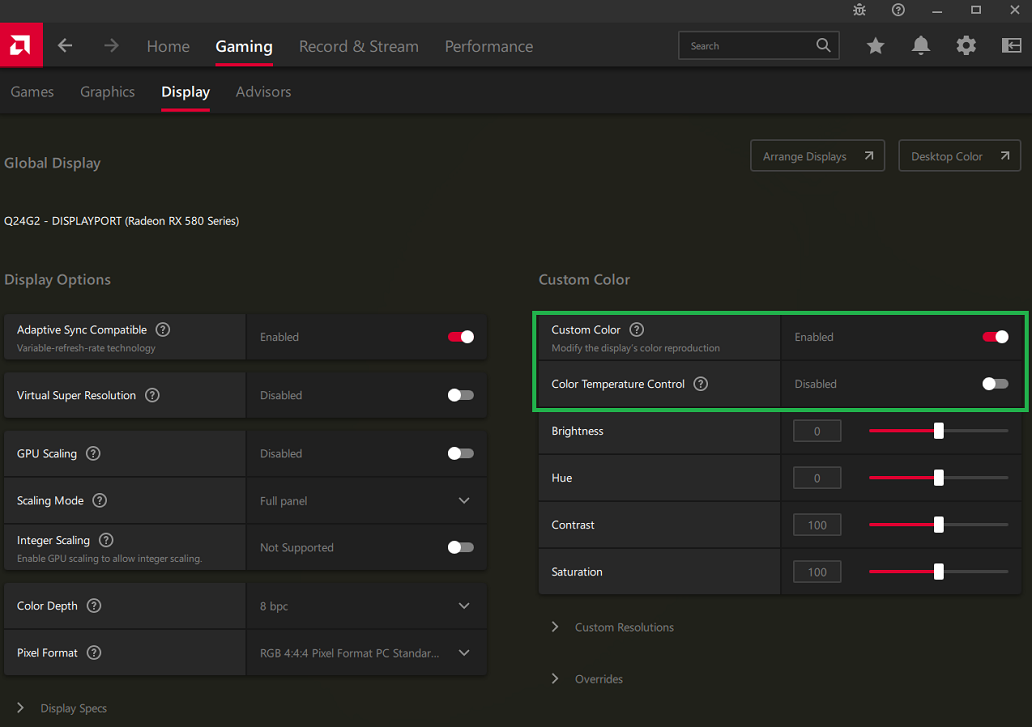
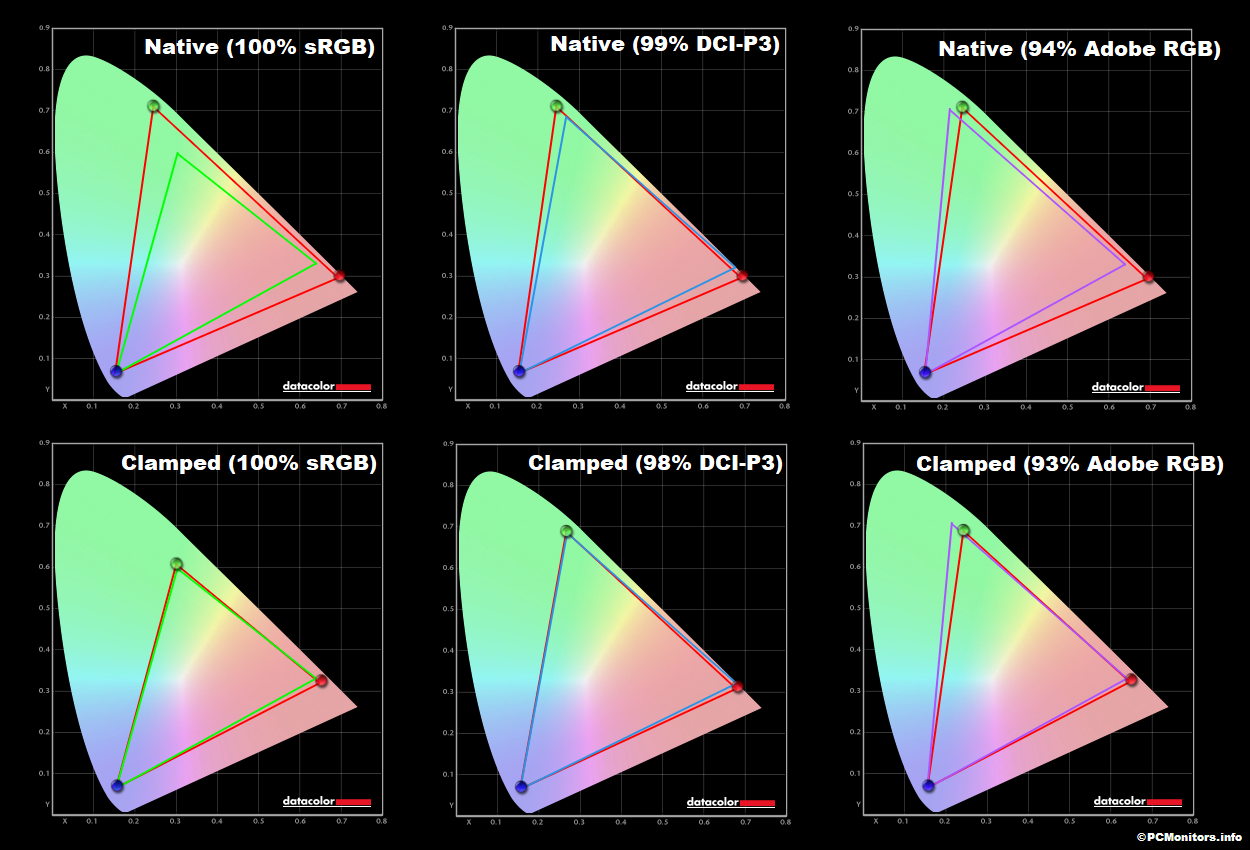
AMD GPU drivers offer an alternative, a flexible sRGB emulation setting that is activated in the driver itself. This setting reads the EDID (Extended Display Identification Data) of the monitor which contains information on the native gamut expected for that model and corrects based on that. Additional changes may be made to the colour channels, leading to potentially significant changes to white point and green balance – so you may need to adjust the monitor colour channels accordingly. These corrections apply universally, including to full screen games and other applications. It has actually existed for some time, but the naming never made it clear what it did so even more technically-minded users may have overlooked it. In older graphics drivers there was a ‘Colour Temperature’ toggle that could be set to ‘Automatic’ rather than the default ‘6500K’ to achieve sRGB emulation. In newer drivers it’s done by opening ‘AMD Radeon Software’, clicking ‘Gaming’ (‘Settings’ or cog icon towards top right for older drivers) and clicking on ‘Display’. You should then ensure that the ‘Custom Color’ slider to the right is set to ‘Enabled’ and ‘Color Temperature Control’ (CTC) set to ‘Disabled’. It may appear to be set this way by default, but the native rather than restricted gamut is likely in play. If that’s the case, simply switch the ‘Color Temperature Control’ slider to ‘Enabled’ then back to ‘Disabled’ to leverage the sRGB emulation behaviour. This is shown in the image below. Note: Under HDR you may end up with upset image balance and intense oversaturation (or some undersaturation, depending on model) by disabling CTC. This can vary depending on monitor and driver version, but either way this tweak is only designed for viewing sRGB content under SDR. Nvidia doesn’t include a similar feature in their graphics drivers, but the Nvidia desktop GPU and driver pipeline does actually include a ‘hidden feature’ that works in a very similar way to clamp the gamut, but without any additional changes to colour channel balance and white point. A tool called ‘novideo_srgb’ can be downloaded here and is discussed in this Reddit thread. Download the latest ‘release.zip’ file and extract the contents to a destination of your choice. Run ‘novideo_srgb.exe’ (Microsoft Defender SmartScreen may flag this as an unrecognised file initially) and click the ‘Clamped’ checkbox. In the vast majority of cases the same EDID data read by the AMD alternative is used and the resulting gamut is extremely similar. The corrections apply universally, including to full screen games and other applications and should apply until you re-open the tool and remove the clamp. The clamp will be temporarily disabled if Windows sends the screen into standby (‘Turn off the display’) after a given amount of time. The clamp will re-apply when your system restarts, but if you don’t wish to do that or stop using that feature in Windows, you’d have to disable then re-enable the clamp after the screen wakes up again. If you click the ‘Advanced’ tab you can select the colour space you wish to target. The default is ‘sRGB/Rec.709’ but ‘Display P3’ (DCI-P3), ‘Adobe RGB’ and ‘BT.2020’ (Rec. 2020) can also be selected. By default the corrections are based on EDID data as described earlier (‘Use EDID primaries’). The image below shows examples of the Dell Alienware AW3423DW (red triangle) compared to sRGB (green triangle), DCI-P3 (blue triangle) and Adobe RGB (purple triangle) natively and with the corresponding colour space clamps applied. As you can see, the ‘novideo_srgb’ clamps work very effectively to cut down over-extension beyond the selected colour space with only a small amount of additional under-coverage. Naturally, they can’t add in additional coverage beyond what the monitor can display natively. Monitors continue to push firmly into the wide gamut territory, but a lot of content is still developed or designed to be consumed within the sRGB colour space. Whilst some models offer a good and flexible sRGB emulation mode, many do not. GPU-level alternatives are available for AMD GPUs via the graphics driver, but users of Intel graphics hardware aren’t so lucky and Nvidia doesn’t yet have this feature neatly integrated into their driver. So this is what we’d like to see from both monitor manufacturers and GPU manufacturers:
We’ve tested this on a broad range of monitors and have found it does usually offer reliable sRGB emulation. Exactly how closely the gamut tracks sRGB varies between models, but we typically see ~98% sRGB coverage (sometimes a touch below, sometimes a touch above) with very little extension beyond sRGB. The beauty of this setting is that you use it in conjunction with the full native gamut of the monitor, allowing you to use the full array of monitor OSD settings available to you. It’s set universally, too, so isn’t something that is simply ignored by some applications. Because significant corrections are applied at the GPU level, this can introduce slight banding which you may notice if you view fine gradients or work with very subtle variations of shade. This isn’t the same as having a well-tuned and flexible sRGB emulation setting on the monitor itself, but for most users it’s a suitable replacement where such luxuries aren’t provided. The colour gamut below shows the Acer XB323U GP set up to use its native gamut, all OSD options accessible, but with CTC disabled in the AMD driver.

Colour gamut XB323U GP (AMD CTC disabled)
You can also select ‘Use ICC profile’ and load in an ICC profile (ideally one you created yourself), which is not activated by the tool but is instead simply read to establish the actual measured gamut. This can enhance the accuracy of the gamut corrections, allowing very close sRGB tracking or tracking of your chosen colour space. Native gamma information is also read and you can use the tool to tweak gamma tracking, if you wish. The idea here is to feed better data to the tool from the profile so it can make more accurate corrections. But these corrections assume the monitor is running with its native gamut and gamma handling rather than with the profile actively being used at the same time. The video below covers some of the points raised in this article and should start at the section which covers this tool.
What we’d like to see
As an Amazon Associate I earn from qualifying purchases made using the below link. Where possible, you’ll be redirected to your nearest store. Further information on supporting our work.

